


Deed Processing


Page Topics:
Workflow for Deed Processing
Resolving the Deed:
Deeds are automatically imported into Capture from probate nightly. Two documents are sent from probate, one consisting of deed numbers and the other document consisting of attributes like grantor name, grantee name, consideration amount, and signature date. Capture links the information in these two documents base on the instrument number. The instruments may be of different types like warranty deed, quit claim deeds, etc. Once imported into Capture, the instruments will be listed on the UNASSIGNED DEEDS page. The mapping supervisor will assign the deeds to individual users daily. The mapping users will find the deeds assigned to them on the Assigned Deeds page.
The following section describes the workflow for resolving deeds. All steps are performed in the Mapping Supervisor workspace.
Note: The following workflow demonstrates how to resolve a 2018 deed. Changes marked on this deed will be reflected in the 2018 property cards of the respective parcels.
Assigning Deeds
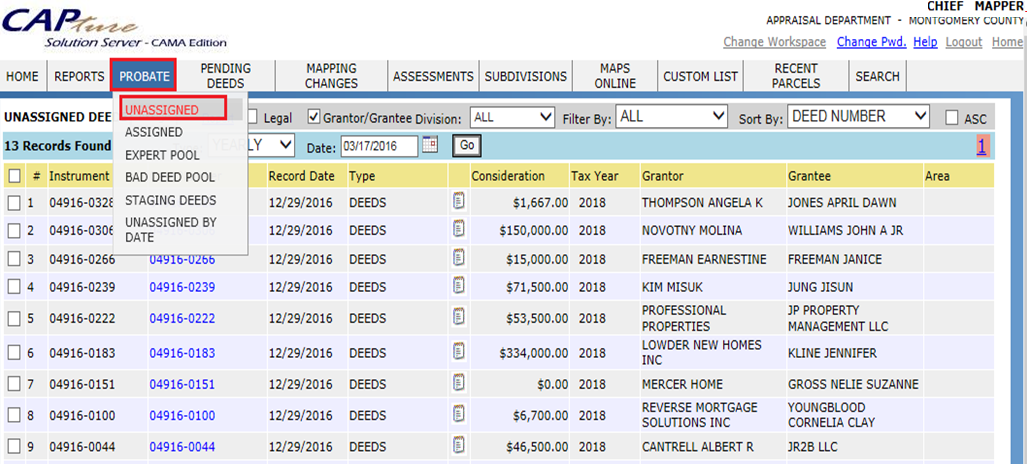
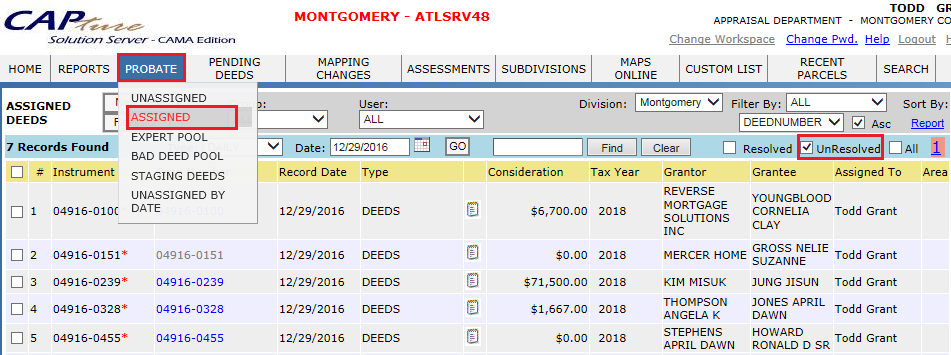
1. In the Mapping Workspace, hover the PROBATE tab and select UNASSIGNED.
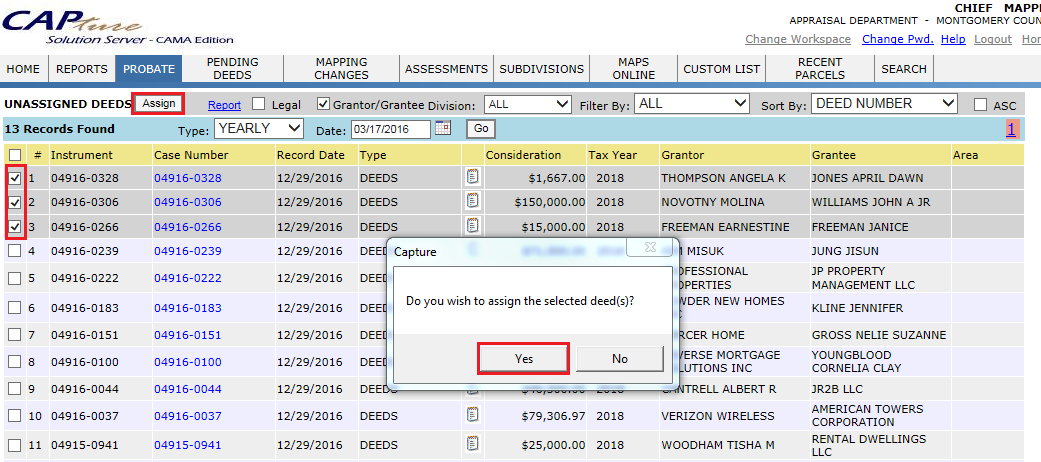
2. Checkmark the deeds to be assigned and click the Assign button. Click Yes on the pop-up that appears to confirm the action. The Assign Deeds window will appear.
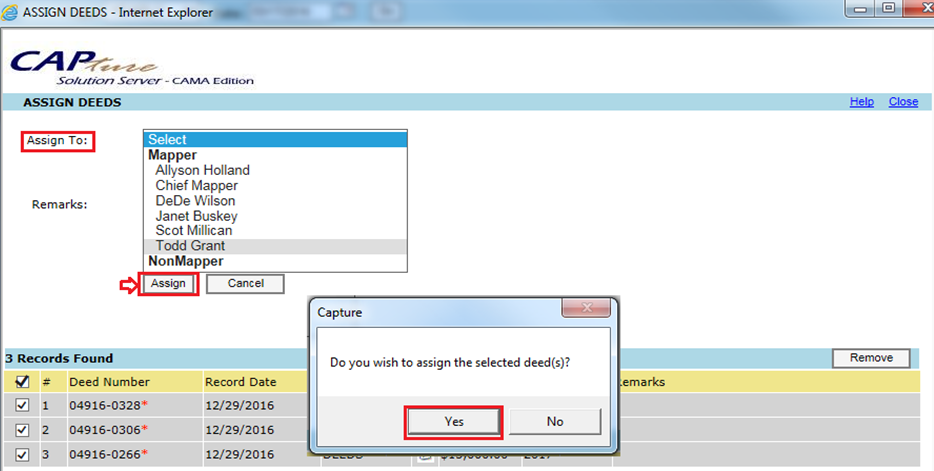
3. In the Assign Deeds window, select a user and click Assign. A pop-up will open to confirm the assignment. Click Yes.
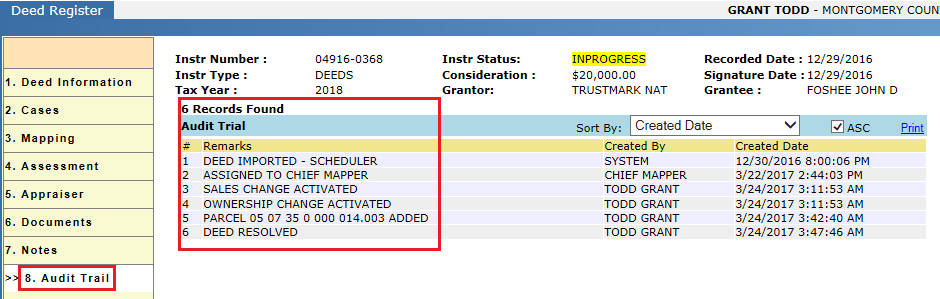
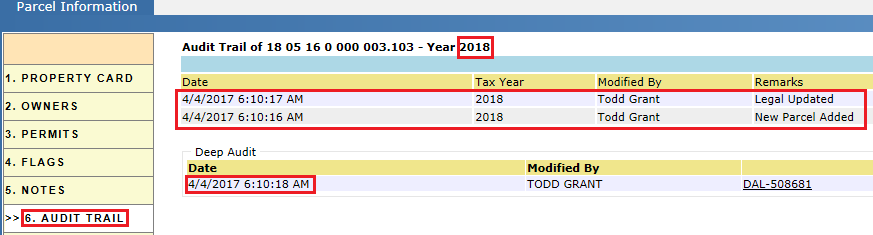
Verify audit trail: After assigning the deed to other user, it should be audited in the deed audit trail.
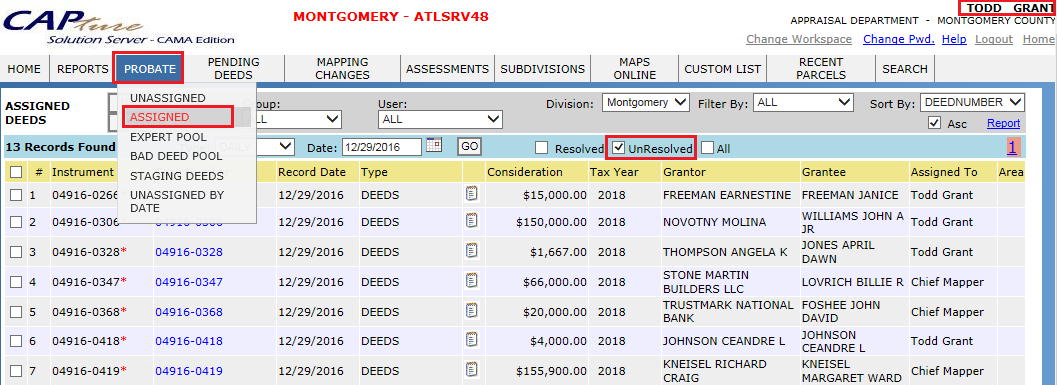
4. The mapping user can find the deeds assigned to them by hovering the PROBATE tab and selecting ASSIGNED. Check mark UnResolved to see only the unprocessed deeds.
5. Click the Instrument number hyperlink to open the Deed Register.
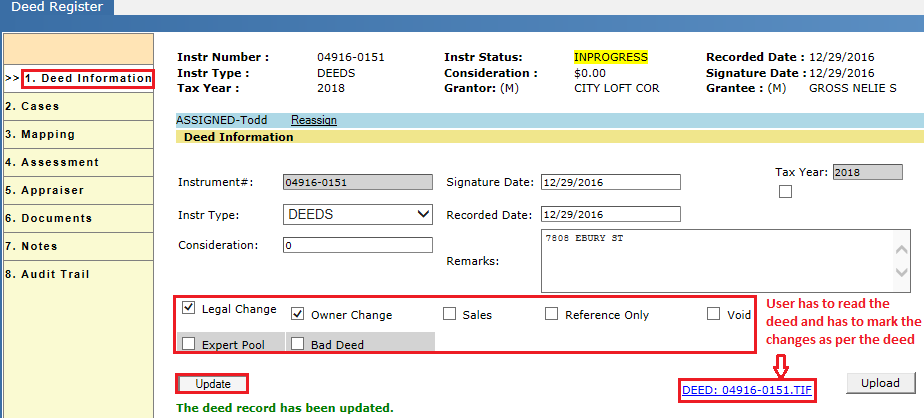
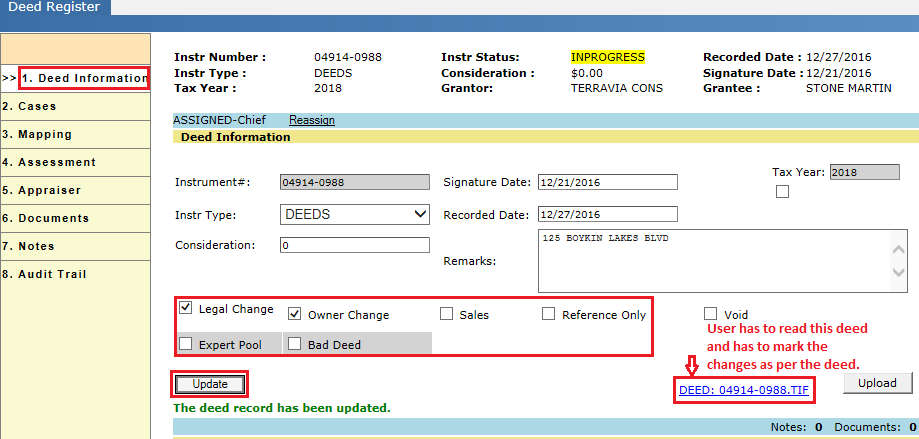
6. From the Deed Information page, checkmark the actions required by the deed then click Update.
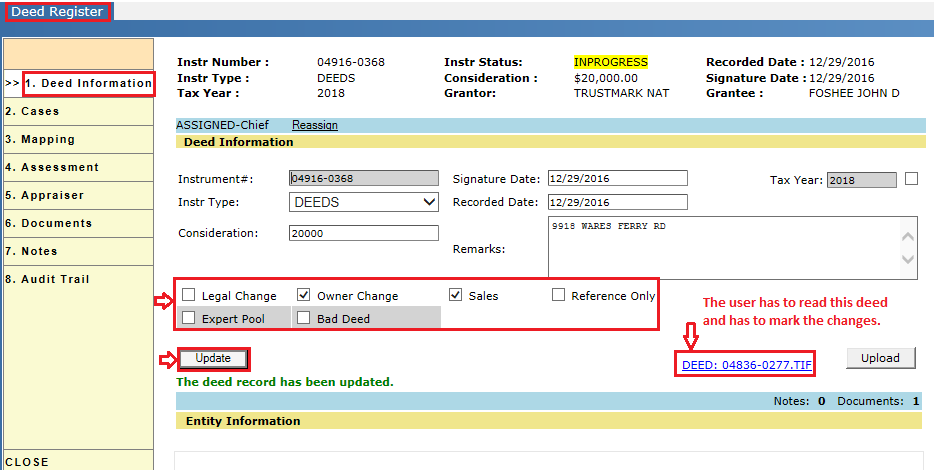
Verify audit trail: After selecting the actions and clicking Update, the selections are recorded in the Deed Register’s Audit Trail.
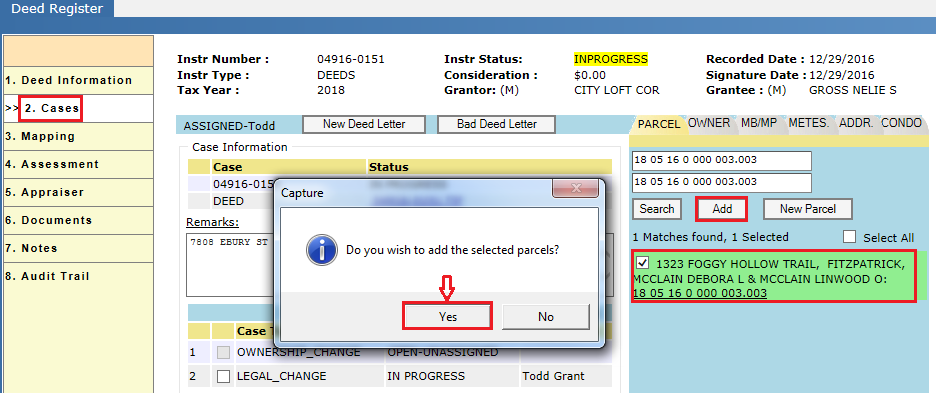
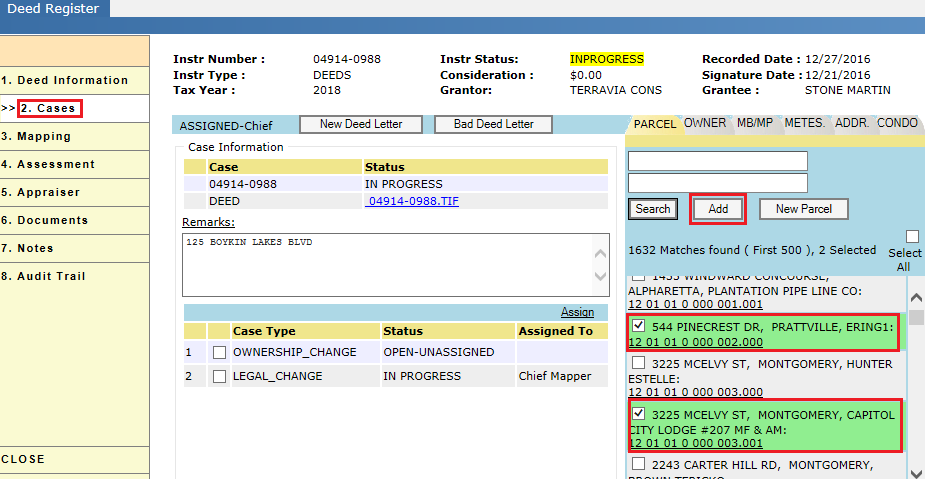
7. On the Cases page, search for the parcel associated with the deed using by any of the available search options (Grantor Name, Property Address, Mailing Address, Metes/Bounds, and Deed Book/Page). When searching from the Owner tab, the grantor name is automatically populated.
8. Checkmark the parcel then click the Add button. Click Yes in the pop-up to confirm the selection.
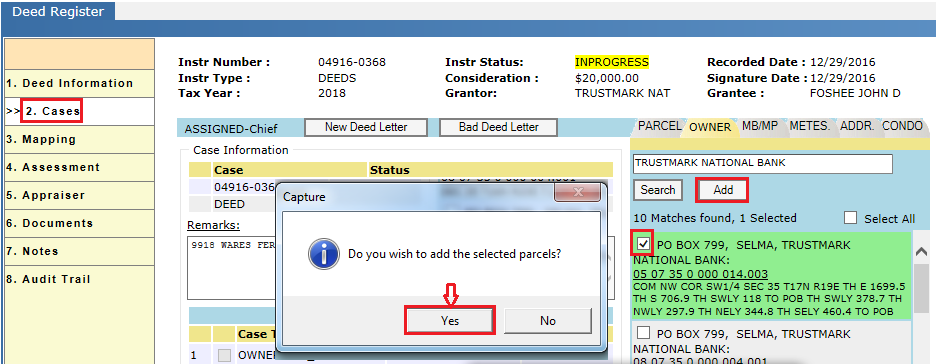
Verify audit trail: The addition of the parcel to the deed is audited in the Deed Register’s Audit Trail.
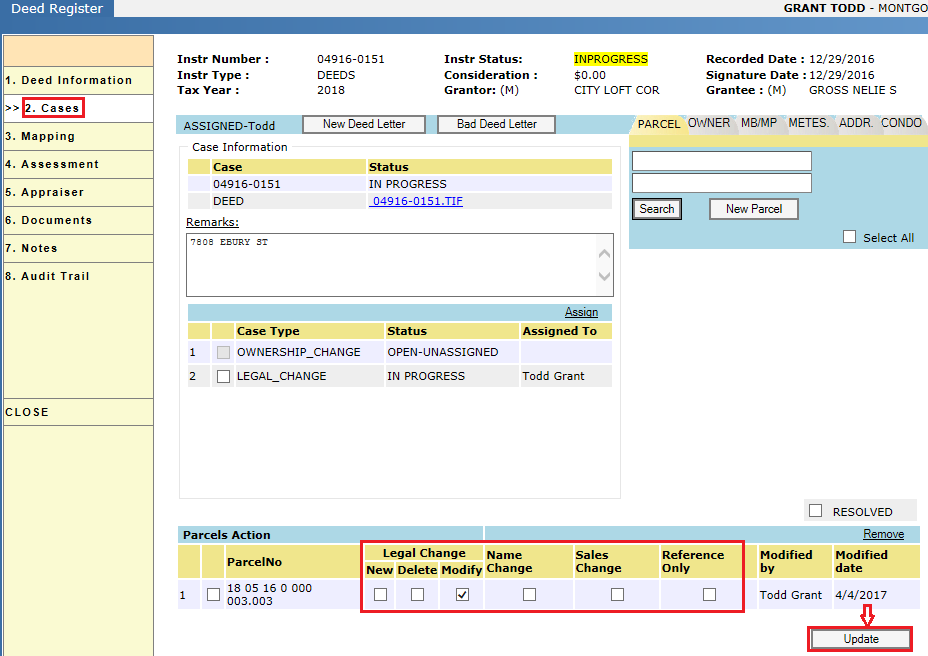
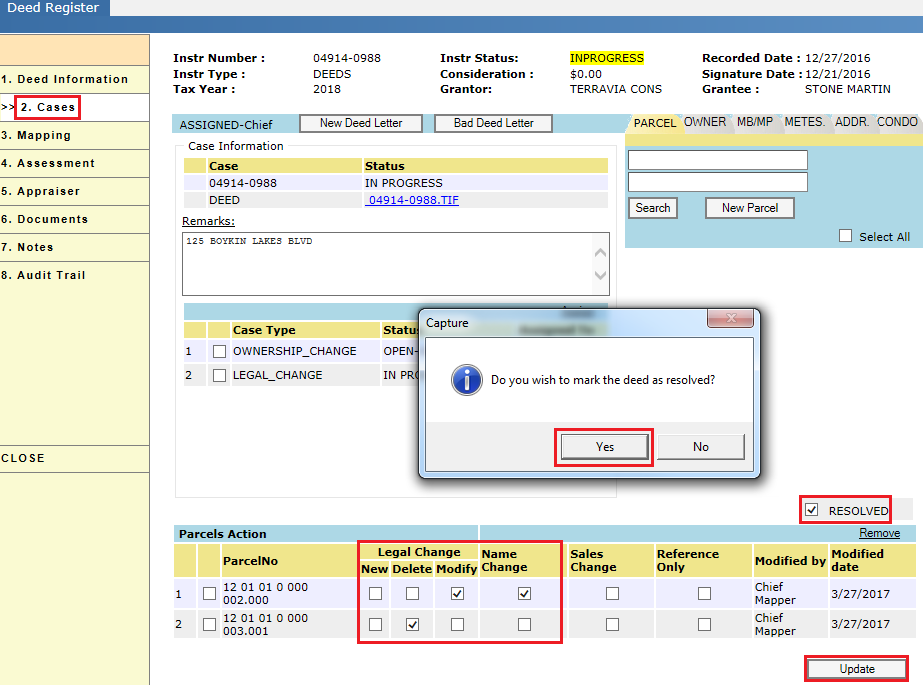
8. In the Parcels Action region, mark the changes required for individual parcels then click Update.
9. Checkmark Resolved to resolve the deed and create sub-cases.
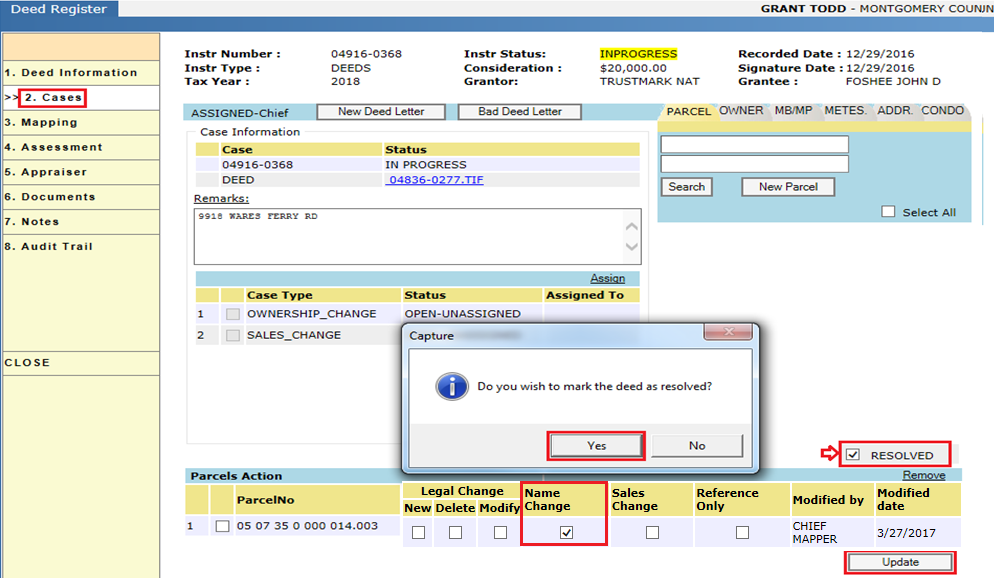
Verify audit trail: A listing of the deed being resolved will appear in the Deed Register’s Audit Trail.
Once the deed is resolved, the newly created sub-cases can be assigned to individual users. The sales change sub-cases are auto-assigned based on control setup in Capture. When the sub-cases are completed then the status of the deed changes from In Progress to Processed.
Deeds Without Mapping Changes:
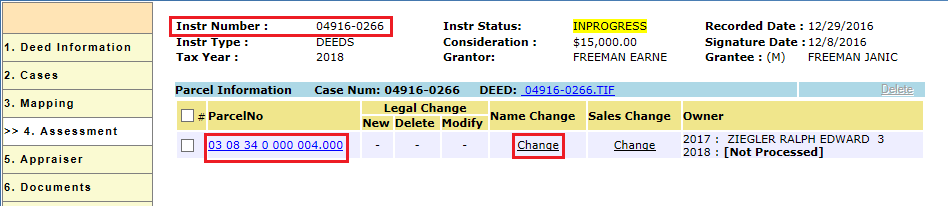
Deeds without mapping changes proceed directly to name and sales changes as they are resolved. For the deed below, no mapping changes (legal changes) are selected, so there is no “Change” hyperlink under Legal Change.
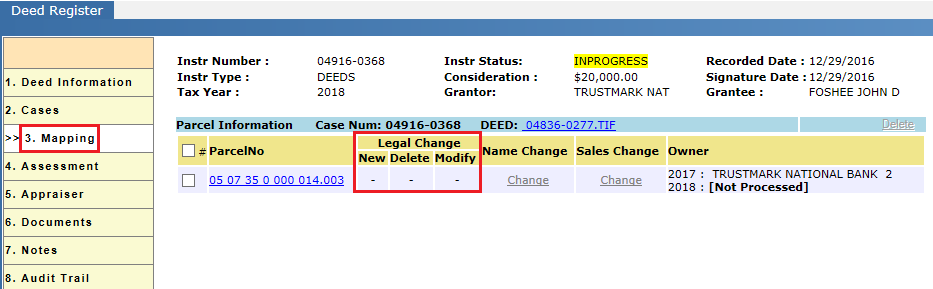
Note: If a deed requires mapping changes, the name change sub-cases will not be assigned until the mapping changes on that deed are completed.
Resolving Deeds - Audit Trails:
The following items are recorded in the Deed Register’s Audit Trail:
-
When and how the deed is added to the system.
-
To whom the deed is assigned or reassigned.
-
The sub-cases activated or deactivated.
-
Parcels added or removed from the deed.
-
The deed being Resolved or Reopened.
Manual Deed Processing
Manual deed cases are created when an instrument has not been imported into Capture automatically or an unrecorded instrument is brought to the tax assessor rather than to the probate office. Once a manual deed case has been created, the rest of the process is identical to the automated deed process. This document will guide the user through manual deed processing of a 2018 deed through the name change and sales change work flows.
Users following the steps below must have the permissions required to process a deed for completion.
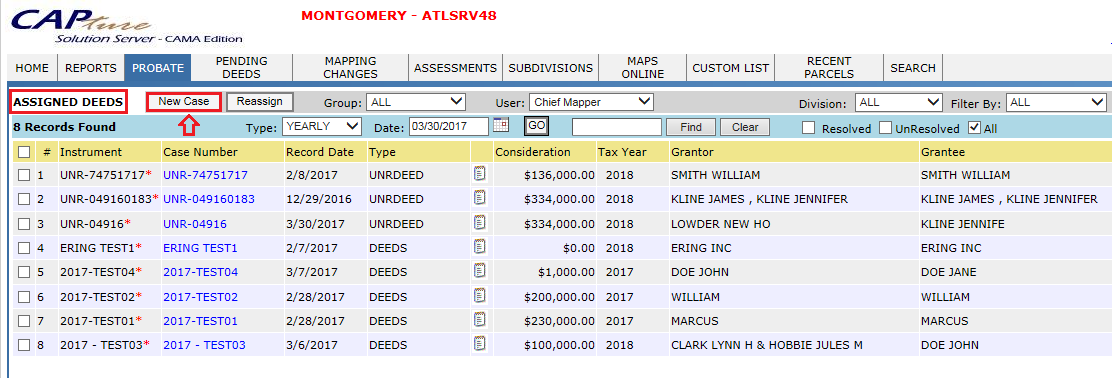
1. To create a deed case manually, select ASSIGNED under the PROBATE tab. This will open the ASSIGNED DEEDS page.

2. Click the New Case button to create a new (unrecorded) deed.
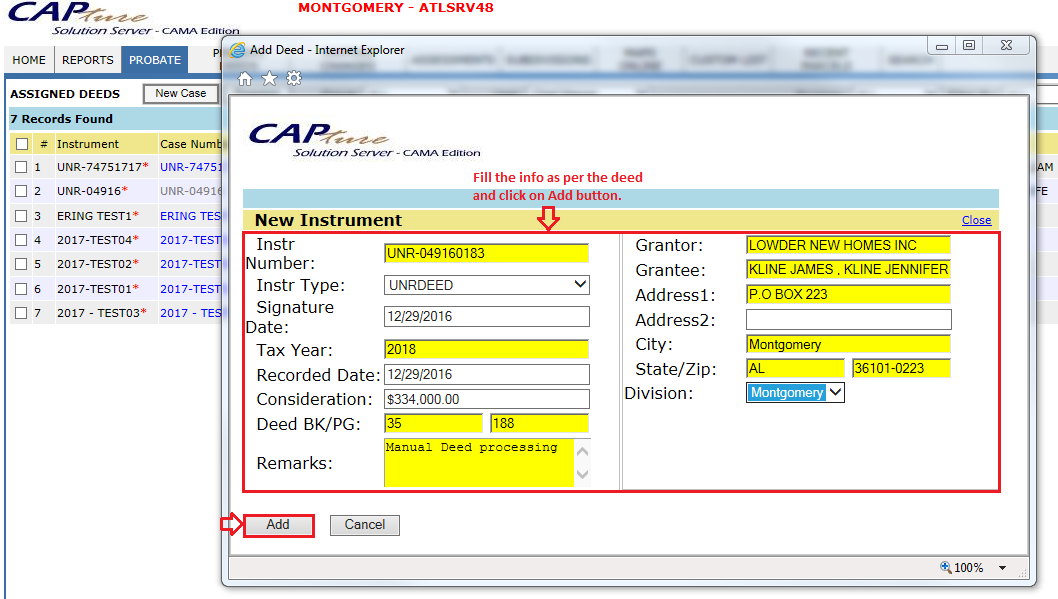
3. Enter the information from the deed and click Add. Once the deed is created then the deed dashboard will open.
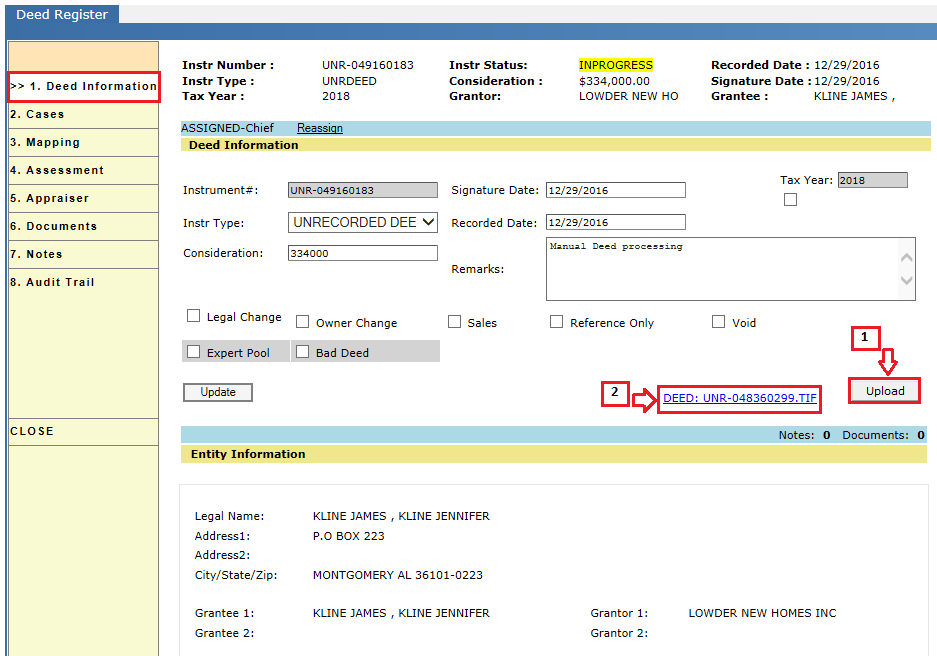
4. To import the deed image into Capture, attach the respective file by clicking the Upload button. Locate and select the deed, then click the DEED hyperlink to verify the deed image attached correctly.
At this point, the manually created deed now functions the same as the imported deeds. See other sections for more details on completing deed processing.
Splitting Parcels
Splitting the parcel means moving acreage from one or more parcels to a newly created parcel. The original parcel is considered the parent parcel. The new parcel is considered the child parcel. Mappers can create any number of child parcels as required.
Setup case: The following steps describe how to split a parcel based on a 2018 deed. The legal changes performed will affect the 2018 property card of the parent parcels. The new parcel will be created for the 2018 record year.
From the main workspace, hover the PROBATE tab and select ASSIGNED. Select deeds and assign them to individual mappers. The mappers can find the deeds assigned to them under Assigned (under probate).
Click the case number to open the Deed Dashboard. Mappers can determine if a split is required from the attached deed document.
1. On the Deed Information tab mark the required changes and click Update
.
Verify audit trail: Activation of Legal change are recorded in the deed’s audit trail.
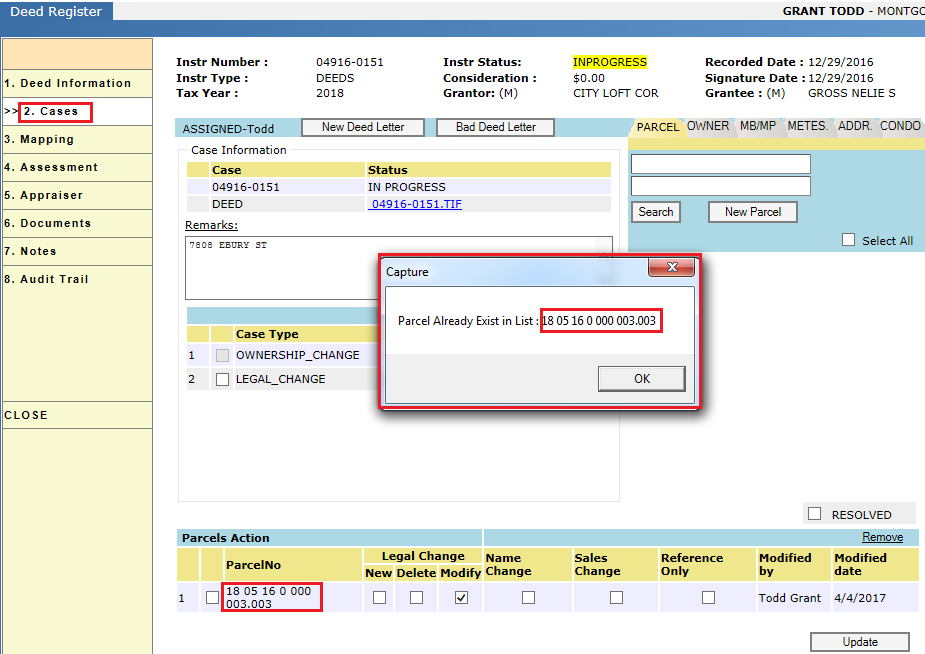
2. In the Cases tab, after selecting the parent Parcel, click the Add button. Click Yes in the pop-up to confirm the selection.
Verify audit trail: The addition of the parcel will be recorded in the deed’s audit trail.
3. Mark the changes required for the parent parcel then click Update.
Note: When users try to add the a parcel that is already on the deed, the system will generate a pop-up as follows:
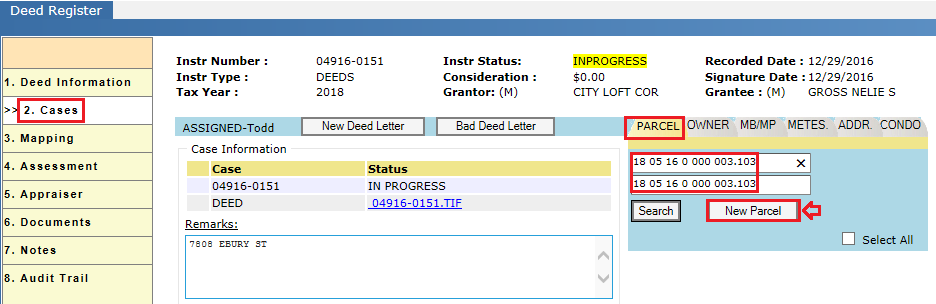
4. Create the child parcel by adding entering a new parcel number and clicking New Parcel.
The new parcel will be added with Legal Change automatically marked New.
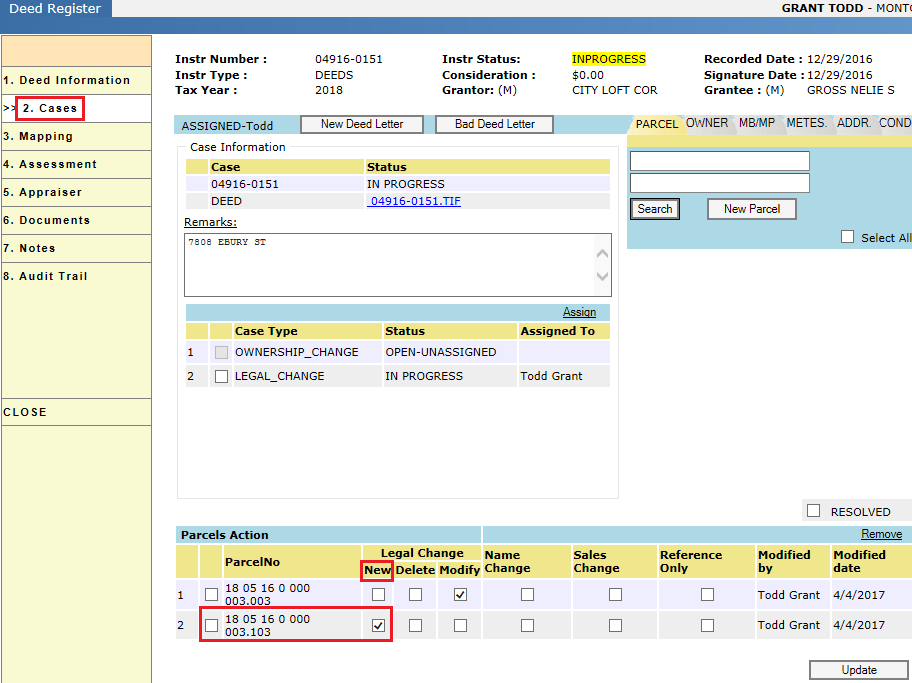
Verify audit trail: Adding the Child parcel to the deed will be audited in the deed’s audit trail.
Note: When adding the new parcel, if the parcel number is already created then a pop-up will be displayed indicating the parcel number already exists.
5. After adding the parcels, mark the changes as per the deed and click Update then mark the deed Resolved.
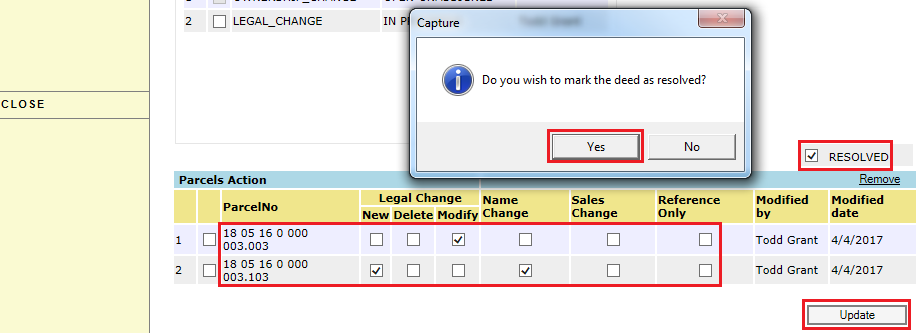
Verify audit trail: Resolving the deed will be audited in the deed’s audit trail.
Note: In Capture, mapping sub-cases can automatically be assigned to the user who resolved the deed based on the county’s specific setup.
6. Click the MAPPING CHANGES tab to find the assigned mapping sub-cases.
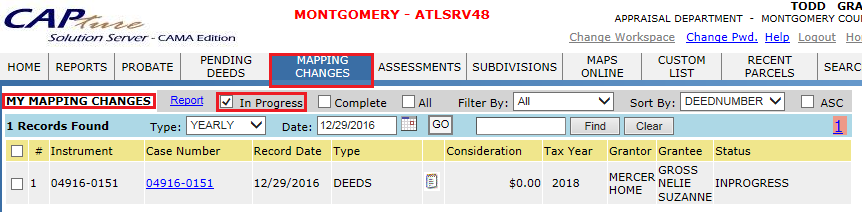
7. Click the case number to open the deed register. The Mapping page opens by default.
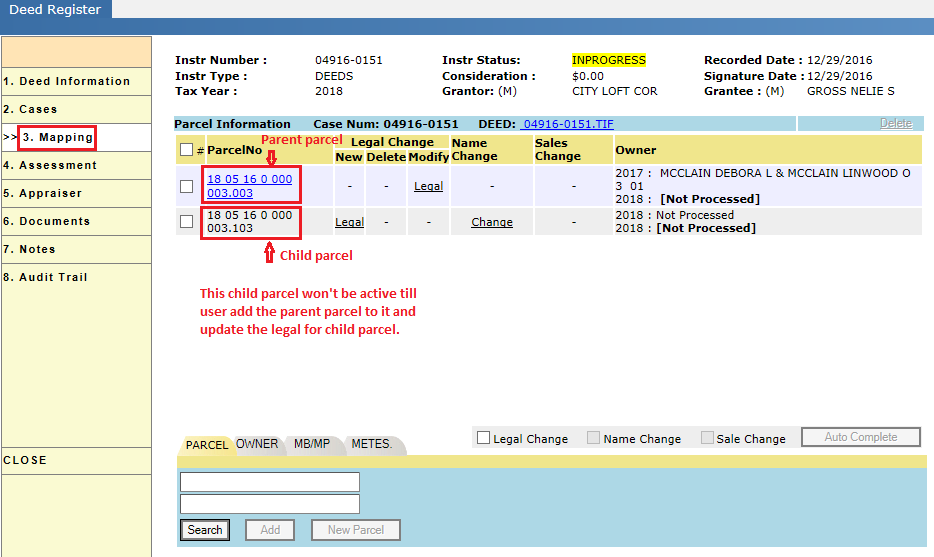
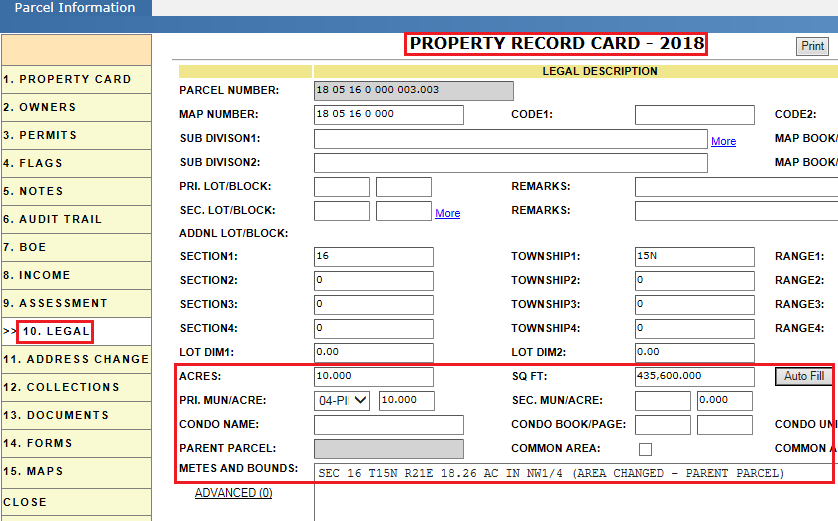
8. In the mapping tab, click the Legal link for the parent parcel and modify the legal information by splitting the acreage as per the deed. (Example: Parent parcel begins with 18.26 acres and is split into 10 acres for parent parcel and 8.26 acres for child parcel.)
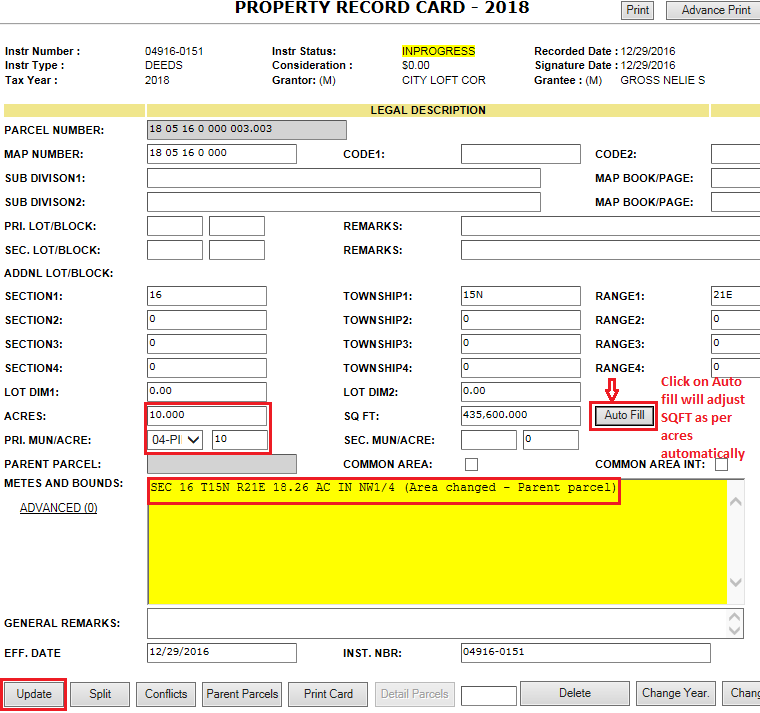
Verify audit trail of parent parcel: Changes to the legal description will be audited in the parcel’s audit trail.
Verify Flags of parent parcel: Modifying the legal description will create a flag for the parent parcel.
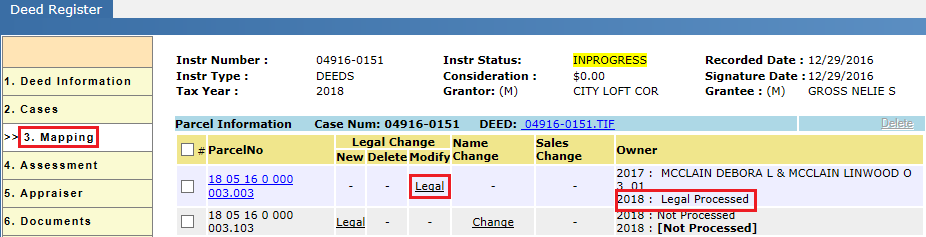
After clicking Update, the status of the legal change goes from Not Processed to Legal Processed on the parent parcel.
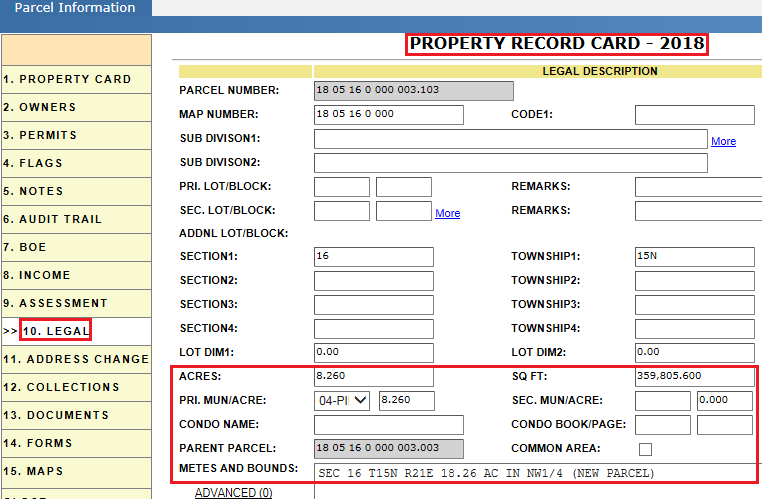
9. Click the Legal link of the child parcel. In the window that appears, select the parent parcel for that child parcel then click Add.
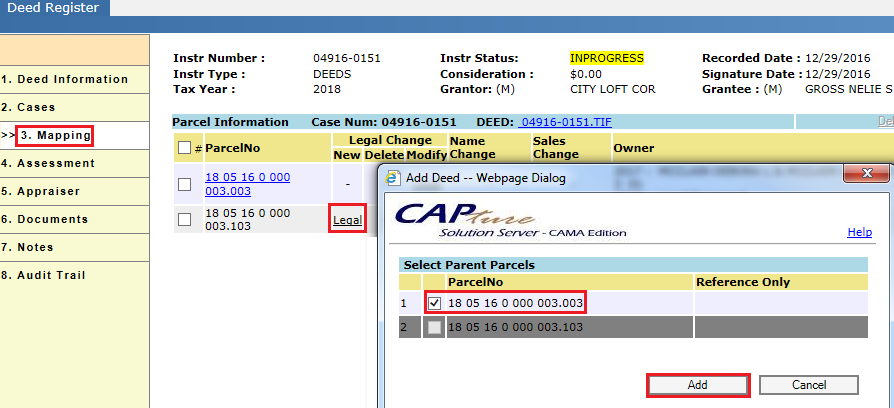
After clicking Add, the Legal page of the Child parcel will open.
10. Enter the required information and click Add.
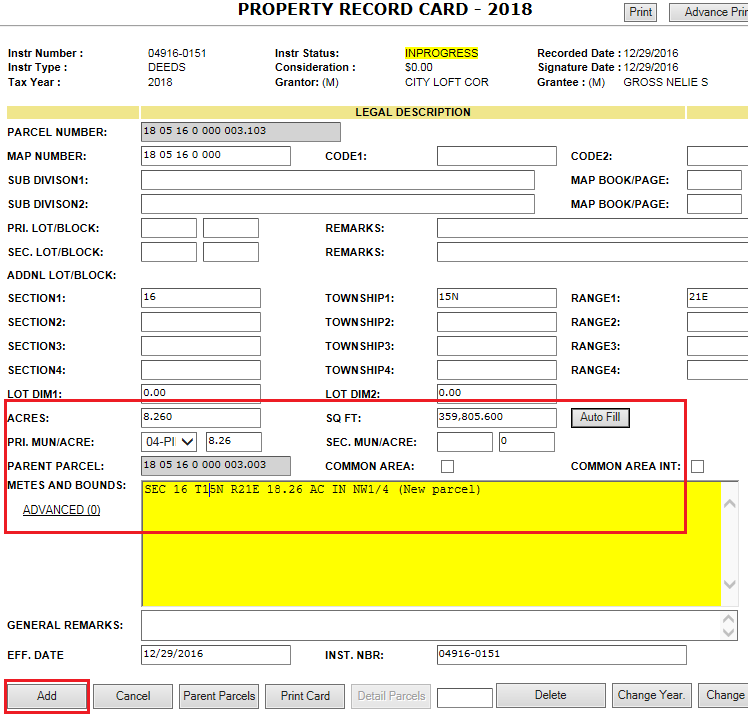
Verify audit trail of Child parcel: Creating the parcel and modifying the Legal will be audited in the parcel’s audit trail.
Verify Flags of Child parcel: Adding a new parcel creates a flag for the child parcel.
Note: Only after updating the legal information will the child parcel be activated.
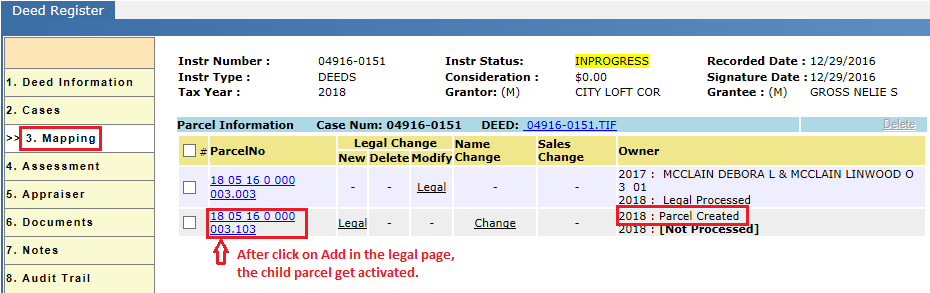
After clicking the Add button on the legal page of the child parcel, the status of the legal change goes from Not Processed to Parcel Created.
Note: Initially the child parcel contains the owner information and property address of the parent parcel.
11. After processing mapping changes to the respective parcels, mark the mapping changes as completed. On the pop-up window click Yes.
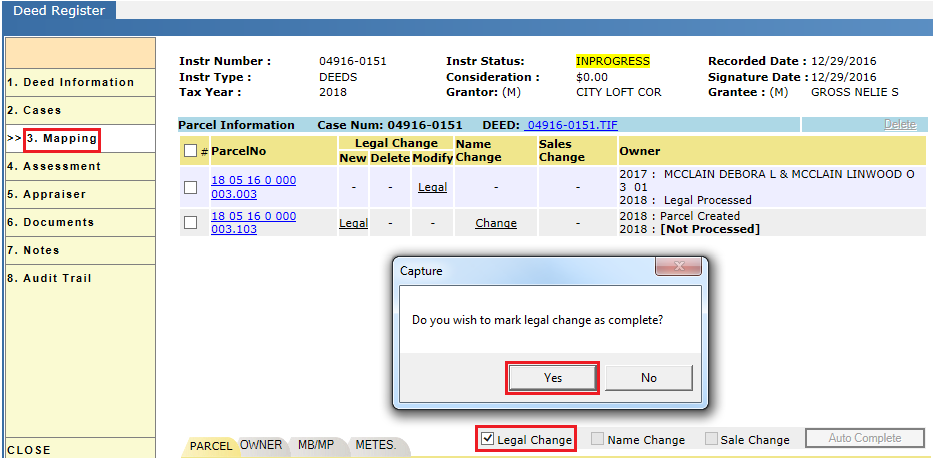
Verify audit trail: After marking the Legal as completed, it will be recorded in the deed’s audit trail.
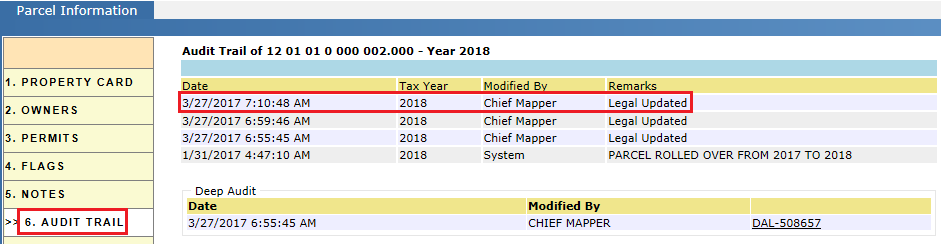
Verify the legal on the parent parcel is same as the Legal updated in the deed dashboard.
Verify the Legal in Child parcel: Click on child parcel in the mapping tab of deed dashboard. As the parcel was created new for 2018 the legal information from the deed will be immediately available on the LEGAL tab.
Verify the legal in the child parcel is same as the Legal updated in the deed dashboard.
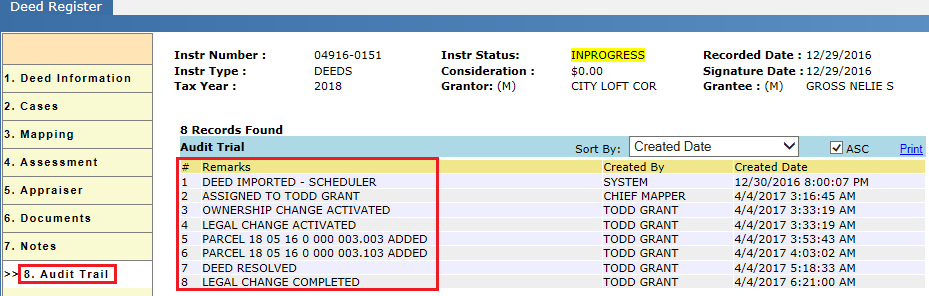
Splitting Parcels – Audit Trails:
The following items are recorded in the deed register’s audit trail:
-
Import/Creation of the deed.
-
Assignment or reassignment of the deed.
-
The sub-cases activated/deactivated.
-
Parcels added/removed.
-
Resolving/reopening of the deed.
-
Completion of sub-cases.
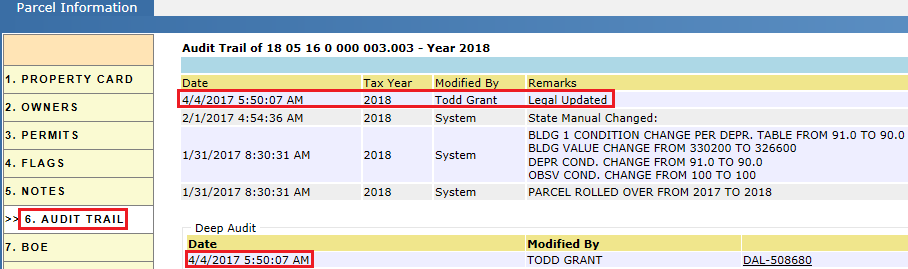
Audit trail of Parent parcel: Click the parent parcel from deed register and go to the Audit trail for that parcel.
Modifying the Legal for parent parcel in deed dashboard is be audited in the parent parcel’s audit trail.
Audit trail of Child parcel: Click the child parcel from deed register and go to Audit trail for that parcel.
Creating the New parcel and updating the legal of the child parcel is audited in the child parcel’s audit trail.
Flags Created - Splits:
In parent parcel: The Parcel Area Changed flag is created after changing the legal description of the parent parcel.
This flag is used to alert appraisers of changes to the parcel.

In child parcel: The New Parcel and Create parcel folder flags are created when a child parcel’s legal description is first added.
The Create Parcel Folder flag is an Optional flag. It can be deactivated at the county’s discretion.
These flags alert appraisers of the creation of new parcels.

Merging Parcels
Merging parcels involves adding the acreage of one or more parcels to another parcel then deleting the other parcels, leaving only the single larger parcel. Mappers can delete any number of parcels required by the deed.
Setup case: The following steps describe the merging of parcels based on a 2018 deed. The legal changes performed on the deed will affect the 2018 PRC of respective parcels. Parcels marked for delete will be deleted in the 2018 record year.
From the main workspace, hover the PROBATE tab and select ASSIGNED. Select deeds and assign them to individual mappers. The mappers can find the deeds assigned to them under Assigned (under probate).
Click the case number to open the Deed Dashboard. Mappers can determine if a merge is required from the attached deed document.
1. On the Deed Information tab, select the actions required and click Update.
Verify audit trail: Activation of Legal change and Name change will be recorded in the deed’s audit trail.
2. On the Cases page, search for the affected parcels and add them to the deed.
Verify audit trail: Adding parcels to the deed will be recorded in the deed’s audit trail.
3. After adding the parcels and marking the changes as per the deed, click Update and mark the deed RESOLVED. Click Yes on the pop-up to confirm.
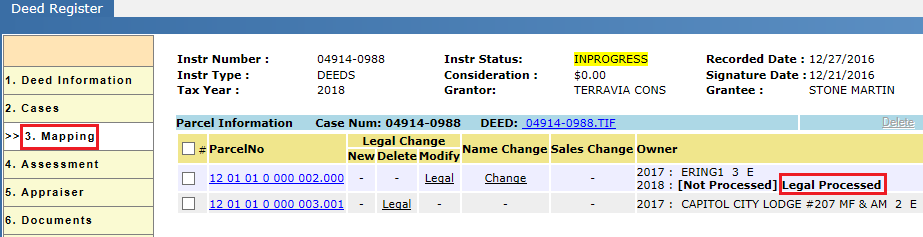
4. For the parcel to be deleted, mark Delete under Legal Change. On the surviving parcel, mark Modify.
Verify audit trail: The Resolving of the deed will be recorded in the deed’s audit trail.
5. After resolving the parcels, go to the mapping tab and proceed with the respective changes.
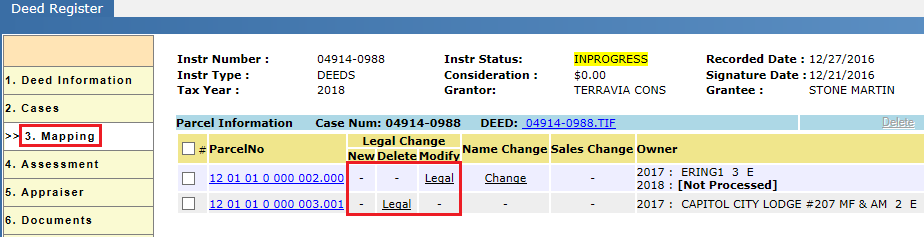
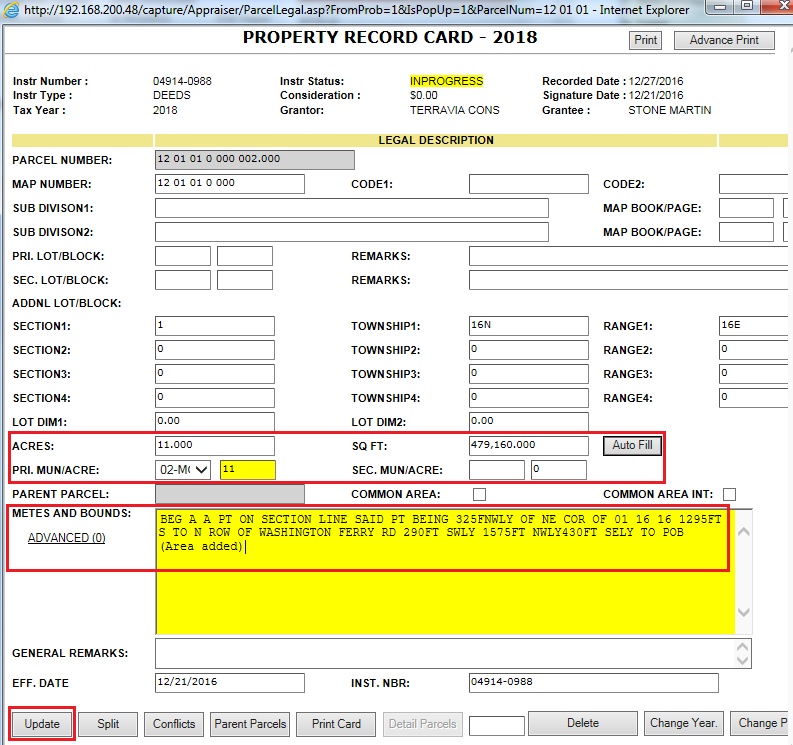
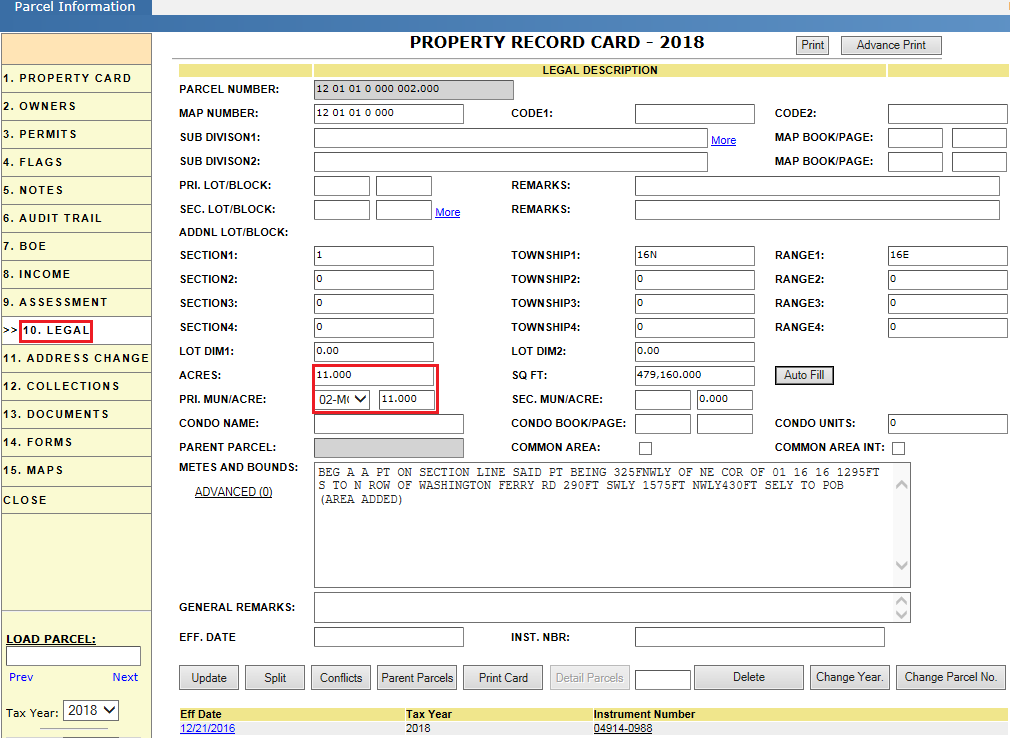
6. From the Mapping tab, select the parcel which is marked for Modify. Update the legal information by adding the other parcel’s acreage to this one as per the deed.
In this case, the surviving parcel has 10 acres and the parcel to be deleted has 1 acre. By merging the 1 acre to 10 acres, the parent parcel becomes 11 acres.
Verify audit trail of parent parcel: The change to the legal description will be recorded in the parent parcel’s audit trail.
Verify Flags of parent parcel: The change to the legal description will create a flag on the parent parcel.
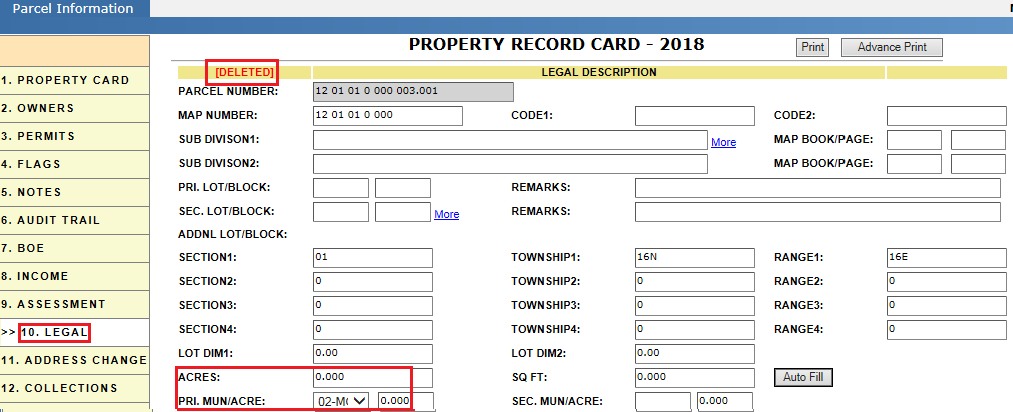
7. Click the Legal link of parcel to be deleted. Change the acreage to ‘0’. Enter the year in which the parcel is to be deleted then click Delete. Click Yes in the pop-up to confirm the deletion.
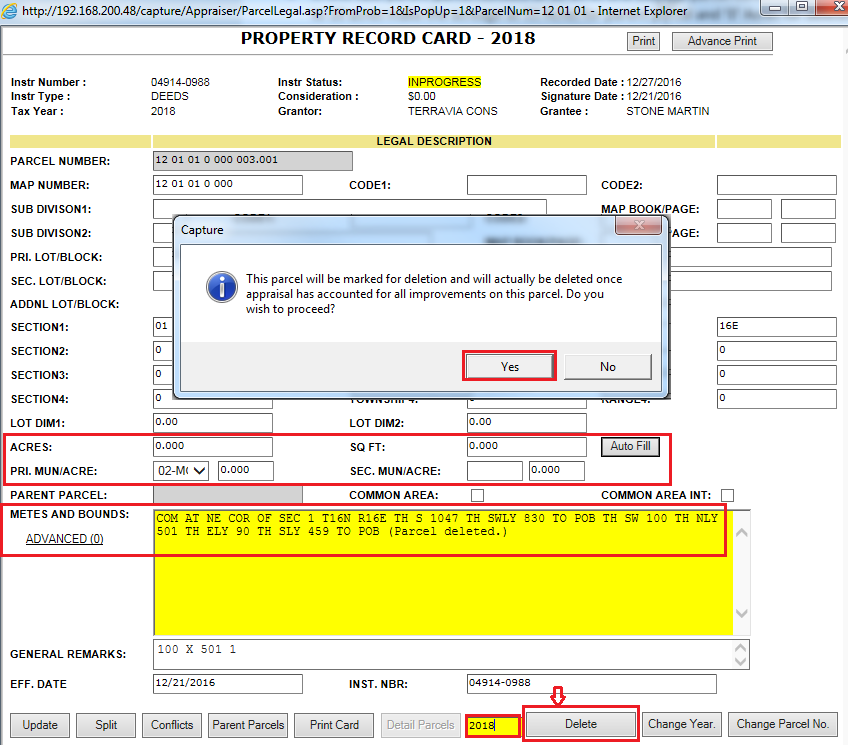
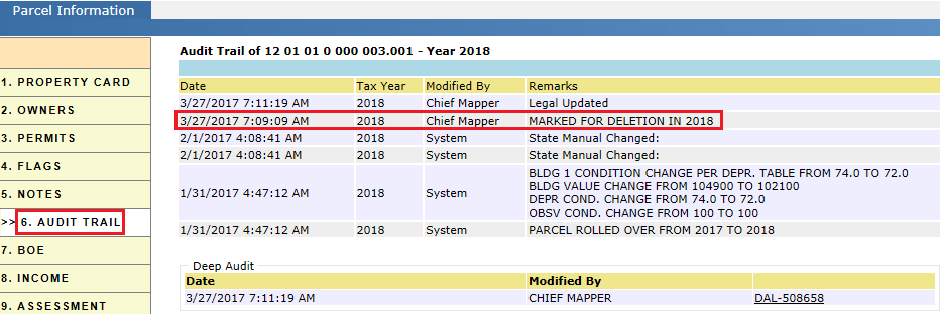
Verify audit trail of Deleted parcel: The deletion of the parcel will be recorded in the parent parcel’s audit trail.
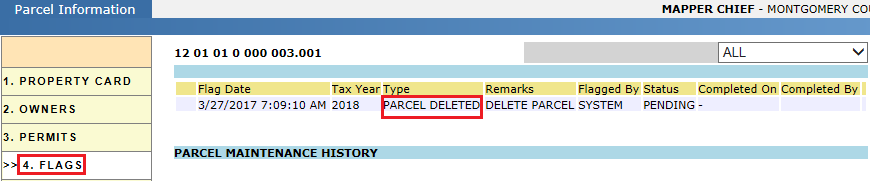
Verify Flags of Deleted parcel: Marking the parcel deleted will create a flag on that parcel.
8. After processing mapping changes for the respective parcels, mark the legal changes completed. Click Yes on the pop-up that appears.
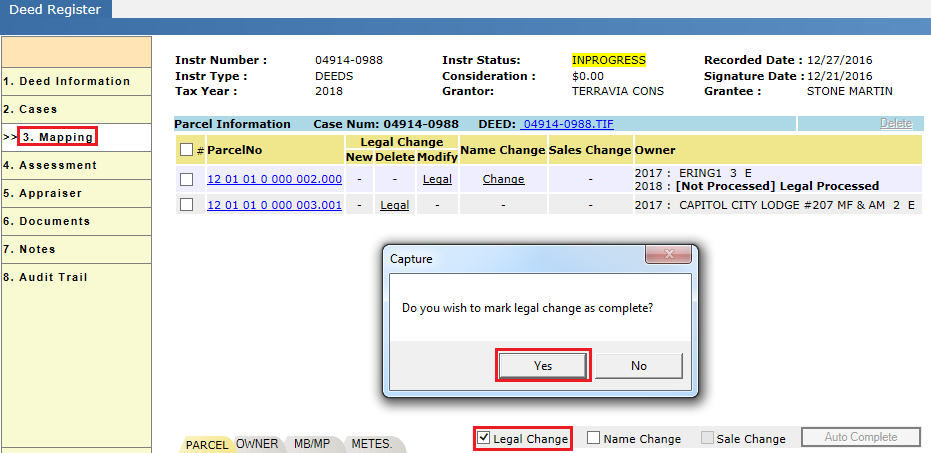
The status of the legal changes have gone from Not Processed to Legal Processed. The name changes are not yet completed for this deed. The status of the name changes remain Not Processed.
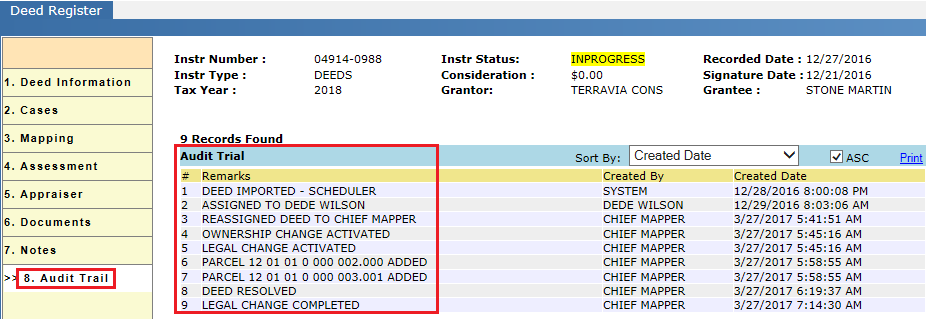
Verify audit trail: The completion of the legal changes will be recorded in the deed’s audit trail.
Verify, the legal description on the modified parcel is the same as the legal description updated on the deed dashboard for the modified parcel.
Verify, the legal description in the deleted parcel is same as the Legal description in the deed dashboard for the deleted parcel. Also verify the parcel shows ‘Deleted’.
Merging Parcels – Audit Trail:
The following items are recorded in the deed register’s audit trail:
-
Import/Creation of the deed.
-
Assignment or reassignment of the deed.
-
The sub-cases activated/deactivated.
-
Parcels added/removed.
-
Resolving/reopening of the deed.
-
Completion of sub-cases.
Audit trail in Modified parcel: Click the Modified parcel from deed dashboard and go to Audit Trail in that parcel.
Updates to the legal description of the modified parcel will be recorded in the parcel’s audit trail.
Audit trail in Deleted parcel: Click on deleted parcel from deed dashboard and go to Audit Trail in that parcel.
Marking a parcel deleted will be recorded in the parcel’s audit trail.
Flags created during merging the parcels through deed:
In the modified parcel Flags tab: The Parcel Area Changed flag is created after the legal information is modified.
This flag alerts appraisers of a change to the parcel.

In the deleted parcel Flags tab: The Parcel Deleted flag is created after marking the parcel deleted.
This flag alerts appraisers that the appraisal items must be accounted for.
Reports used while Resolving the deeds:
The deeds imported into probate can be found on Unassigned (under probate). From here, the deeds can be assigned to individual users.
Mappers can find the deeds which are assigned to them on Assigned (under probate).
Use the Resolved and UnResolved checkboxes to filter deeds base on their current status.
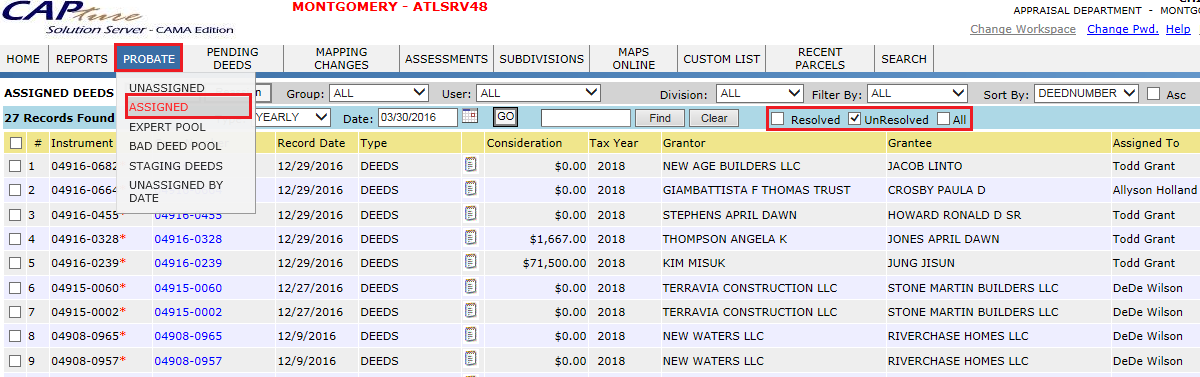
To search for a deed by its instrument number, enter the deed number in search box and click Find.

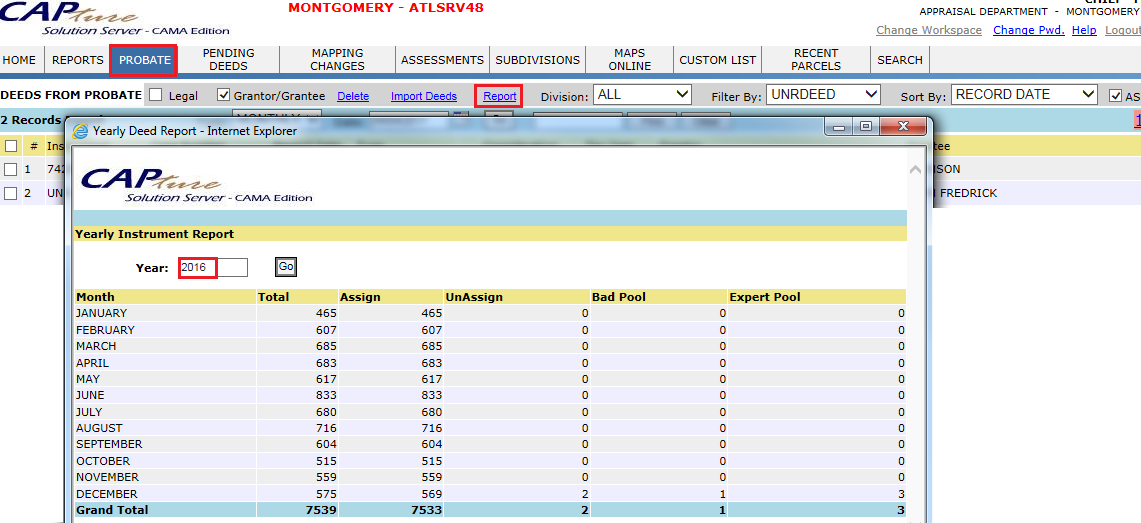
To see a report of deeds indicating how many deeds are Assigned, Unassigned, Bad Pool, Expert Pool and Total deeds in one record year, click the Report link on the DEEDS FROM PROBATE page.
Reports used while Splitting/Merging the deeds:
The deeds imported into probate can be found on Unassigned (under probate). From here, the deeds can be assigned to individual users.
Mappers can find the deeds assigned to them on Assigned (under probate).
Parcels which are marked for mapping changes will appear on Unassigned (under Mapping changes).
Mapping changes can be assigned to users from this page.

Click Assigned (under Mapping changes) to see mapping sub-cases assigned to individual users.
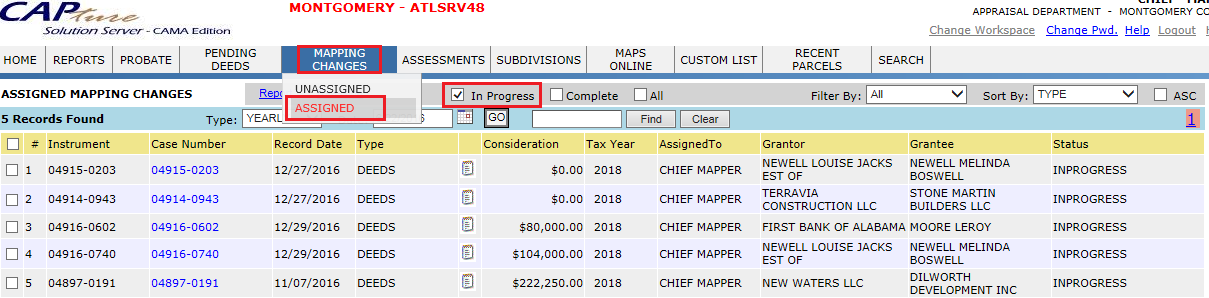
Individual users should click on Mapping changes to see only the mapping sub-cases assigned to them.
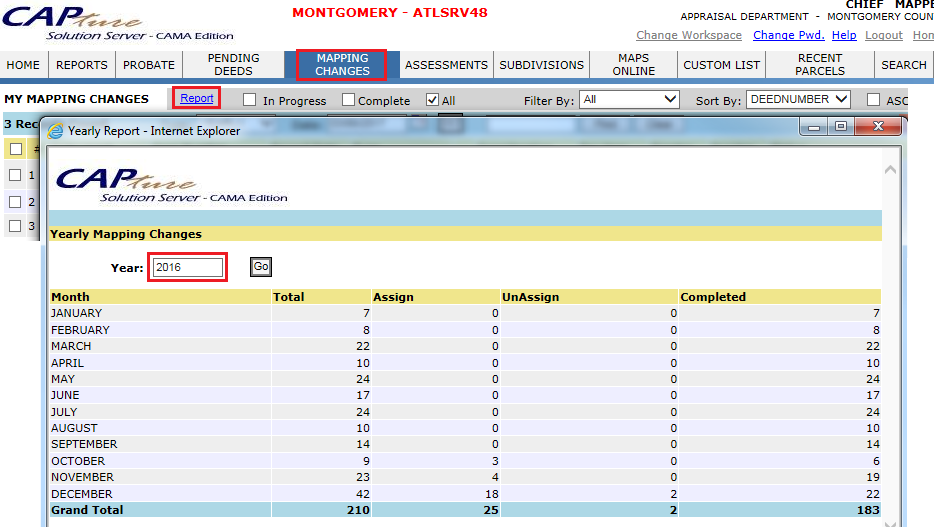
To see a report of deeds indicating how many deeds are Assigned, Unassigned, Bad Pool, Expert Pool and Total deeds in one record year then click the Report link on the DEEDS FROM PROBATE page.
Bad deed, Expert Pool, and Printing the Mapping Letters:
Expert Pool: A deed is marked for expert pool when the mapper needs assistance from a supervisor. The supervisor can access the deed and provide the mapper with assistance.
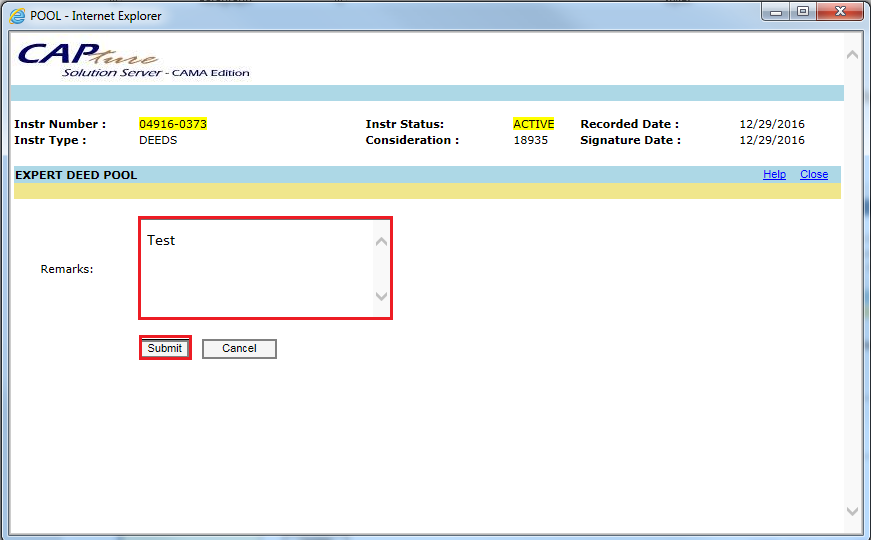
Deed is Marked for Expert Pool:
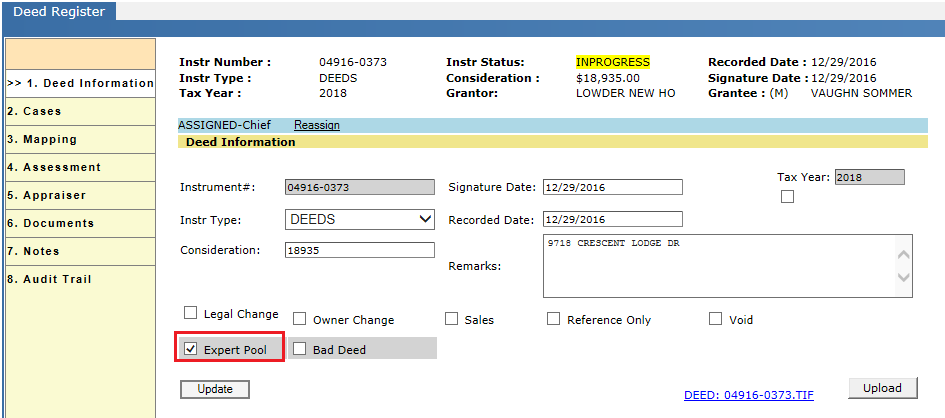
After marking Expert Pool in the deed info tab, a window will open where remarks can be entered. Submitting the remarks updates the deed automatically.
Verify audit trail: Marking Expert Pool is recorded in the deed’s audit trail.
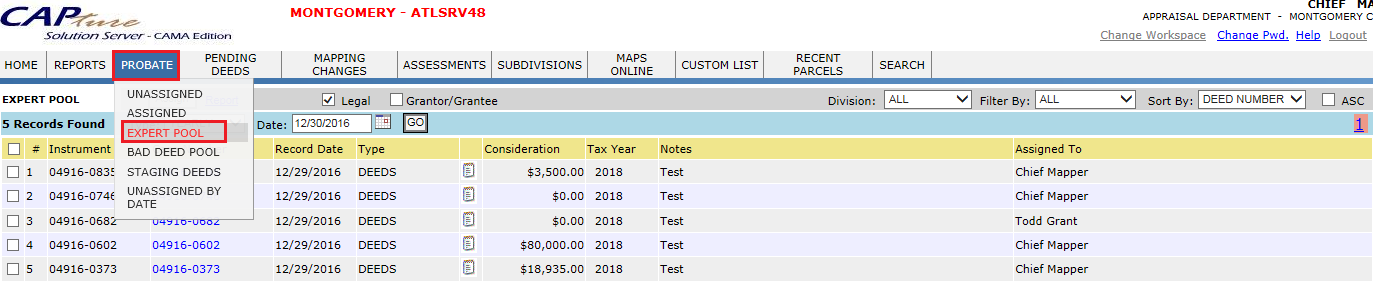
Deeds that are sent to the Expert Pool will appear on the Expert Pool report (under Probate).
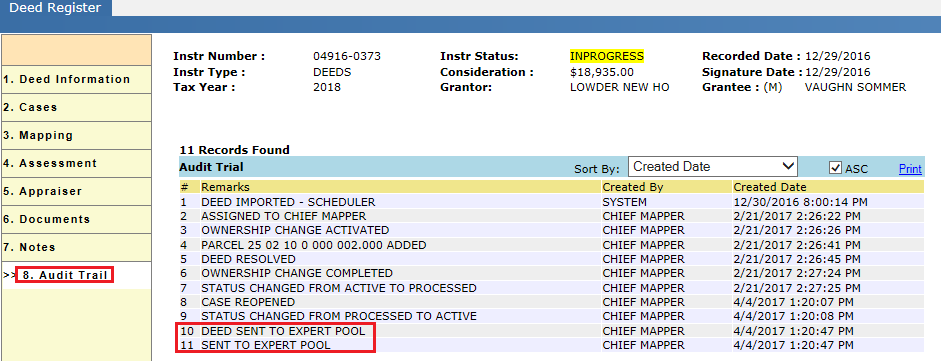
Audit Trail of Expert Pool:
This audit indicates that the deed was sent to the expert pool.
Bad Deed: A problematic deed can be marked Bad Deed. This may be necessary if the deed contains an invalid legal description and cannot be processed. All the deeds that are marked as bad deeds will appear under Bad Deed Pool where respective user can mass print them.
Deed is marked as Bad Deed:
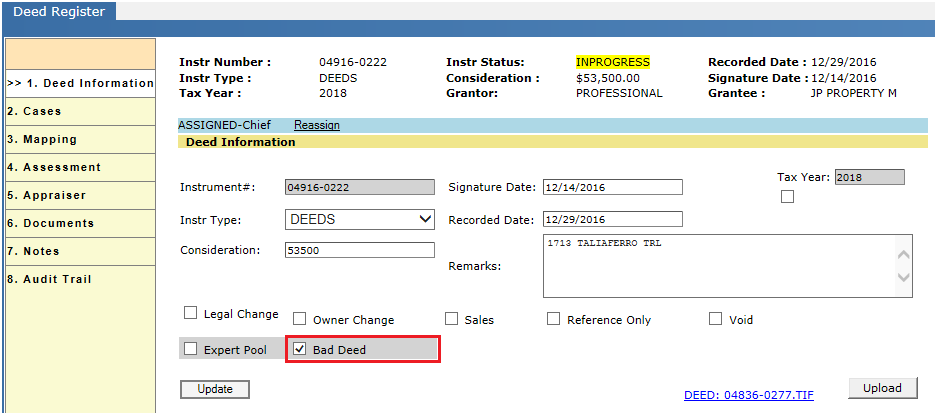
After marking Bad Deed, a window will appear where the user can enter remarks. Submitting the remarks automatically updates the deed.
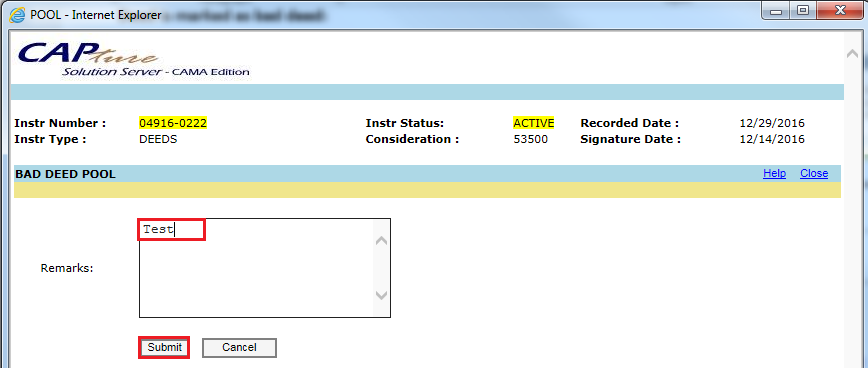
Verify audit trail: Marking Bad Deed, is recorded in the deed’s audit trail.
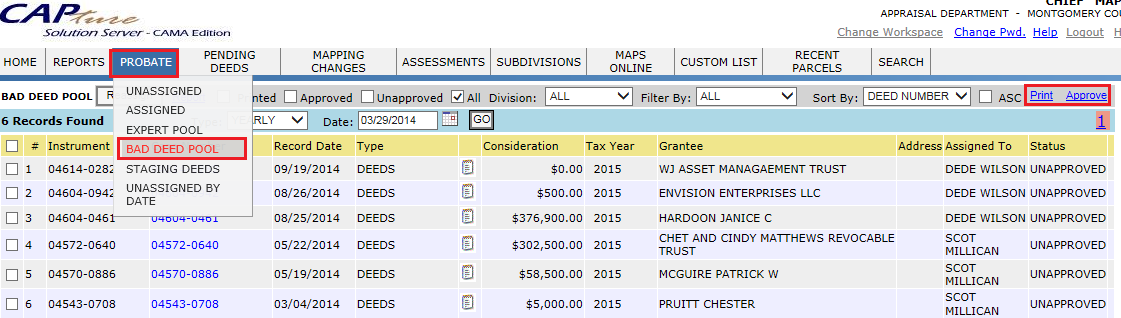
The deeds that are marked as bad deed are listed in the Bad Deed pool (under probate). Here all the deeds can be mass printed by selecting the deeds and clicking the Print link. Users can also approve all the bad deeds at once.
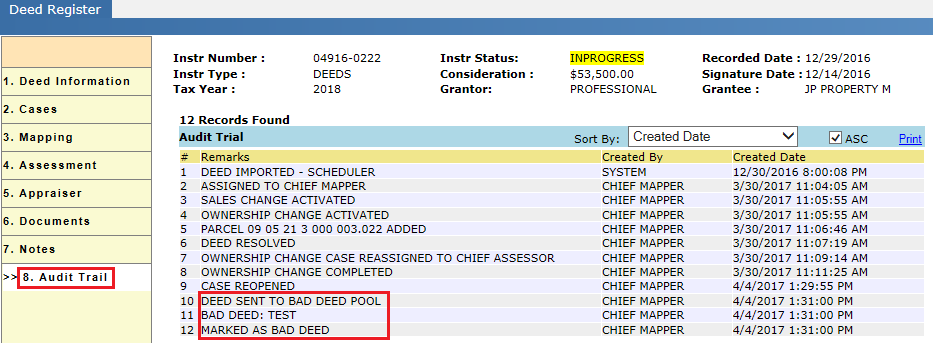
Audit trail of Bad Deed Pool:
This audit trail will show when the deed was marked bad when the remarks were added and when the deed was sent to the bad deed pool.
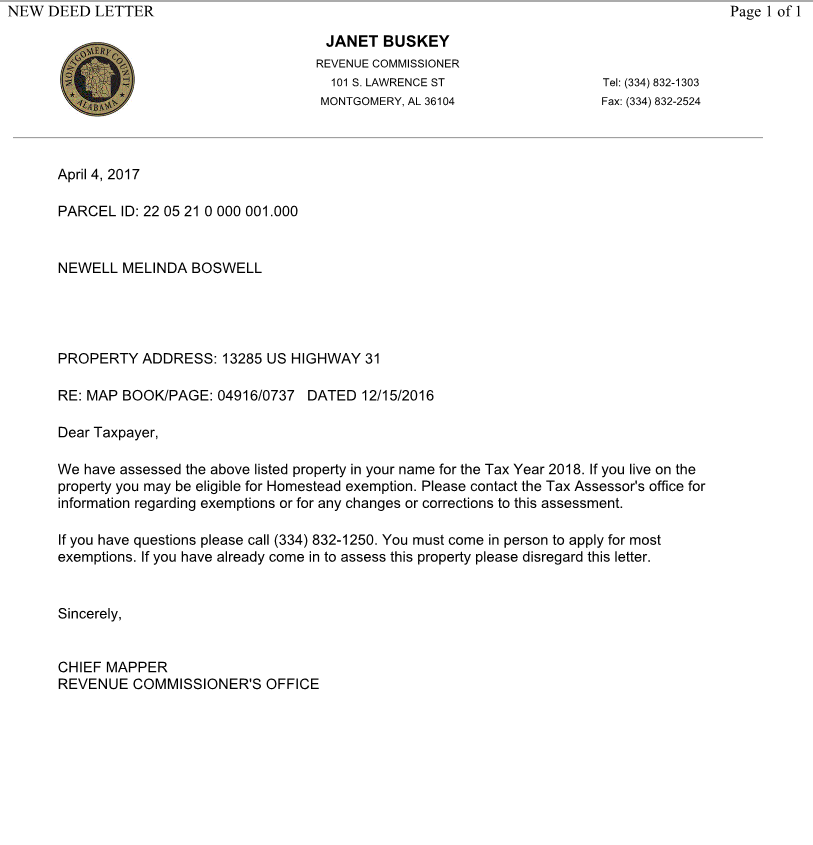
New Deed Letter: A New deed letter is sent to the tax payer to have their property assessed and filed for any exemptions if applicable.
Click the New Deed Letter button under the Cases tab to print the letter.
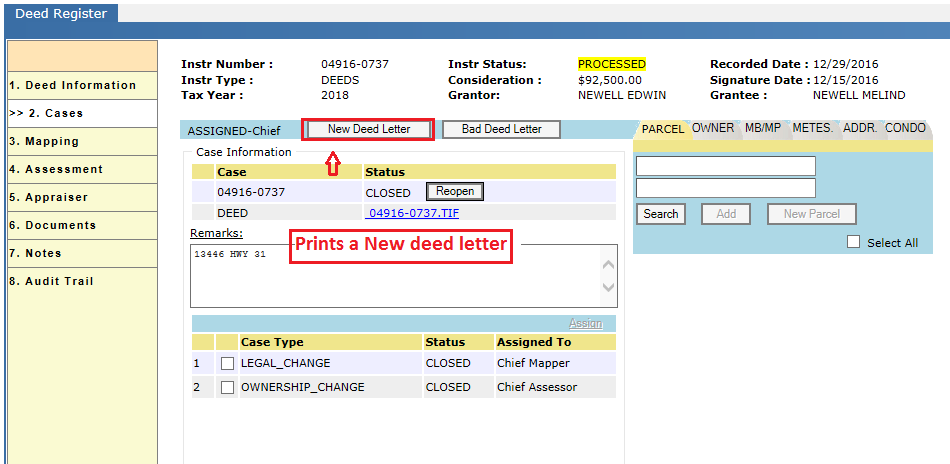
A New Deed Letter contains parcel number, owner name, and property address. The tax payer will be instructed to contact the Tax Assessor’s office to file for any exemptions and corrections they see fit.
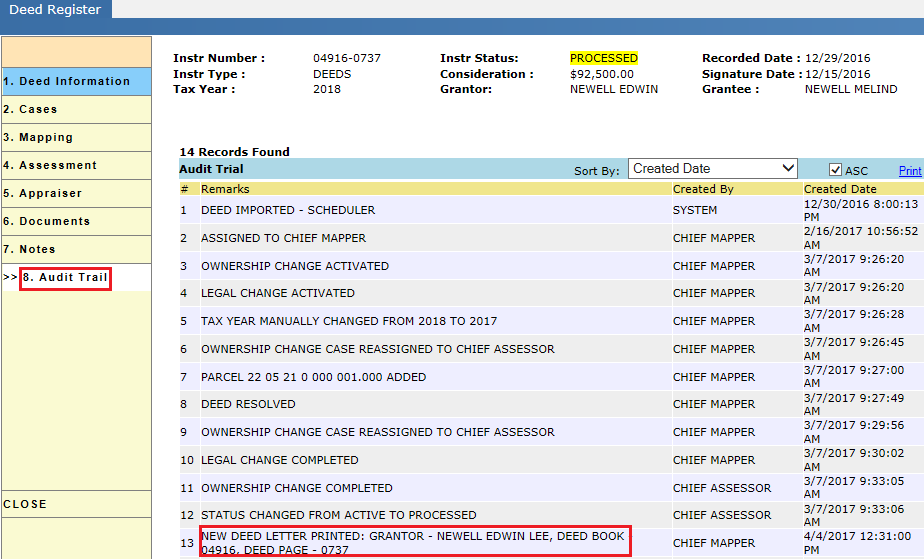
Audit trail of New deed letter:
Printing the New Deed Letter is recorded in the audit trail along with some pertinent information.
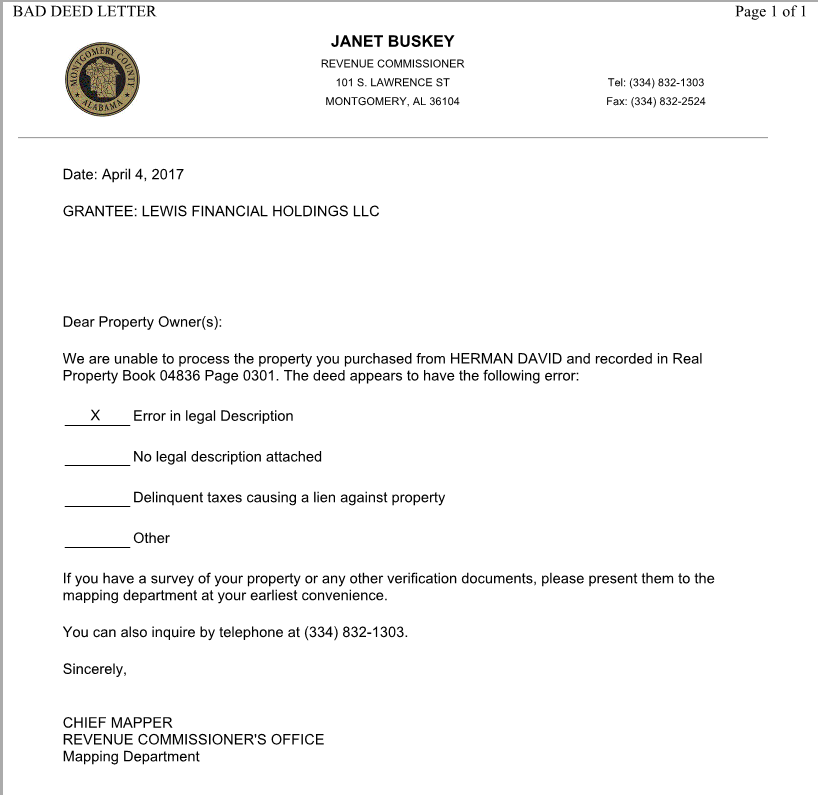
Bad deed Letter: A Bad Deed Letter is sent to the grantee listed on the deed to let them know that the deed is not workable by the mappers.
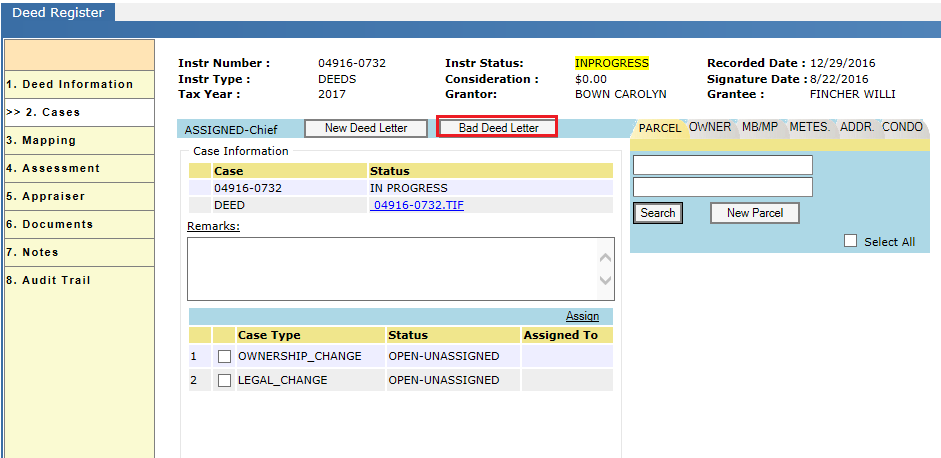
After clicking the Bad Deed Letter button, select the options to describe how the deed is incorrect (see image below).
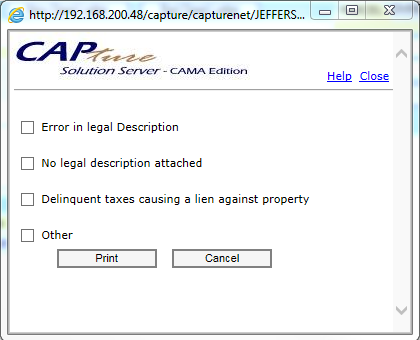
The Bad Deed Letter includes grantee name and the error in the deed.
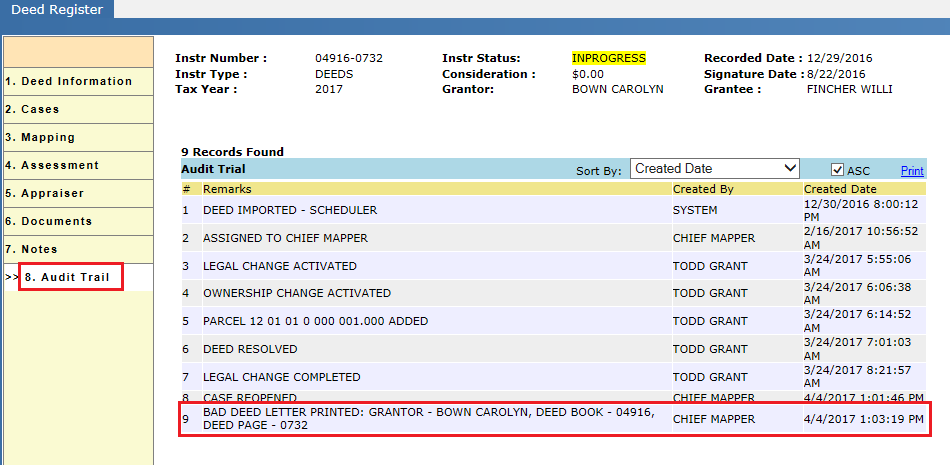
Audit trail for Bad deed letter:
Printing the Bad Deed Letter is recorded in the audit trail along with some pertinent information.
Deed Processing – Name Changes
-
Once a deed has been resolved by the Mapping group and legal changes have been addressed (if any), the name change sub-cases become available to the name change group.
-
Here, the name change cases won’t assign to the respective users automatically. The user who is privileged to assign the name changes (Chief Supervisor) will assign these cases to the respective Users in that group.
-
The primary task of the name change users is to verify the Grantor/Grantee details and to add any additional owners if necessary.
-
This user is also responsible for entering the mailing address of the new owner into the system.
Assigning Name changes to the users:
1. Login as the user (Chief Supervisor) who is privileged to assign the name change cases.
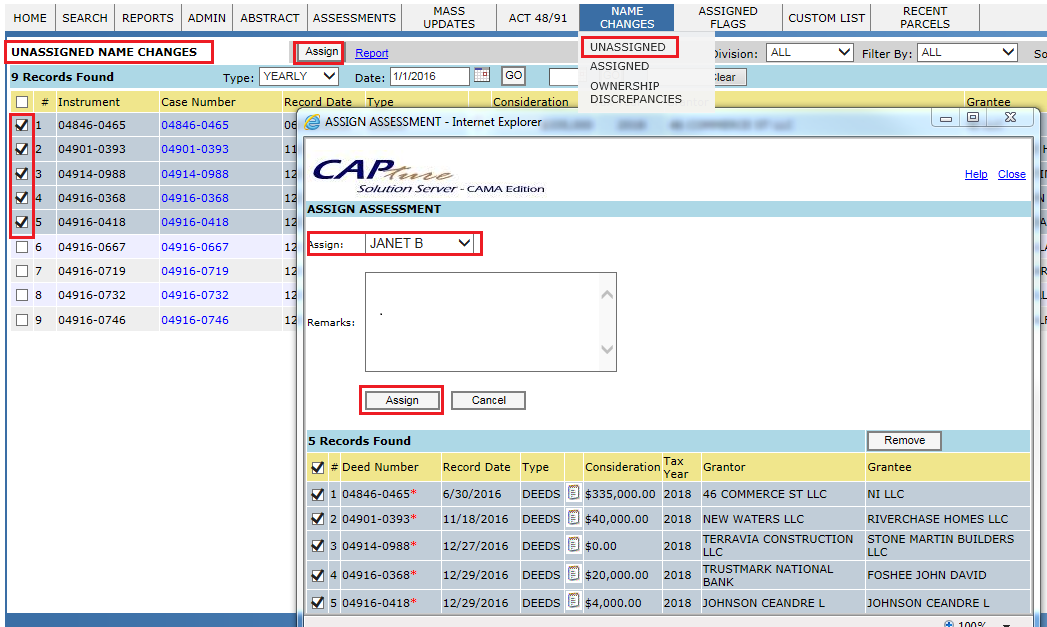
2. Hover over the Name Changes and click Unassigned cases.
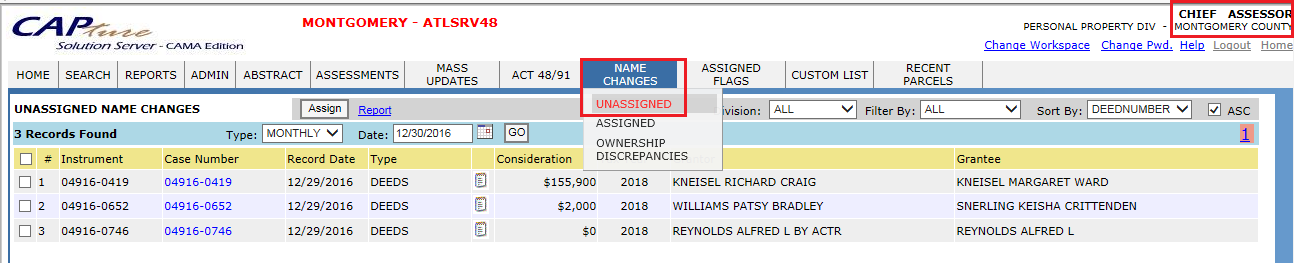
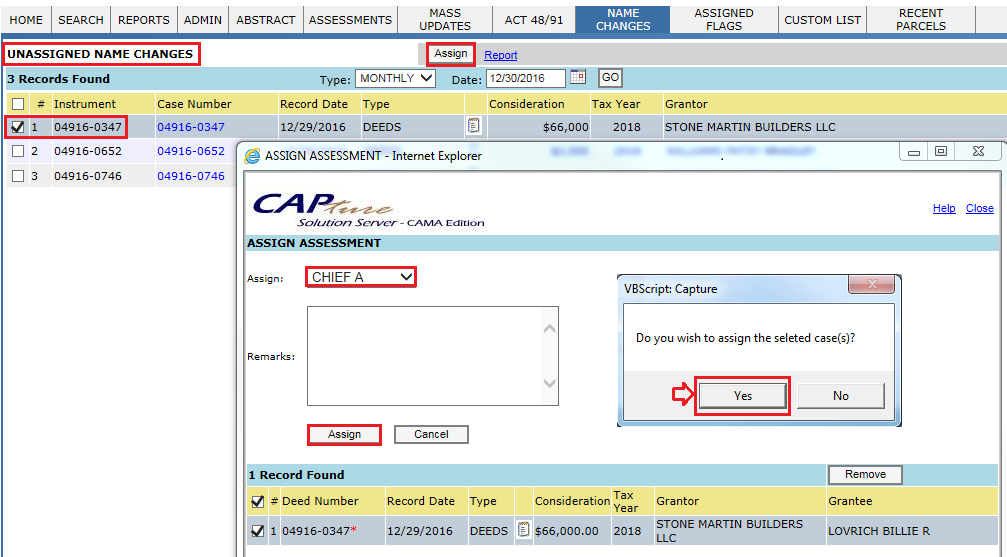
3. Select the cases to be assigned and click the Assign button. It opens the Assign Assessment Window. Select the user and click the Assign button.
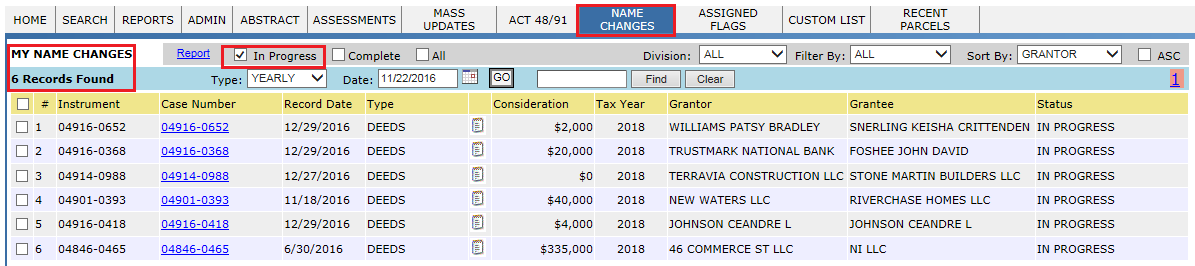
4. The respective users who are privileged to perform Name Changes can find the name change cases under the Name Changes tab.
5. Check mark the In Progress to display only the name change cases which have not been processed.

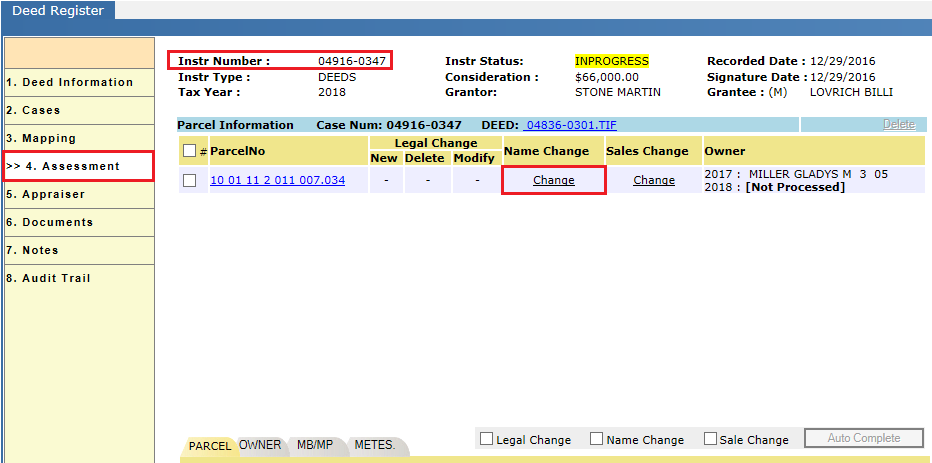
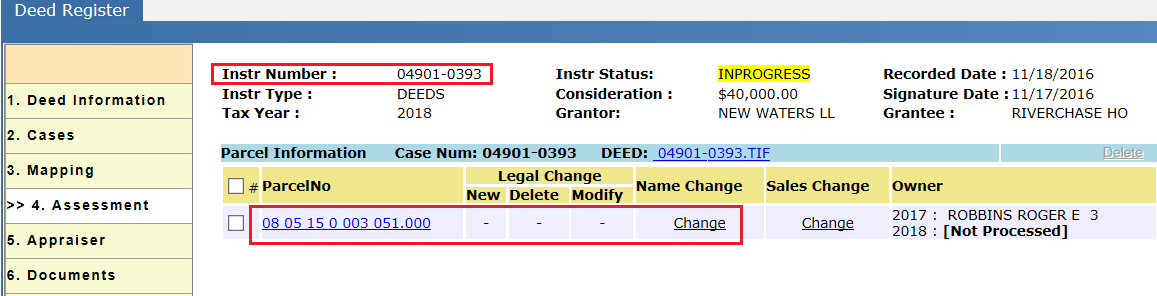
6. Click the case number hyper link. It opens the Deed Register page. Click the Change link on the Assessment tab.
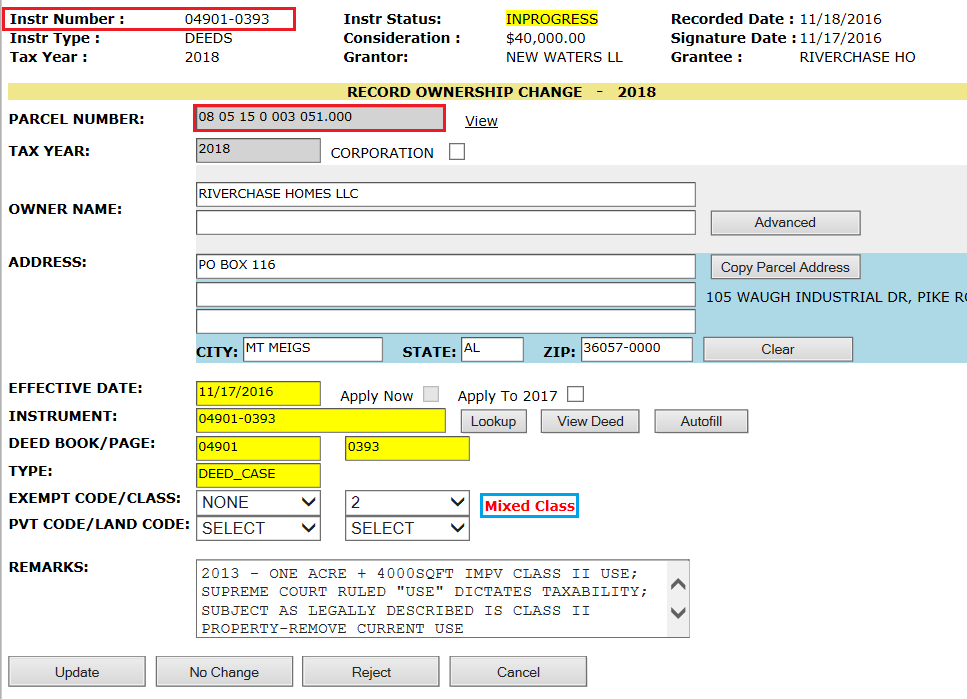
7. Enter the Grantee details and Mailing Address as per the deed. The Copy Parcel Address option copies the property address. This is useful when the new owner mailing address is the same as the parcel address. Exemptions and Property Class are defaulted to None & 2 respectively, as shown below.
8. The idea behind the default settings is that Capture doesn’t know if the new owner is eligible for the existing exemption or not (In Alabama, the owner carries the exemption, not the property) and for what purpose the property is going to be used. The new owner will have to apply if they want an exemption & change in property class.
9. If the parcel has a discrepancy between the Main Class and Item Class then Capture tracks the property as "Mixed Class. "
10. If the parcel in the deed has a name change with mixed class, Capture indicates that the parcel has Mixed Class in red color text.
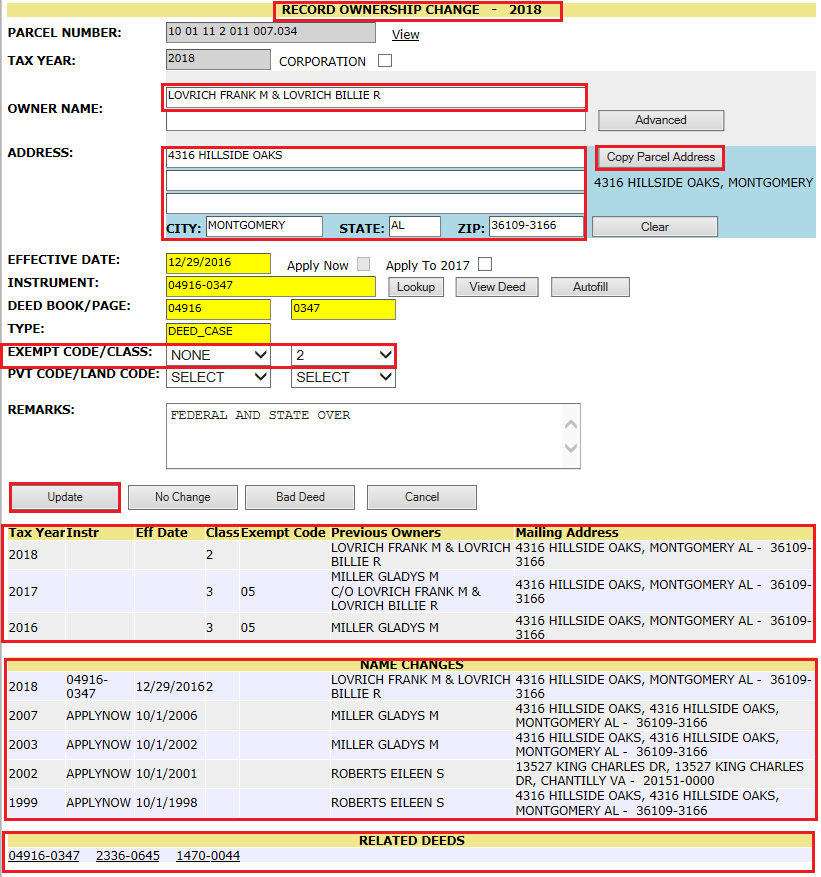
Previous owner information: Displays previous years' records with class, exemption and owner information. By having this information available, the user can see how the parcel was assessed in previous years.
Name changes: Displays all the records of name changes through deeds.
Related deeds: Displays all the deeds where the respective parcel participated in different deeds.
11. If the deed has multiple owners and the user needs to change the ownership details then click the Advanced button and modify the details.
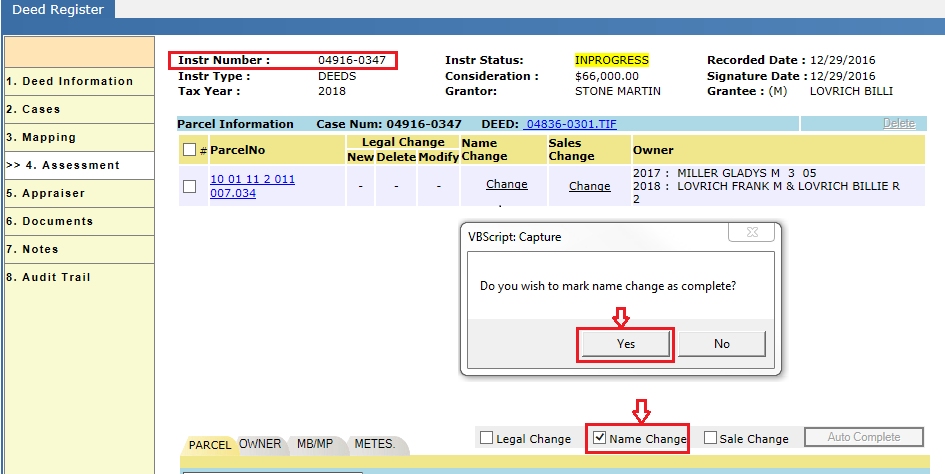
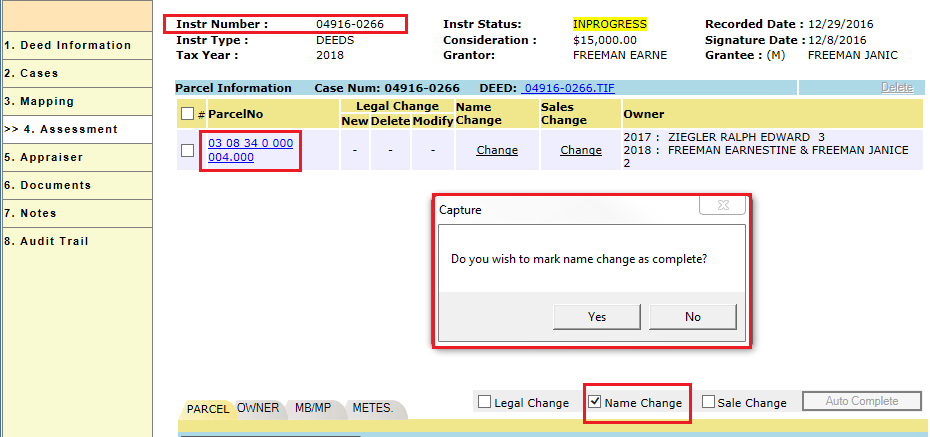
12. After updating the owner’s information, checkmark the sub-case Name Change as complete.
Flags generated after completion of the Name Change: Assessment Name Changed flag is optional.

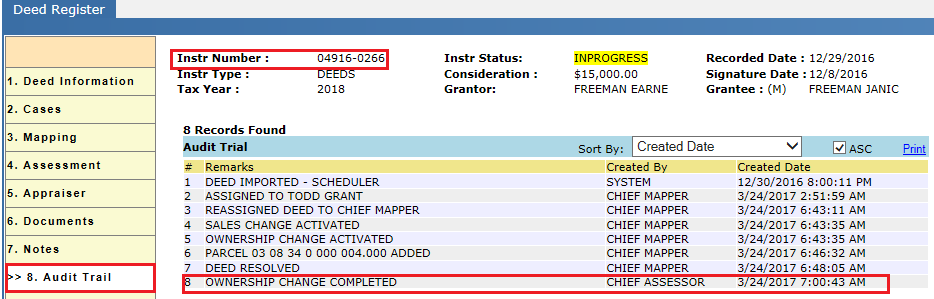
Verify the Audit Trail:
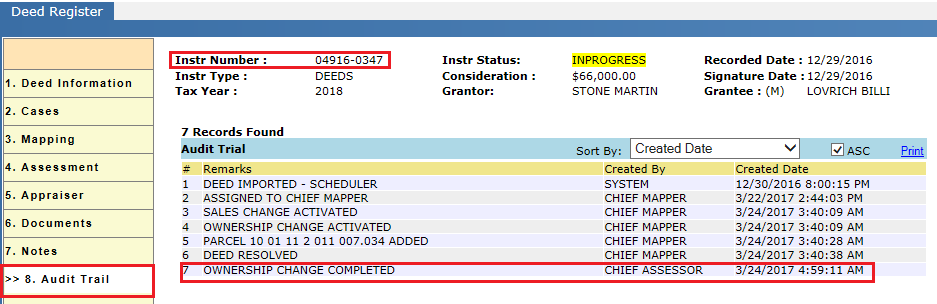
Audit Trail after resolving Name Change:
Name Change completion is audited.
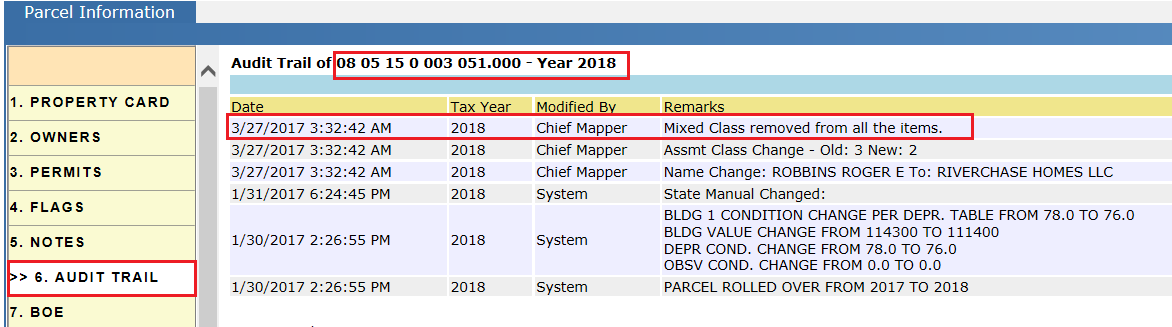
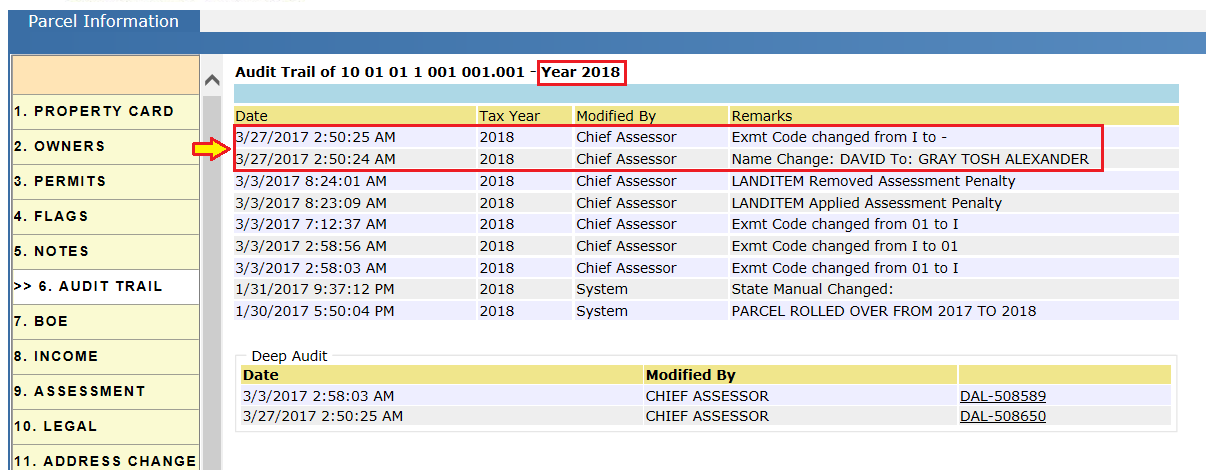
Audit trail of the parcel (2018): Information audited regarding Name Change, Exemption Removal & Class Change.

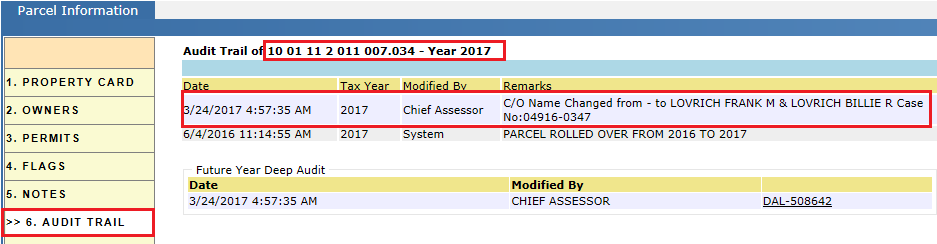
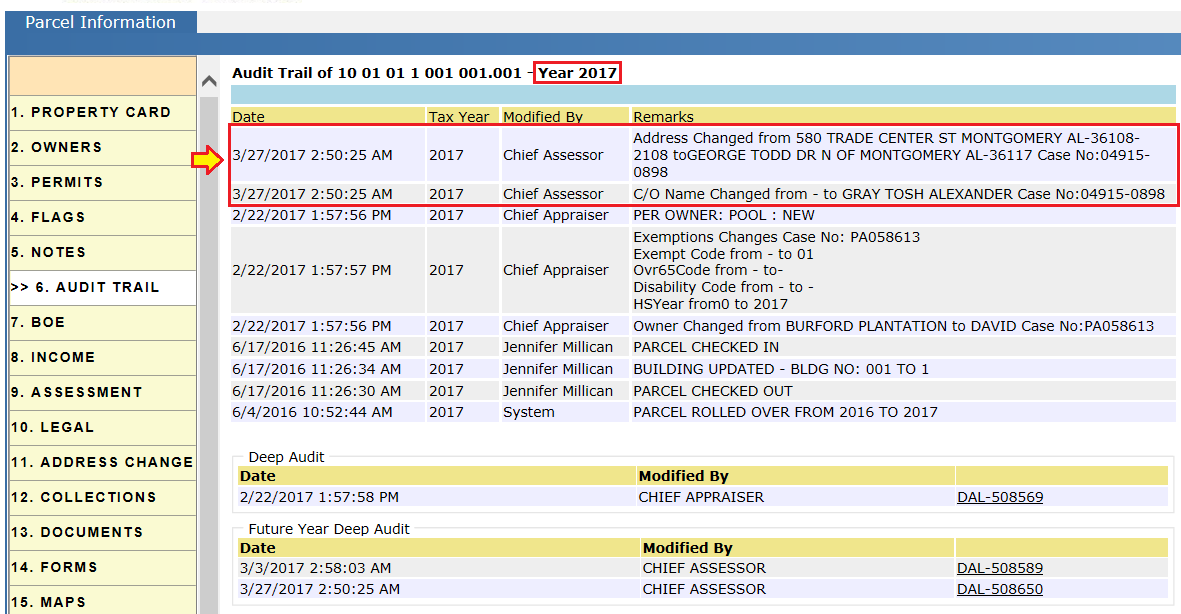
Audit Trail of 2017 PRC: Name Change was performed in Tax Year 2018. And there should be a C/O in Tax year 2017.
Reports used:
If the mapping user resolved the deed by marking name changes, those deed cases are on Unassigned Name Changes (Name Changes -> Unassigned).
Then supervisor will assign the cases to different name change users.
The detail count can be viewed by clicking on the report hyperlink.
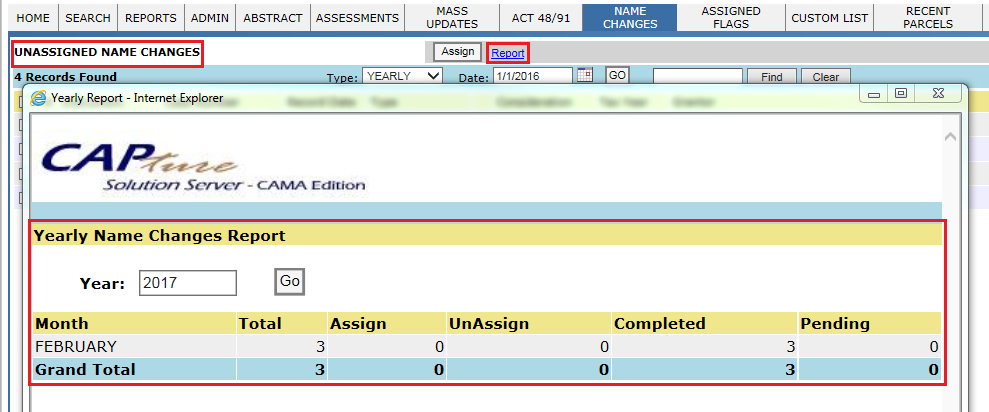
Assigned name change cases are located on the Name Changes tab.
Verify the changes in the Parcel PRC:
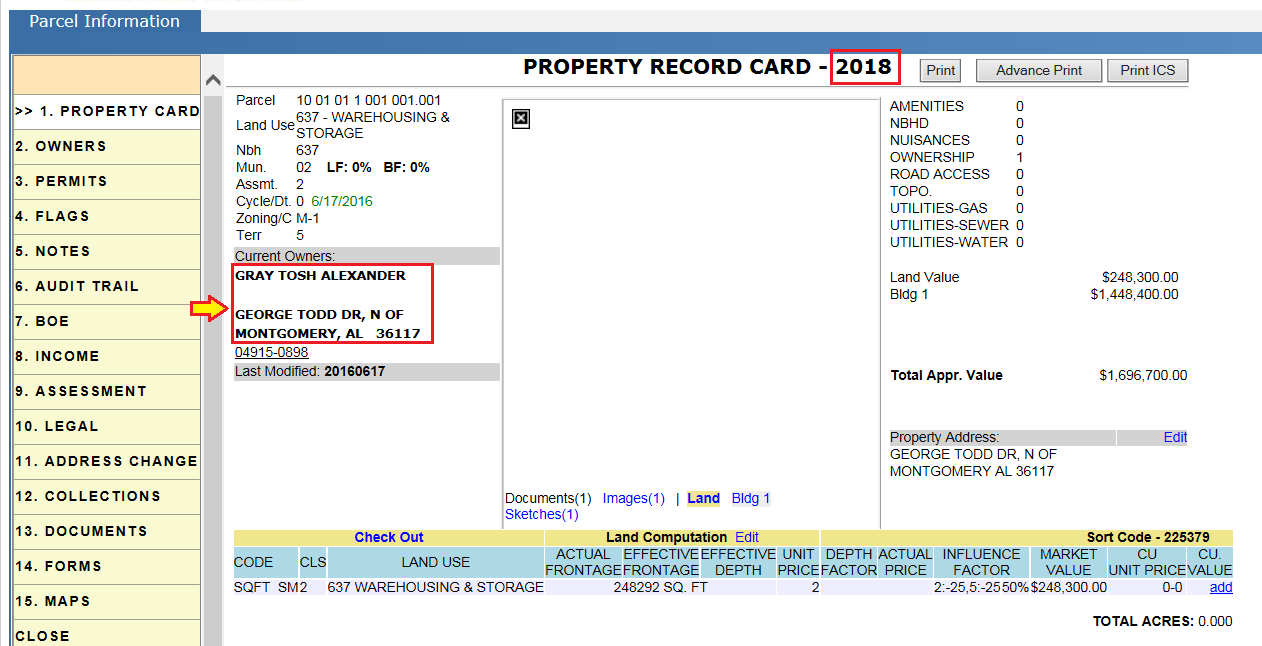
New Grantee applied to 2018 tax year:
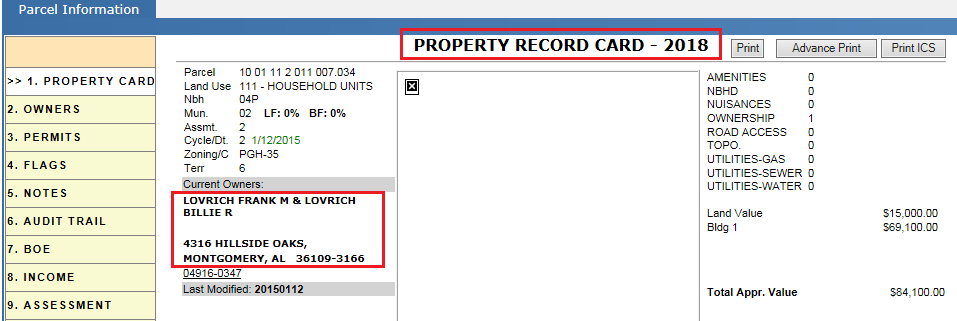
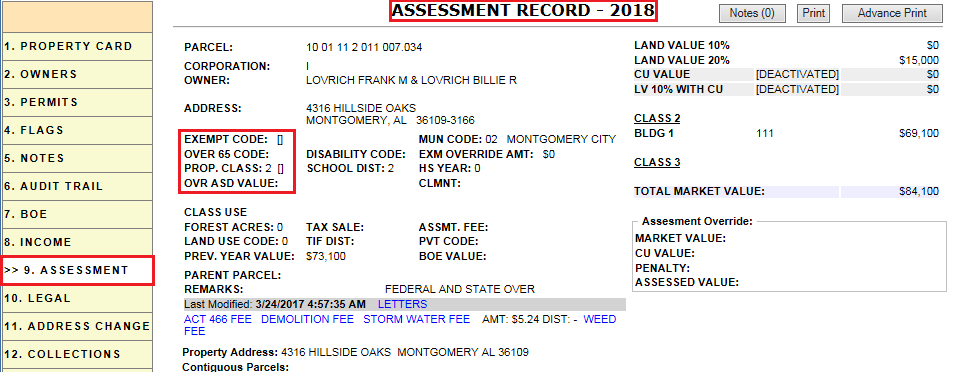
Assessment Details of Parcel for 2018: Exempt code set as None and Class is changed to 2 by default.
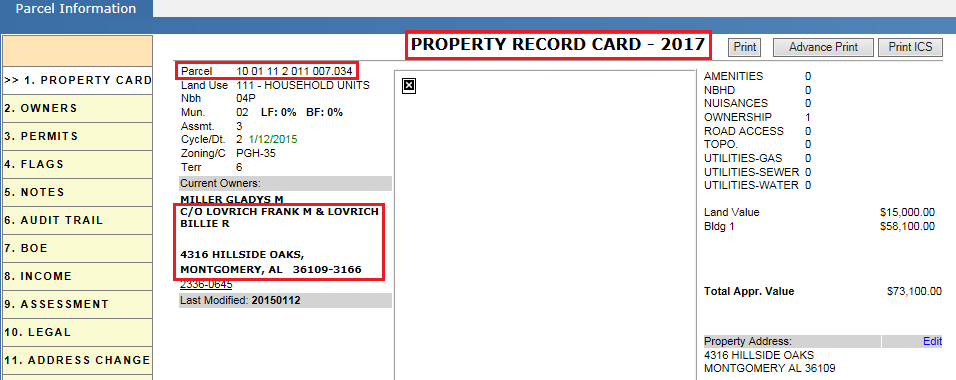
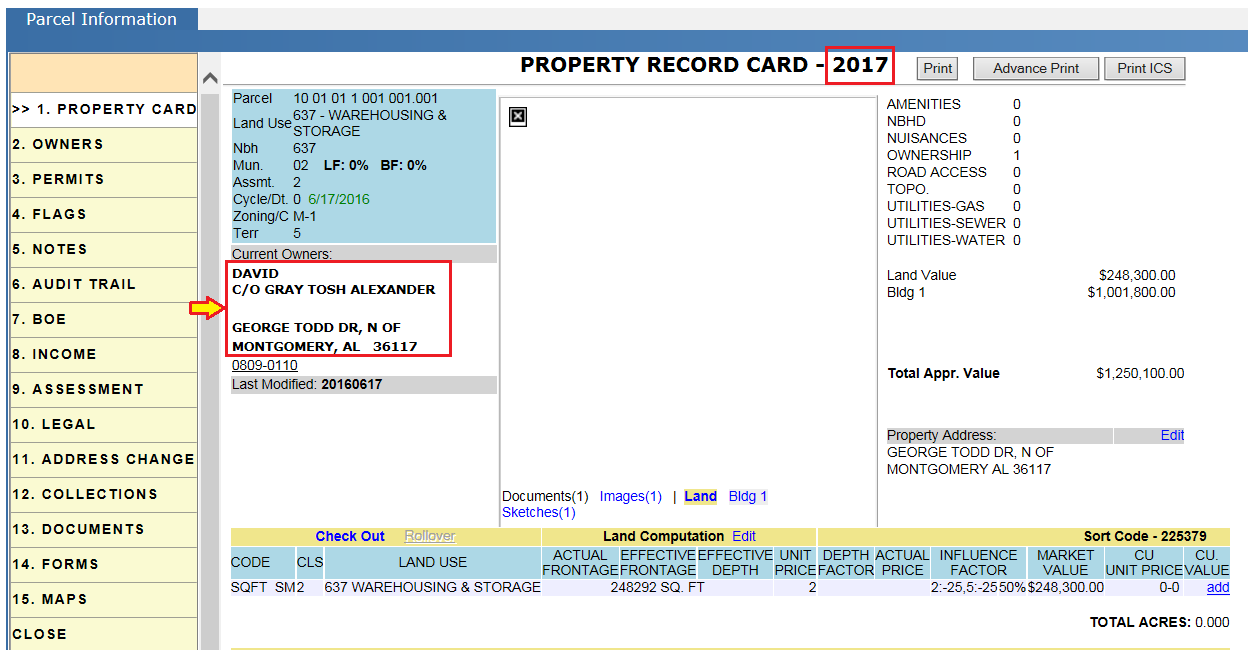
C/O name applied to 2017 tax year: The new grantee information is placed into the 2017 year as C/O. This happens because when the 2017 tax bills are sent out, the old owner (Grantor) is not interested in paying the tax bill for the property which has already been sold to Grantee.
If Parcel has Current Use
Current use is not removed from the parcel automatically when a name change occurs. Instead, Capture creates a CU Name Change flag type to notify the Appraiser(s). The appraiser is responsible for deactivating the current use from the parcel of respective tax year (2018). Also, appraiser users are responsible for printing the letter to new owner stating the CU was deactivated on the property. The new owner is required to apply for current use.
Current Use parcel assigned to a deed:
Update information on the name change screen as before and checkmark the Name Change as complete.
Name change and c/o will be applied to the 2018 & 2017 as usual.
Flags tab of the parcel: A CU flag is generated after marking the Name Change as complete. The Assessment Name Changed flag is an optional setup item.

Audit Trail: Name Change completion through deed is audited.
An audit of the appraiser deactivating the current use on the parcel.
Letters will be mailed to the new owners indicating that CU has been deactivated on the property. Then the new owner should apply for current use.
Mixed Class:
Mixed Class: If parcel has a discrepancy in the Main class and Item class then Capture tracks that property as Mixed Class. To retain mixed class after processing the name change, the user should apply mixed class manually to the parcel.
Deed Register:
Name Change Screen:
After making the changes and updating the information in the screen, mixed class from the property will default to class 2.
Audit Trail of the Parcel: The class which was updated in Name Change should be Audited.
Name Changes for multiple parcels:
In case of a deed with multiple parcels, Capture has a way to perform name changes for multiple parcels at once.
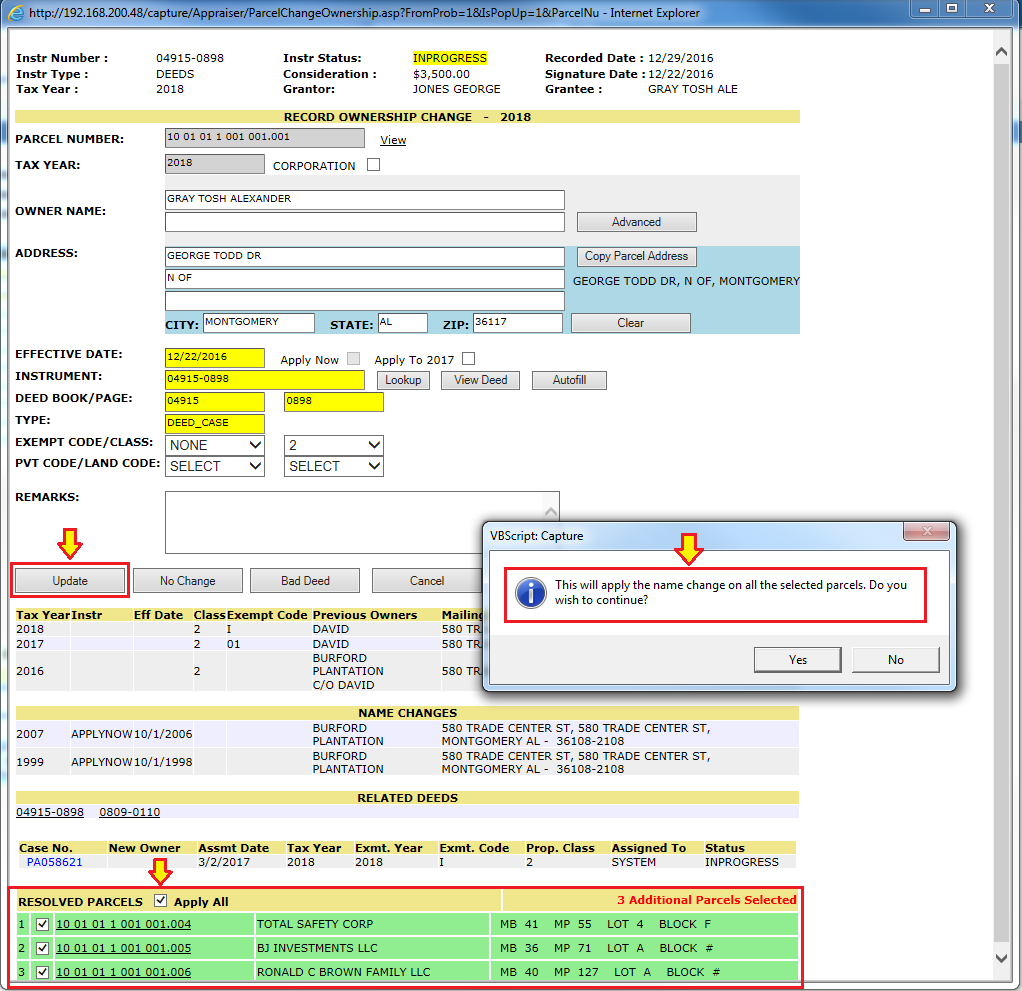
1. In Assessment Tab – under name change field click the Change hyperlink for a parcel.

2. To perform a name change for multiple parcels, select the parcels and click Update. All the parcels that were selected are updated with same name and address information.
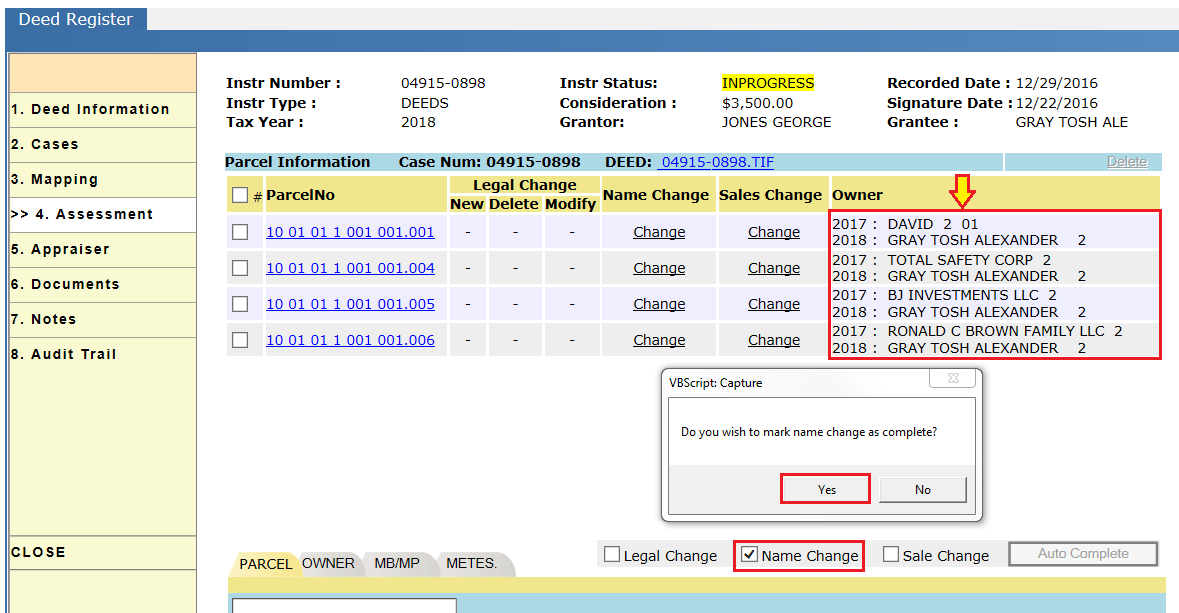
3. Checkmark the sub-case Name Change as complete.
Flags generated after completion of the Name Change: Assessment Name Changed flag is optional an optional setup item.

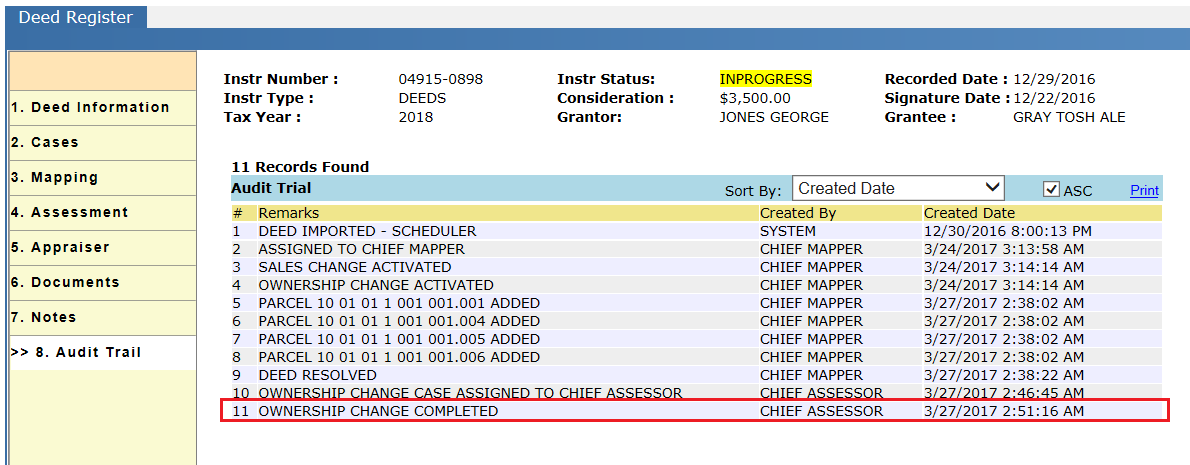
Verify the Audit Trail of the Deed Dashboard:
4. If the deed was assigned, it is Audited.
5. Name Change is Audited.
Audit trail of the parcel (2018): Information like Name Change and Exempt Code are Audited.
Audit Trail of 2017: A C\O is audited in Current Year-1(Current year means the Tax Year on which deed was worked).
Verify the changes in the all the PRC’s:
New Grantee applied to 2018 tax year:
C/O name applied to 2017 tax year: We are putting new grantee information in the 2017 C/O, because when the 2017 tax bills are sent out, the old owner (Grantor) is not interested in paying the tax bill for the property they no longer own.
Deed Processing – Sales Recording
Sales Recording: This process is to determine whether the sale is a Valid or Invalid.
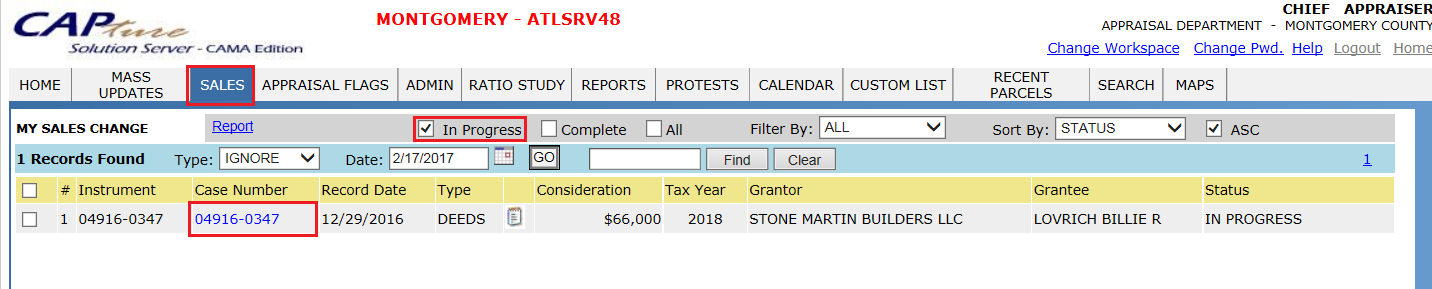
To perform sales recording, the user should have the permissions for Update Sales. This process gets initiated when a deed, with sales price, is processed by a mapper. Once the Mapper processes the deed that has a sales price, a sales change sub-case is created for the deed. Analysts/users can work sales recording sub-cases only after it is assigned to them. After resolving the deed, the sales sub-case is assigned to the respective user automatically. The sub-case may be reassigned to another user. Sale changes that are assigned to users and not yet processed can be found by clicking on SALES and marking the checkbox In Progress. On this page, there is also an option to search a deed by instrument number.
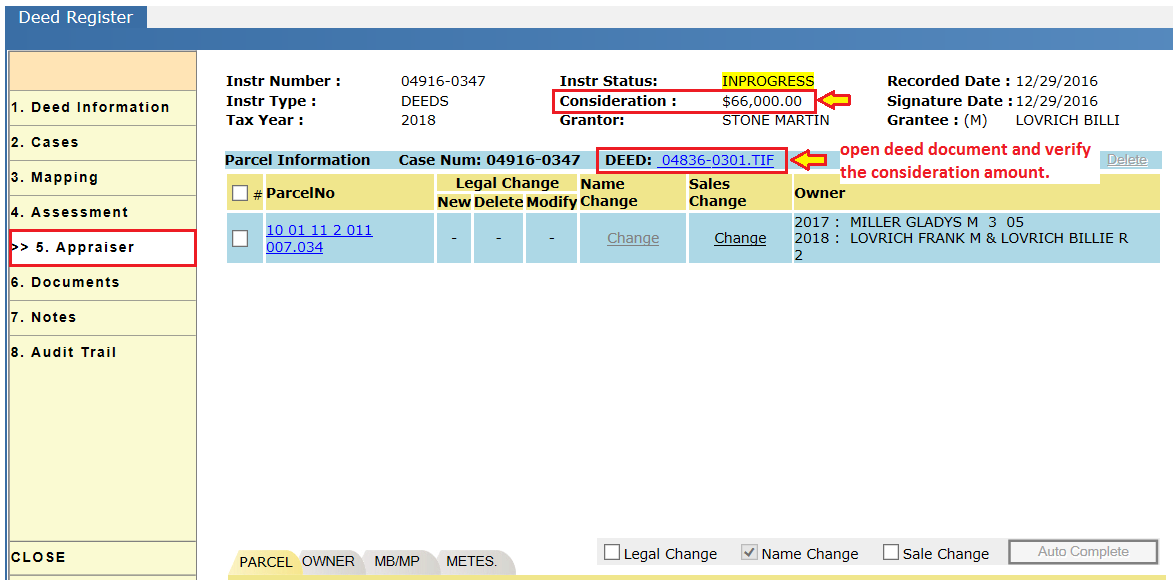
Go to Deed dashboard by clicking the case number hyperlink.
Verify the sales price on deed dashboard with respect to the deed document attached as they should be same.
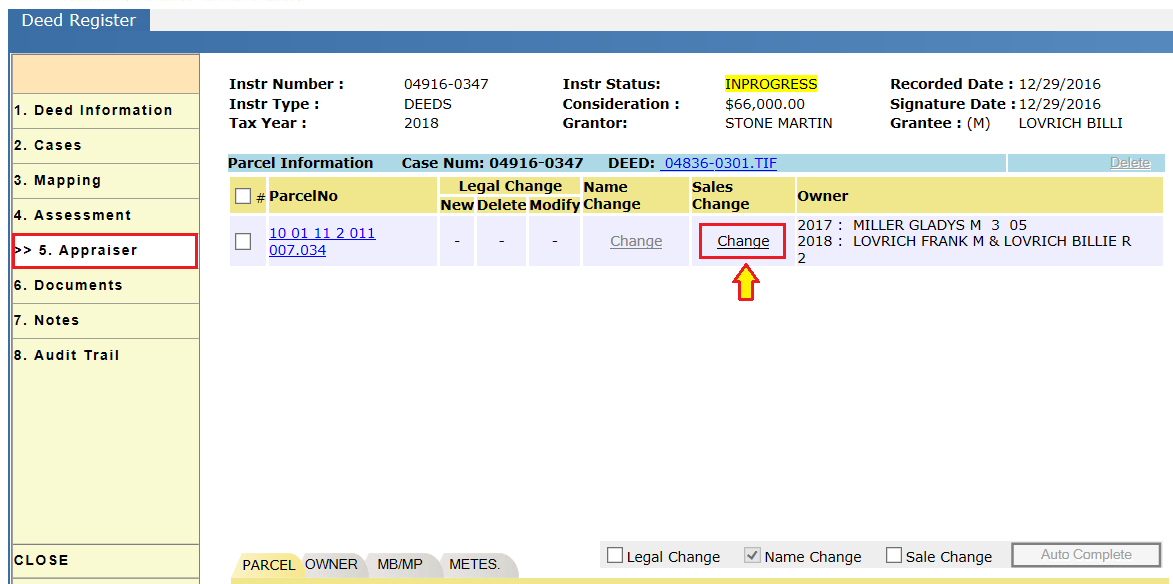
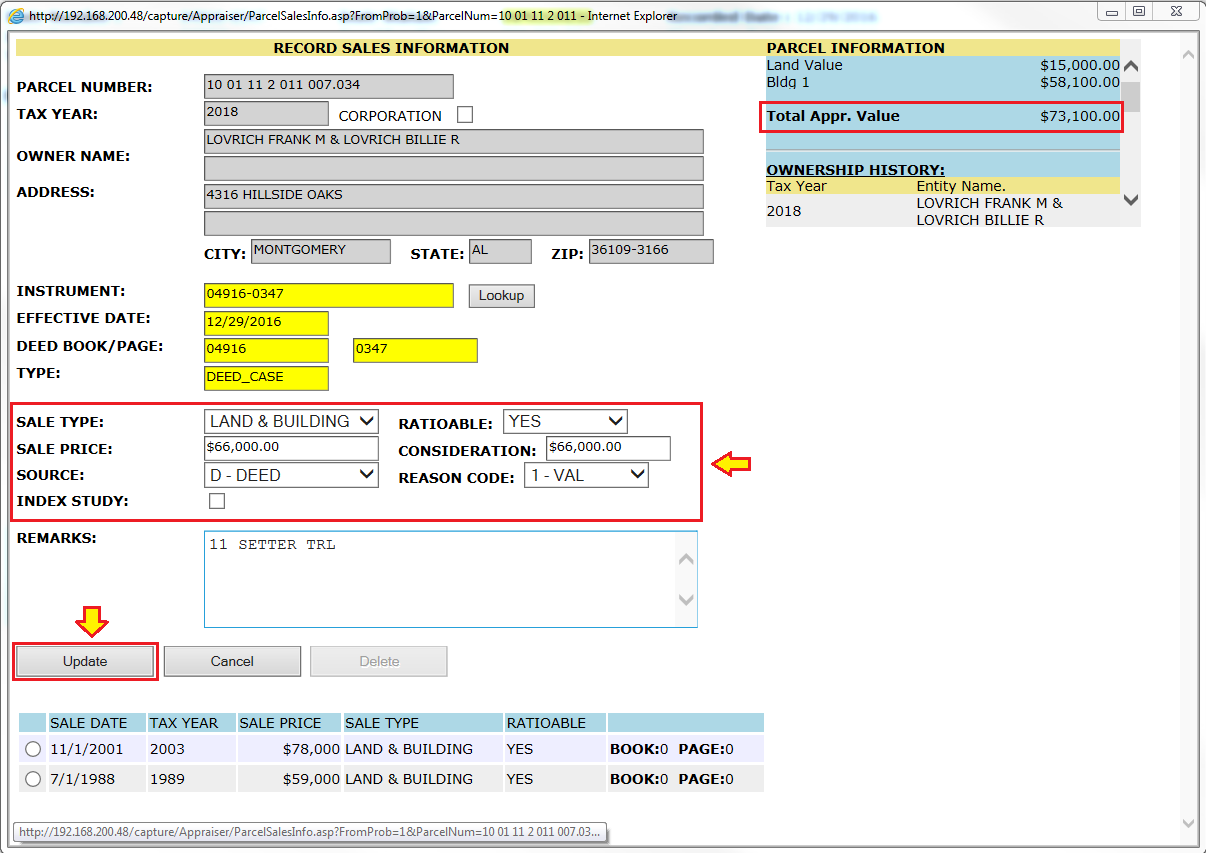
After verification, click the change hyperlink. The Record Sales Information window opens.
Compare the sales price with the Total Appraised Value. If the sale is valid then select the Reason Code as 1-VAL. If the sale is not valid, select the reason code as 2-INV. Likewise, select the reason code with respect to Sale price and click the Update button.
Note: For land, if the user notices the sales value is significantly high then mark it for Index Study. The reason behind marking it as index study is that there may be a chance of improvement value included with the land. From that, the county can get new replacement cost for the improvement. The County will adjust the cost index by comparing the replacement value with appraised value.
Mark the Sales change as Complete.
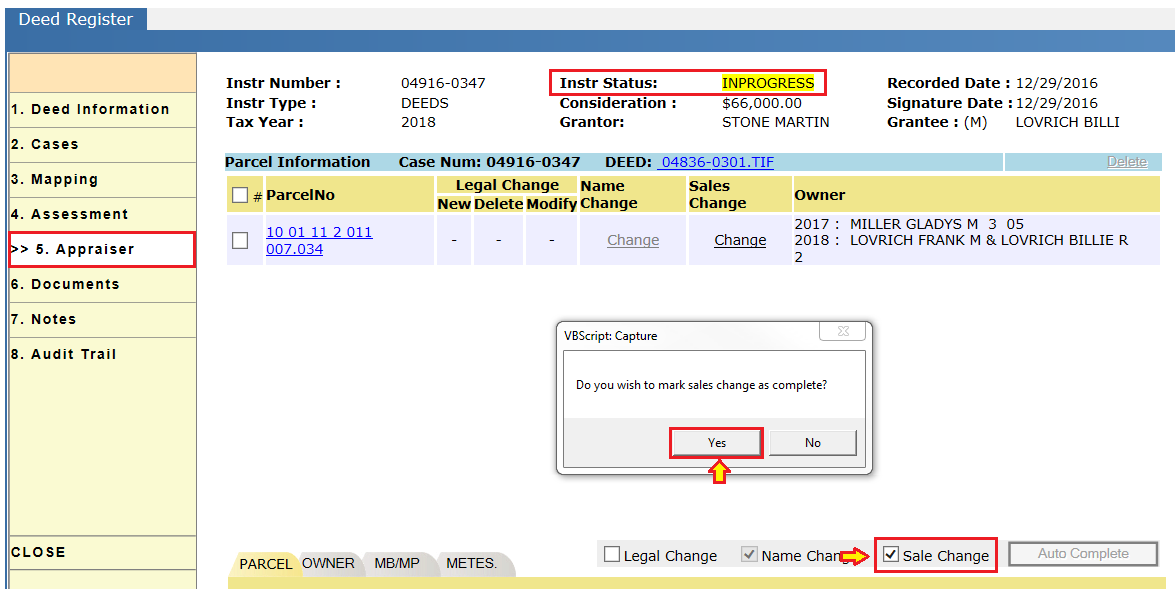
Once the all sub-cases for the deed are marked as completed, the status of the deed changes from In Progress to Processed.
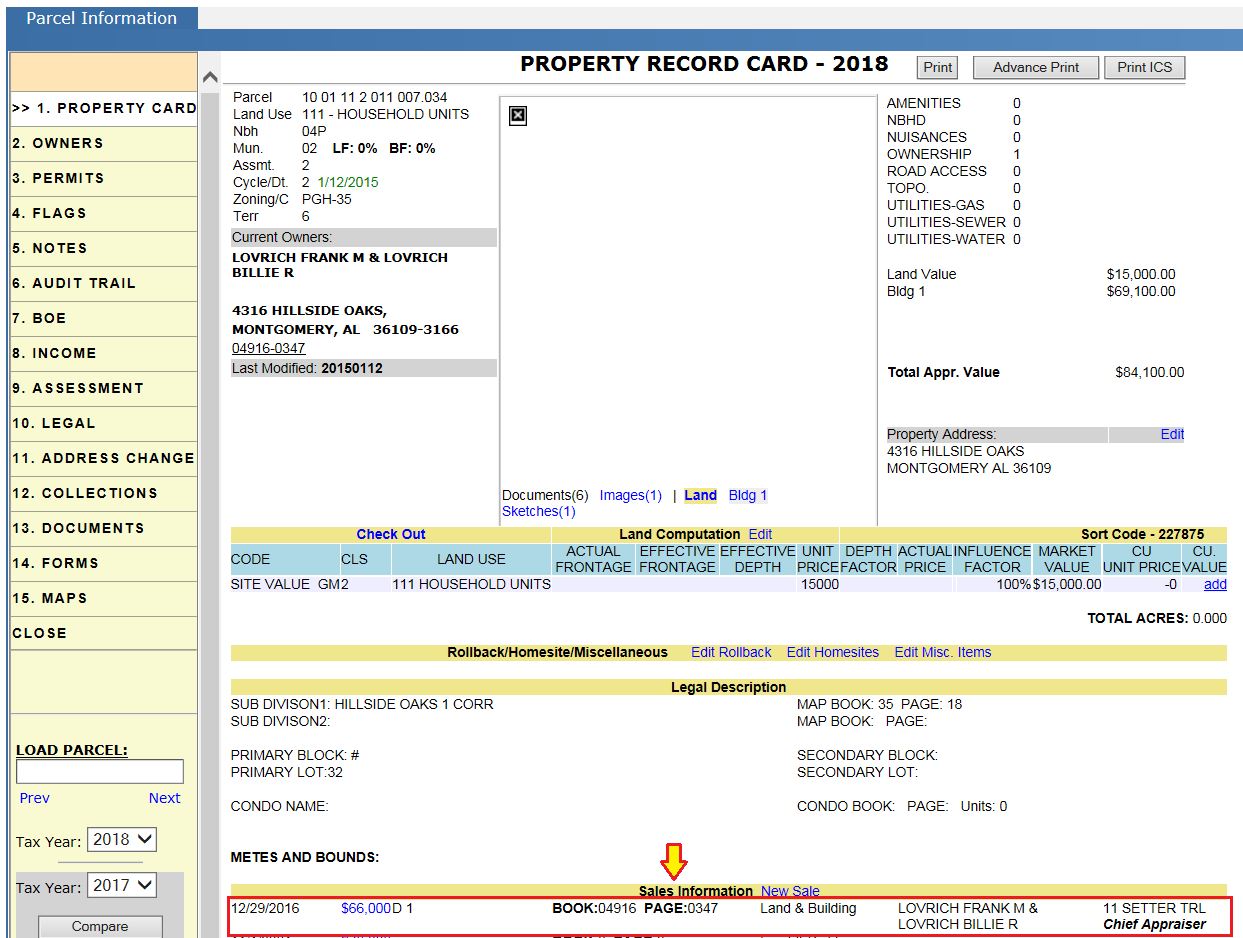
Verify the sales information on Parcel PRC.
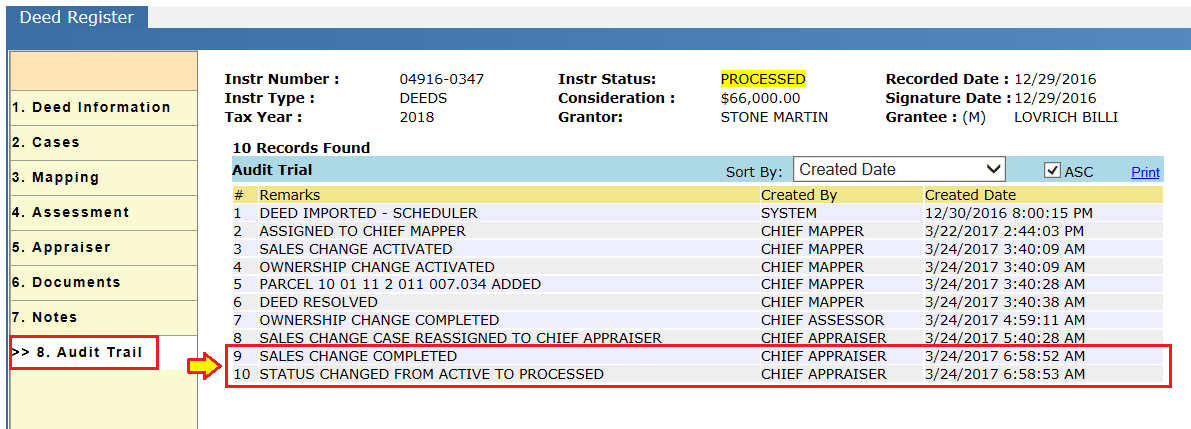
Audit trail of Deed Dashboard:
-
Completed Sales Changes are audited.
-
Reassigned Sale Change sub-cases are audited.
-
When all the actions on the Deed Completed, the Instrument Status Changed is Audited.
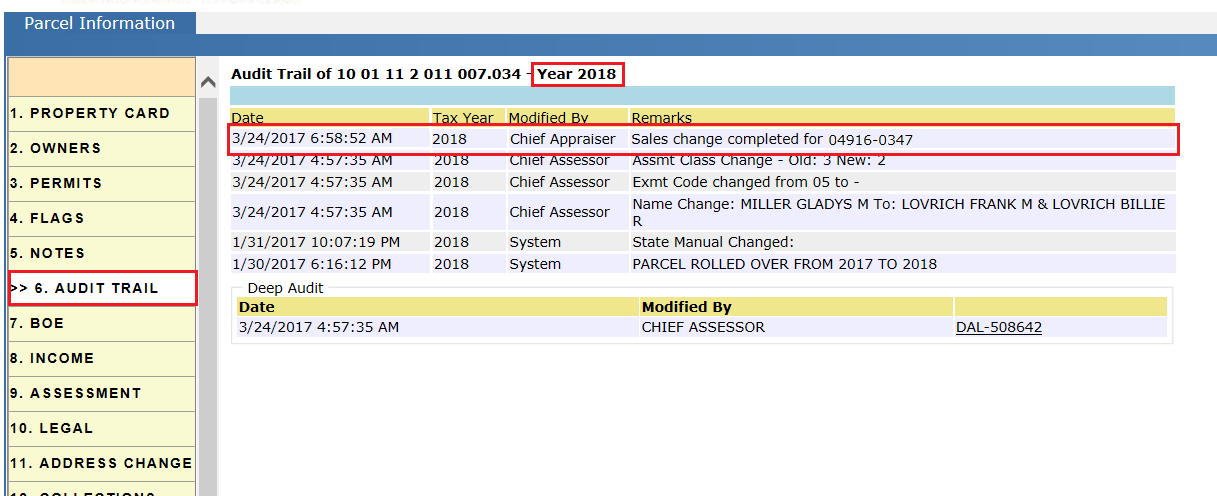
Audit trail of PRC for year 2018 (as deed for tax year 2018): The Deed through which a Sale Change was completed was audited in Parcel's Audit trail.
Reports used:
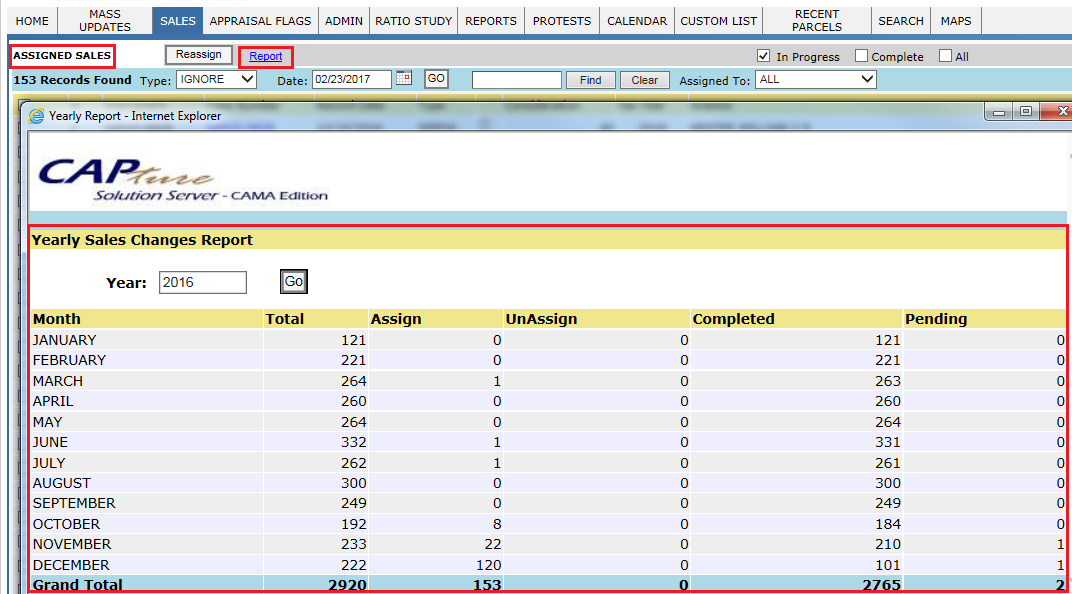
If the mapping user resolved the deed by marking sales changes, those deed cases will be auto assigned to the different sales change users. Also, supervisors can reassign the cases from Assigned Sales page (hover over Sales and click on Assigned tab) to different sales change users. Supervisors can use this report to reassign the assigned sales changes.

The User can see the detail count by clicking the report hyperlink.
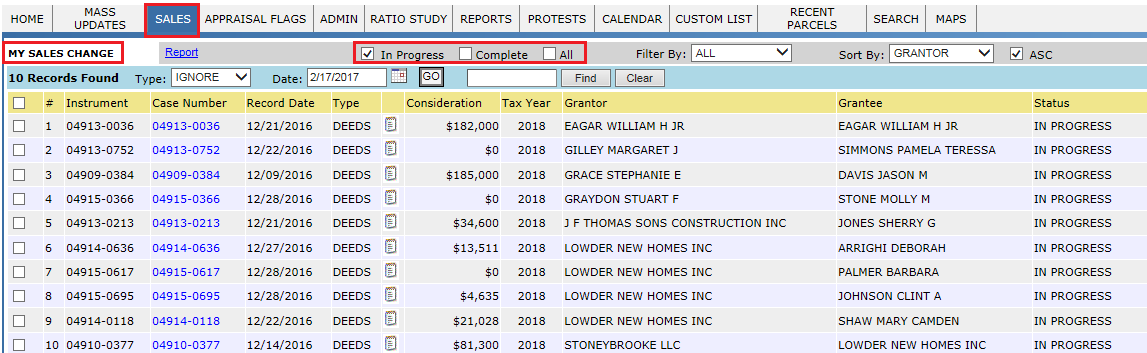
The cases that are auto-assigned or reassigned are seen on the Sales Changes (click on Sales tab) tab of the individual user. Individual users use this report to see the sales changes assigned to them.

Confidential | Copyright © 2017 E-Ring, Inc.