


Page Topics: Advanced Topics:
|
|
|
Taking Payments
Introduction
Once the abstract is generated, privileged User will create receipts for the amount due on each parcel. When a taxpayer comes to pay taxes, the receipt for the appropriate parcel is added to a transaction and the receipt is paid. Taxpayer can walk in or mail payment to pay the taxes. Capture has two ways to pay receipts i.e. Single pay and Group pay. Tax payer can pay the taxes in one or more transactions.
Single Pay - Check Payment (Full Pay)
Step 1: User should load receipt which is going to paid, by using the format “r Receipt Number Z” (Without spaces). By using this format receipt will automatically opened for the user.
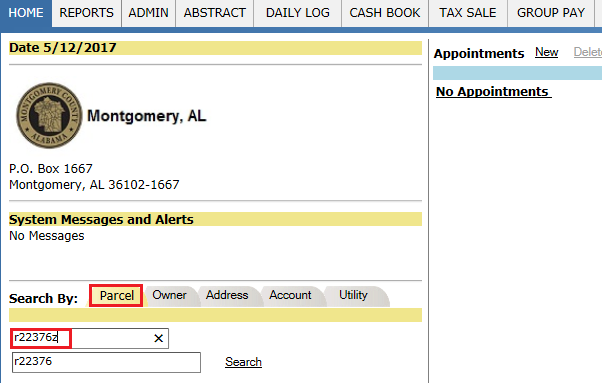
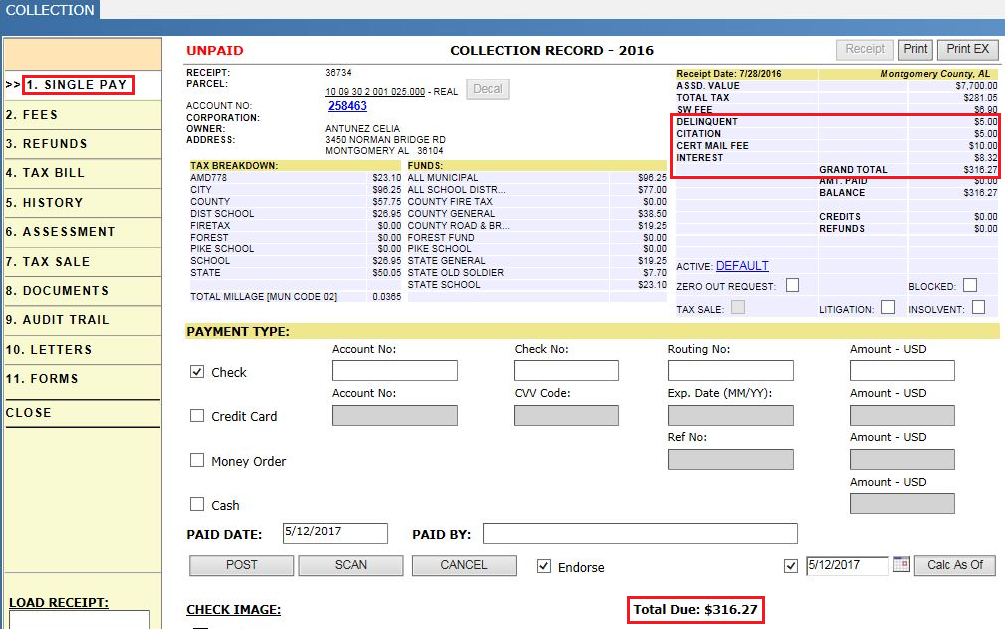
Receipt: As the tax amount on this receipt is still not paid, on the top of the receipt it shows the status as Unpaid and below it shows the Total due that should be paid by the tax payer.
The following information provides a detail of the Single Pay screen and how it appears when a receipt is paid and unpaid.
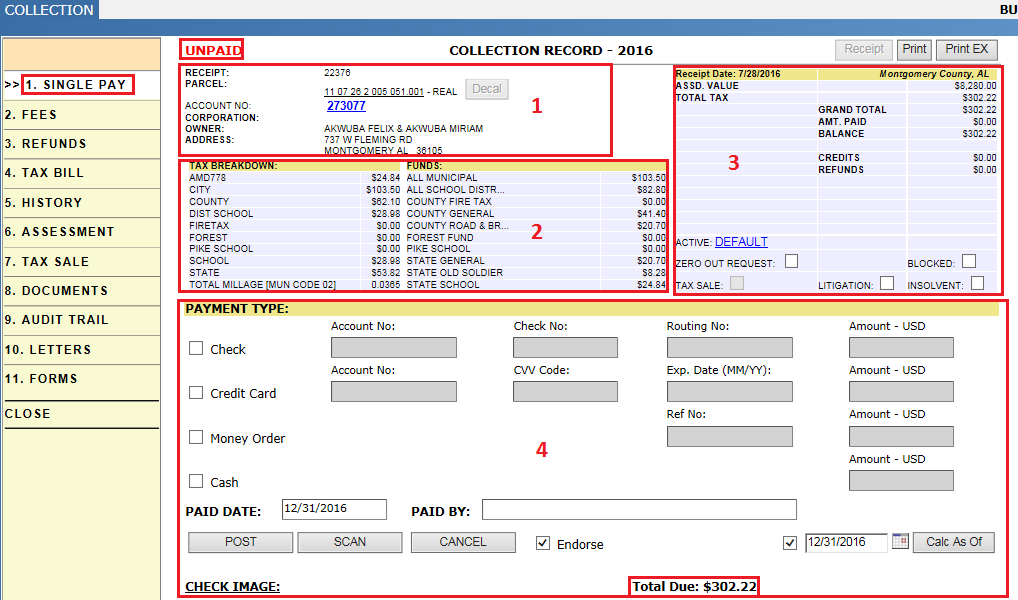
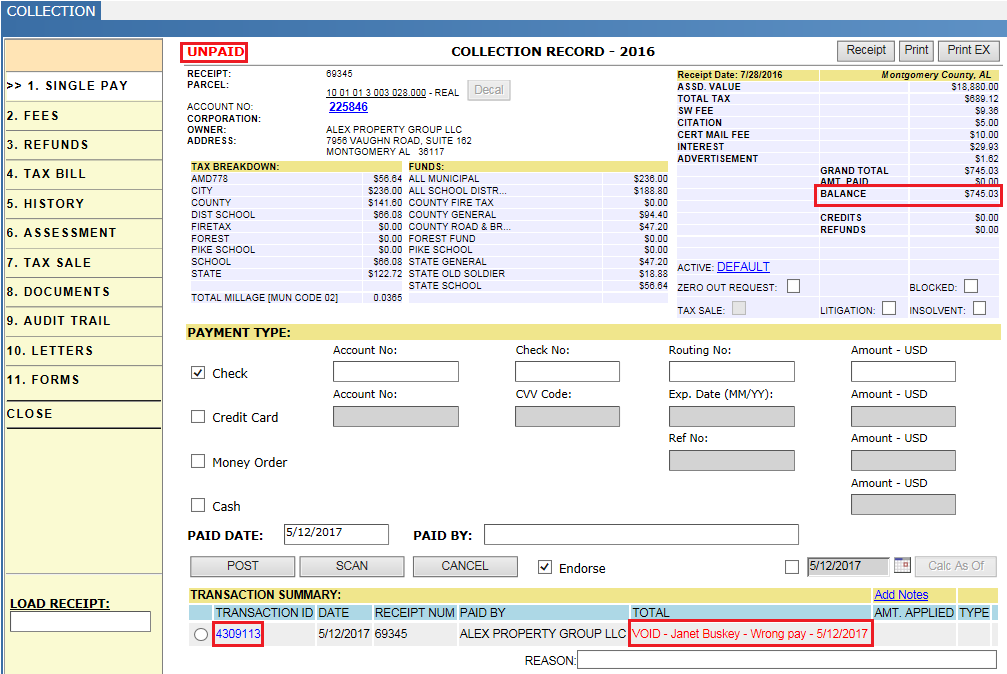
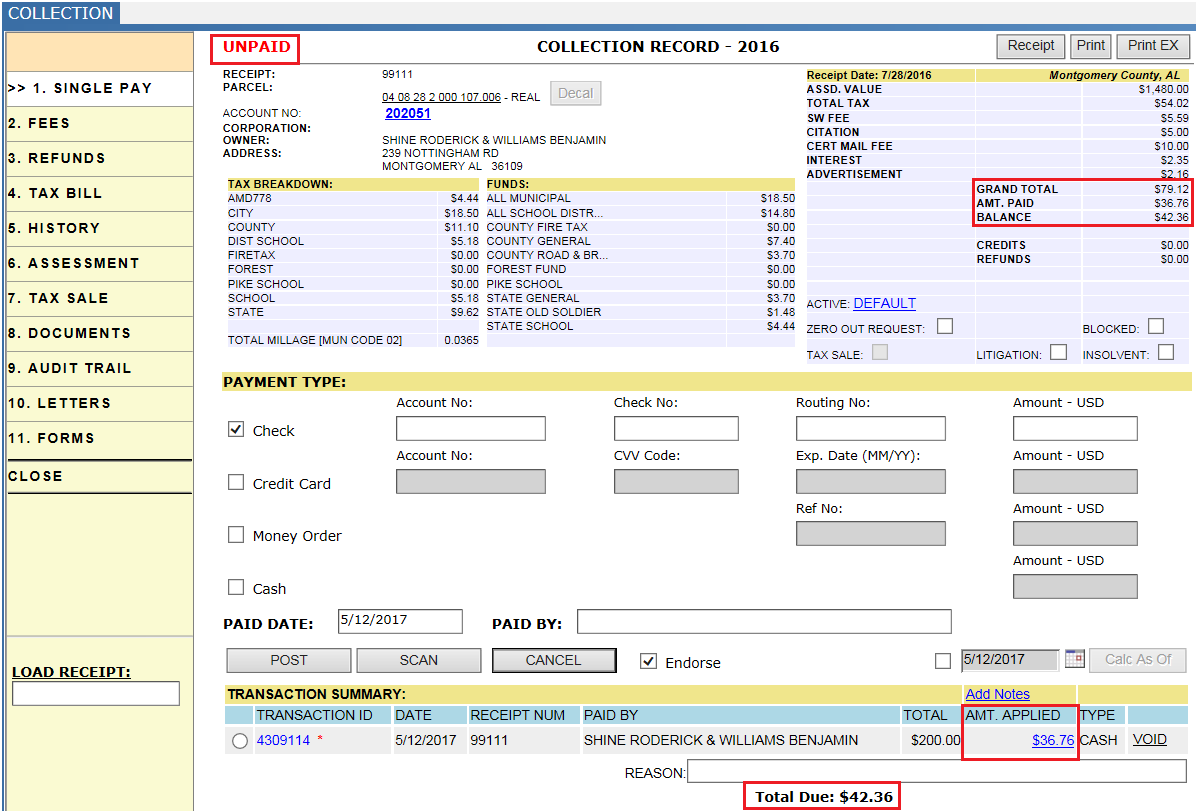
Collection Record: Displays general information about the receipt, including receipt number, parcel number, the owner name on the parcel, and the address. Clicking the Parcel Number opens the PRC. The receipt status is also Shown-Unpaid. The Decal button is available if an Ad Val decal needs to be issued for a manufactured home.
Tax Breakdown: Displays a breakdown of taxes owed, along with the total millage used in calculating taxes, and the municipal code. There is also a breakdown by fund that displays what is owed to each fund individually from this receipt.
Receipt: Displays the assessed value, total tax due, any fees and interest, the grand total, and whether the bill has been paid (Amount Paid). If the bill was paid but a balance remains, then that is displayed in the Balance row. Any credits or refunds on the receipt are also displayed.
Active: The batch that this receipt is a part of is displayed. To update the active batch, click the batch name hyperlink.
Zero out Request: Alerts the assessor that there is a zero-out request after a supplement has been released.
Blocked: Allows for the manual addition of blocks to the receipt.
Tax Sale: Displays whether a parcel has been sold in tax sale.
Litigation/Insolvent: Select the corresponding checkbox if the current year receipt is to be marked insolvent or under litigation.
Payment Type: Displays the payment types that are accepted on an unpaid receipt. When a teller takes a payment, User should checkmark the correct payment type and then enter any necessary information in the fields provided.
Note: when taxpayer wants to pay taxes using credit card, taxpayer can swipe the credit card that will populate account number, expiry date etc. information automatically, if not user can manually enter that information.
Paid Date: Defaults to the teller’s Daily Log date currently open.
Paid By: Enter the name of the person paying the bill.
Post: After filling the required fields User must click on Post to process the receipt.
Note: Capture will keep track of the taxpayers, who have both real and personal property. So, taxpayer should pay first personal property taxes. if the tax payer tried to pay real property taxes first, capture will block the POST button, by saying it has Unpaid personal property taxes. Similarly, if taxpayer have unpaid insolvent taxes and taxpayer came to pay regular tax, capture will through a warning saying
that it has unpaid insolvent taxes.
Scan: This is Used to Scan the checks given by taxpayer. If a check image is scanned, then that image will populate below the Payment Type section.
Calc. As Of: If interest and fees must be adjusted, check the box and enter the date then click the Calc. As Of button.
Total Due: The amount owed on the receipt.
Note: Based on the Capture setup, if the receipt got paid in time there will be no Fees applied on that receipt. If the Receipt is still unpaid after crossing the time limit, respective fees and interest will be applied on that receipt based on capture setup.
Step 2: Select any one of the Payment type and fill the required fields (Amount, paid by etc.) and click on Post Button.
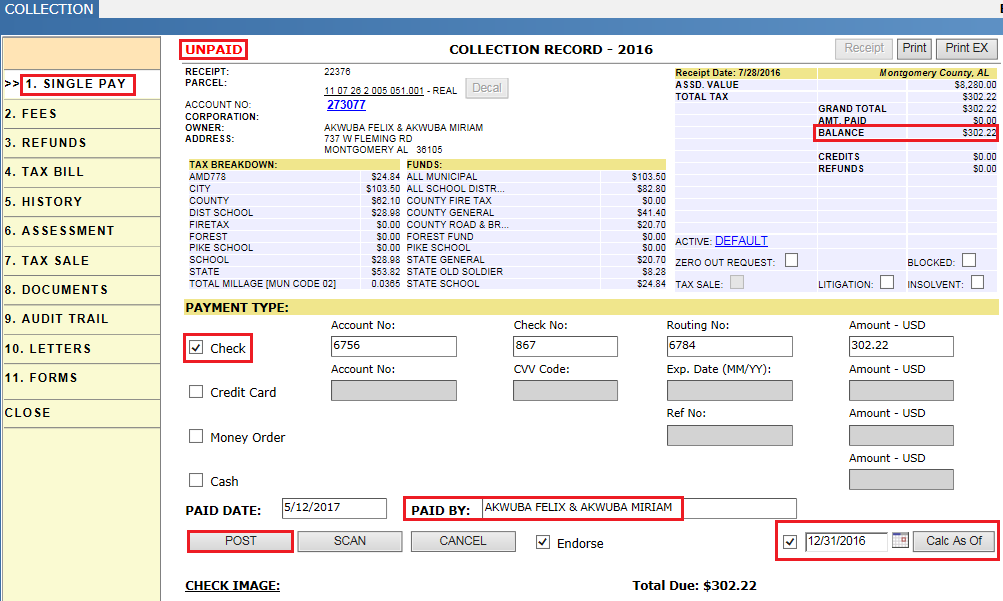
Note: If user selects one of the payment types other payment types will be disabled. User can’t do two types of payments at the same time.
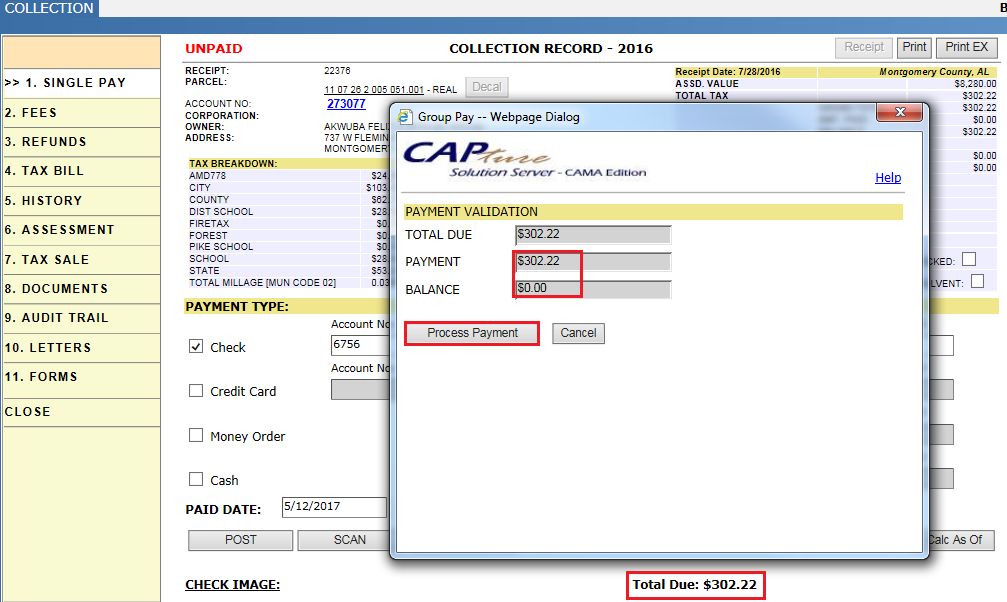
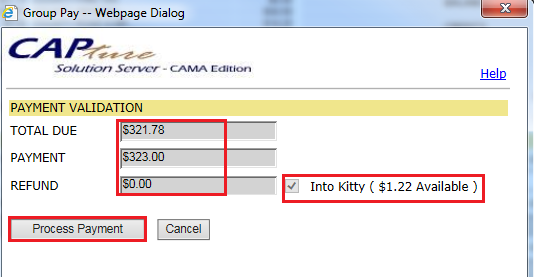
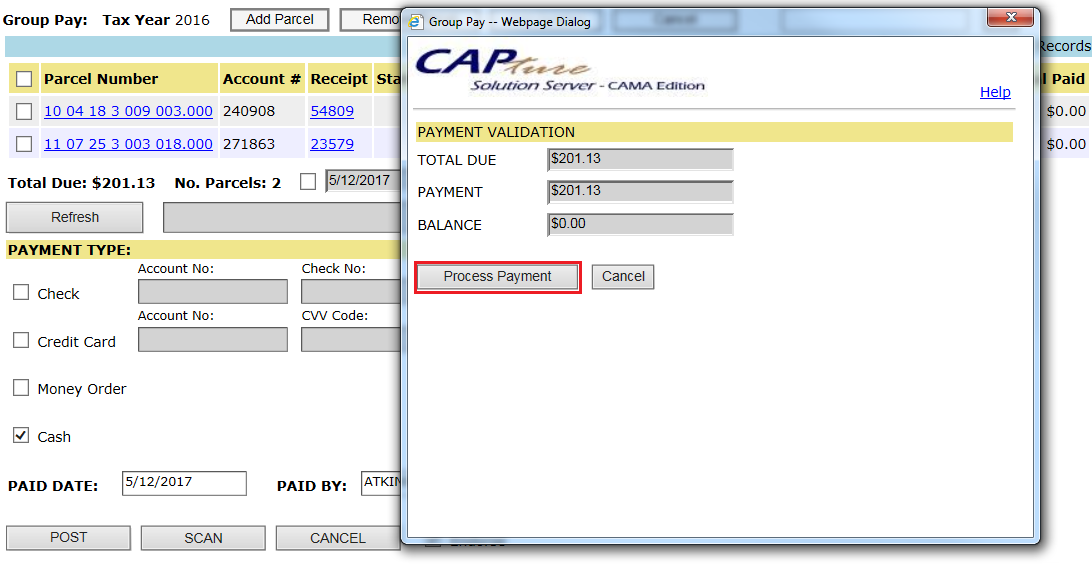
Step 3: User should Verify the payment and balance and click on Process Payment.
Note: If the user pays extra amount than the due, if the extra amount is in the limit of Kitty it will go to kitty else the amount will be refunded to the tax payer in both single pay and Group pay.
After click on process payment, Receipt Print will be generated automatically (only for single pay) based on capture set up which gives information regarding tax amount and parcel information.
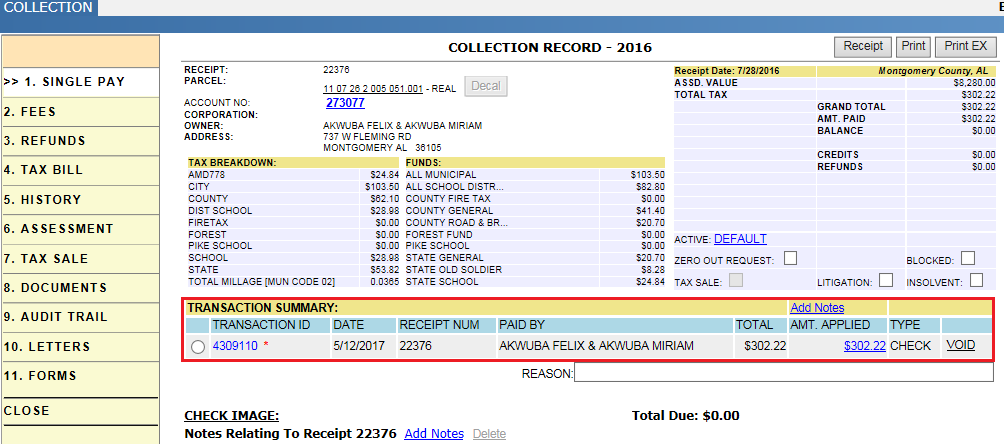
When the person pays the tax bill, the payment information will be updated into Capture and a Transaction ID is generated for that transaction. User can see that under Transaction Summary section.
Verification:
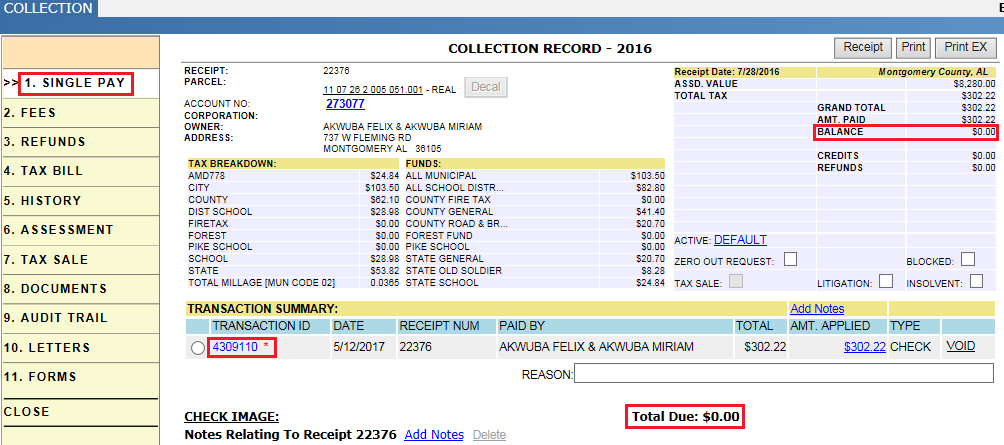
In the receipt: Once the receipt got paid, the status of the receipt changed from unpaid to None. And the balance and Total Due will be changed to $0.00.
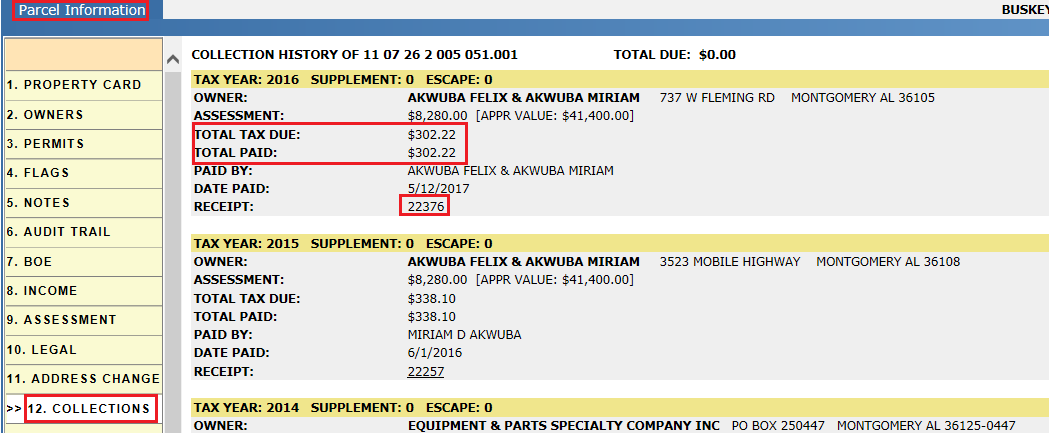
In parcel Dashboard: User should verify, the total tax due is paid fully or not. Total tax due and Total Due should be same.
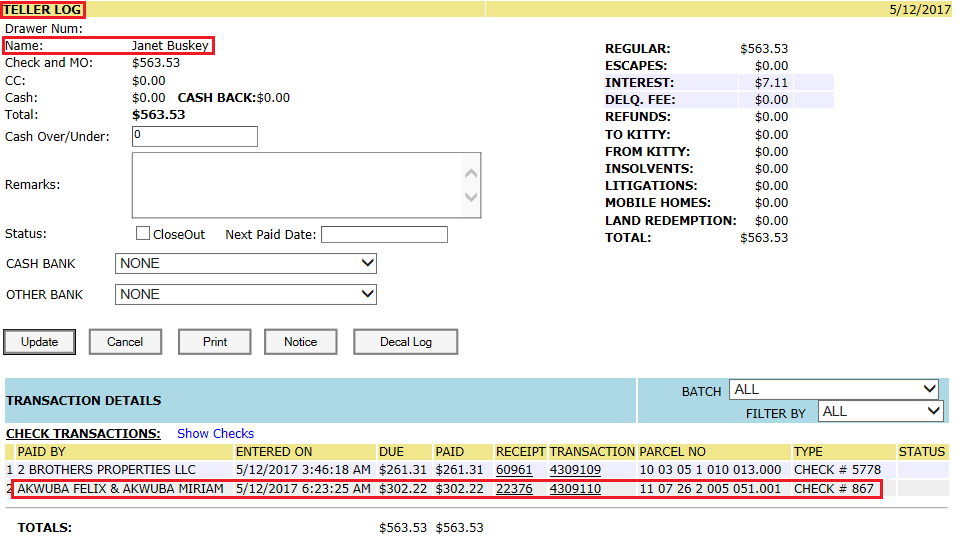
Daily Log: After Receipt is paid that transaction should come under daily log. User can see this transaction by creating New Log and selecting the respective User.
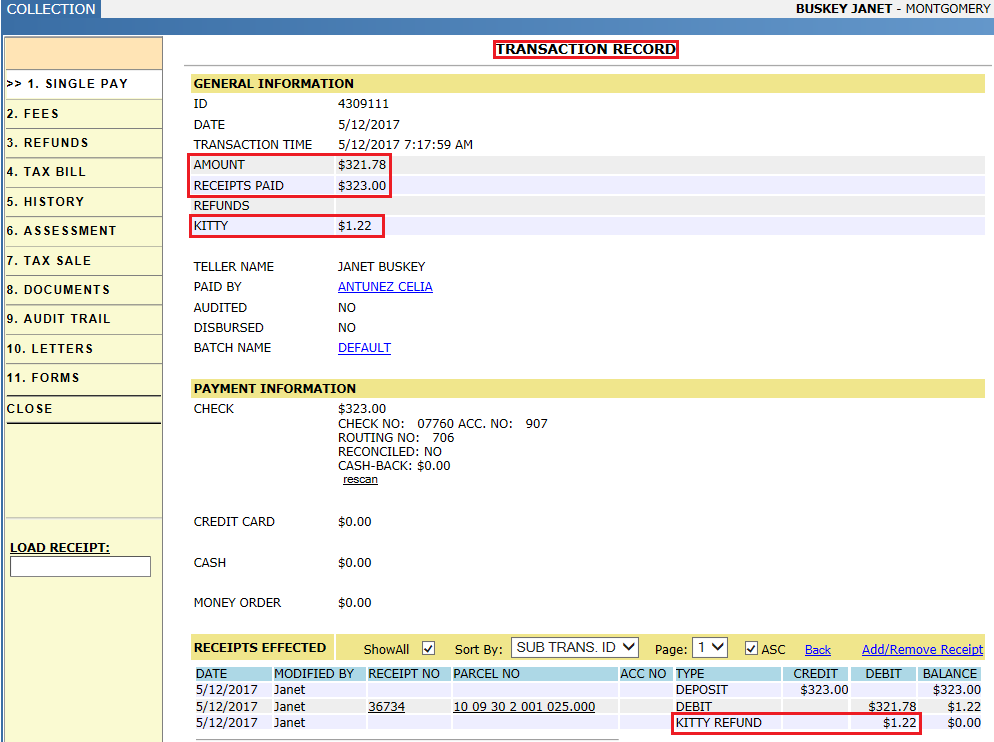
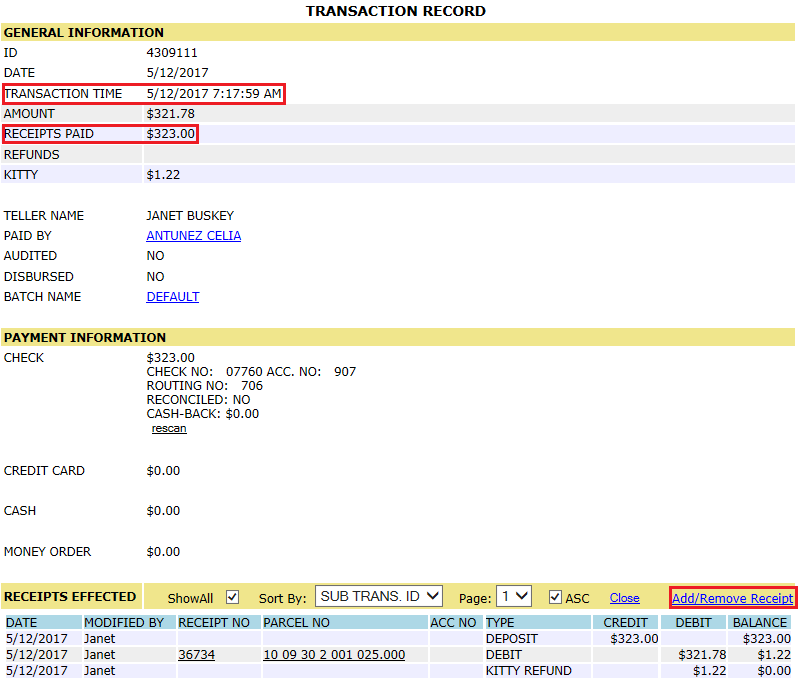
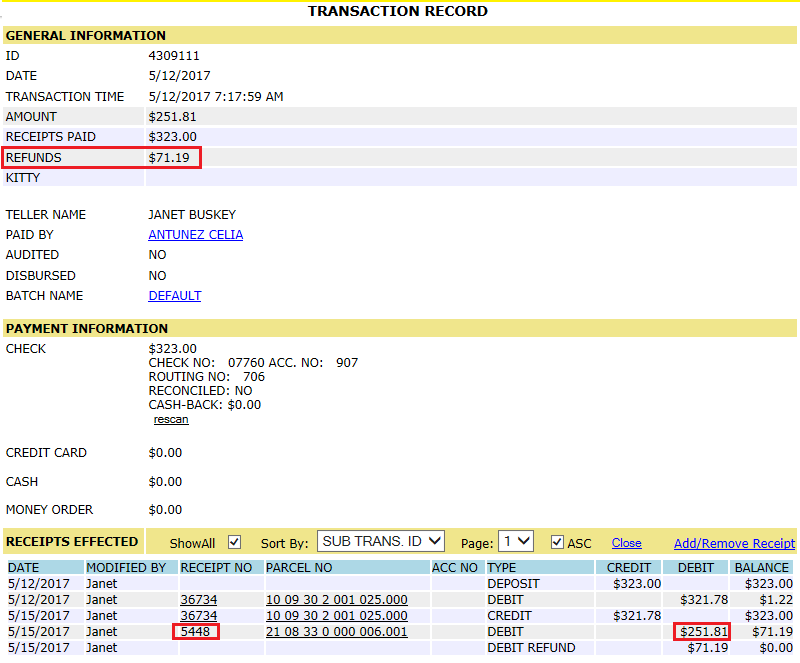
Transaction record: Click on the Transaction Id hyper link, it will open transaction record, there user can see details about the transaction.

General Information: Displays information about the transaction.
ID: Displays the identification number assigned to the transaction.
Date: The date the transaction was paid or posted. The date can be changed by users with the correct permissions. The transaction will appear on the Daily Log which matches this date.
Transaction Time: The time in which the payment was processed in real time. The date here will not always match the transaction date.
Amount: The amount that was paid (not necessarily the amount due).
Receipts Paid: The total amount paid towards the receipts.
Refunds: The total in refunds generated from the transaction (this includes refunds for overpayments and refunds for any receipts that were removed).
Kitty: Displays any money taken from or sent to Kitty.
Taxpayer and Teller Information: Displays information about who paid and who processed it.
Teller Name: Displays the name of the teller who took the payment for the transaction.
Paid By: Displays the name of the person who paid. Clicking the name opens the Edit Transaction Paid By page where the paid by name on the transaction can be adjusted with the proper permissions granted.
Audited: Displays whether an audit has been performed on the transaction.
Disbursed: Displays whether the transaction has been disbursed.
Batch Name: Displays the name of the batch in which it was processed. If no batch was created, then it is named “Default.” Clicking the batch name opens a page where the batch can be updated (with the proper permissions).
Payment Information: Displays information about the payment used to cover the transaction.
Check: If the transaction was paid by check then information about the check is available. It shows how much the check was written for, the check number, account number, and routing number that was entered when payment was taken. If the transaction was reconciled then it is noted, as is any cash back that was given. Clicking re-scan allows for the check image to be re-scanned if necessary.
Credit Card: If paid by credit card, then the amount is shown.
Cash: If paid by cash, shows the amount tendered and the change issued.
Money Order: If paid by money order, then the amount is shown.
Receipts Effected: This section tracks the actual movement of money from the transaction as it is applied and sometimes removed from receipts. Each receipt and how much was paid on the receipt is shown. The Credit column shows what was paid and the Debit column shows the amount applied to each receipt. The Balance column shows the amount of money remaining on the transaction. If a check was returned, then it is shown as a credit and then debit since it was initially a charge but then taken back.
Clicking the Add/Remove Receipt hyperlink opens the Add/Remove Receipt from Transaction page. Receipts are removed or added for a receipt here. How to add/ remove receipts is discussed in further cases.
Bad Transactions: Allows for the transaction to be marked bad for a variety of reasons.
Returned: Checks that have been deposited and returned must be marked here. The reason for why the check is being returned is provided in standard statements that can be selected (reasons include):
-
Insufficient Funds
-
Account Closed
-
Endorsement Cancelled
-
Stop Payment Order
-
Other
Void: If a transaction has not yet been deposited, then it can be voided.
Revert Kitty: When overpayments are pushed to Kitty, this button allows the teller to refund the difference instead.
Check Payment - Using Kitty
Consider a receipt in the delinquent list, and pay excess amount of $1.22. As this receipt in delinquent list, respective fees will be applied on this receipt. Like Delinquent, Citation, Certified mail fee, interest etc.
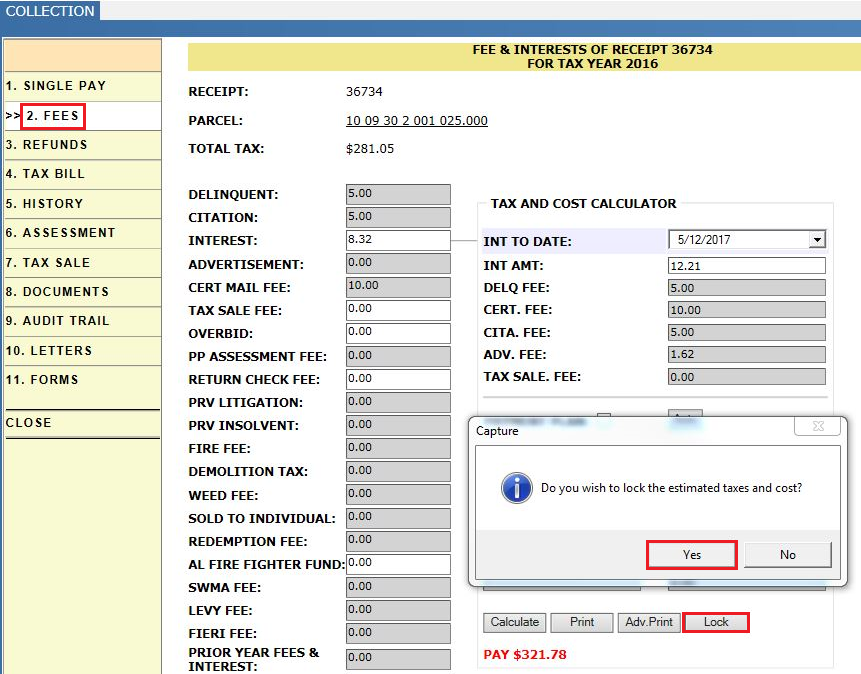
Step 1: Open a receipt and verify the fees applied and interest on that receipt. Tax payer should pay the interest till the day of payment (based on capture setup), user should do Calc. As of and lock the tax should be paid.
In required cases if user should not apply tax on that delinquent receipt, in the fees tab user can check mark the Stop INT and Fee calculation and Update the tax due.
Step 2: Click on Calculate, it will calculate the interest up to the payment date and fees as per the fee Schedule setup.

Step 3: User should Lock the New tax due. Now tax payer should pay this tax amount. Once the value got locked in Tax and cost calculator region, these values will reflect in the beside region where all the fees are listed.
Step 4: Fill the required fields and click on Post.
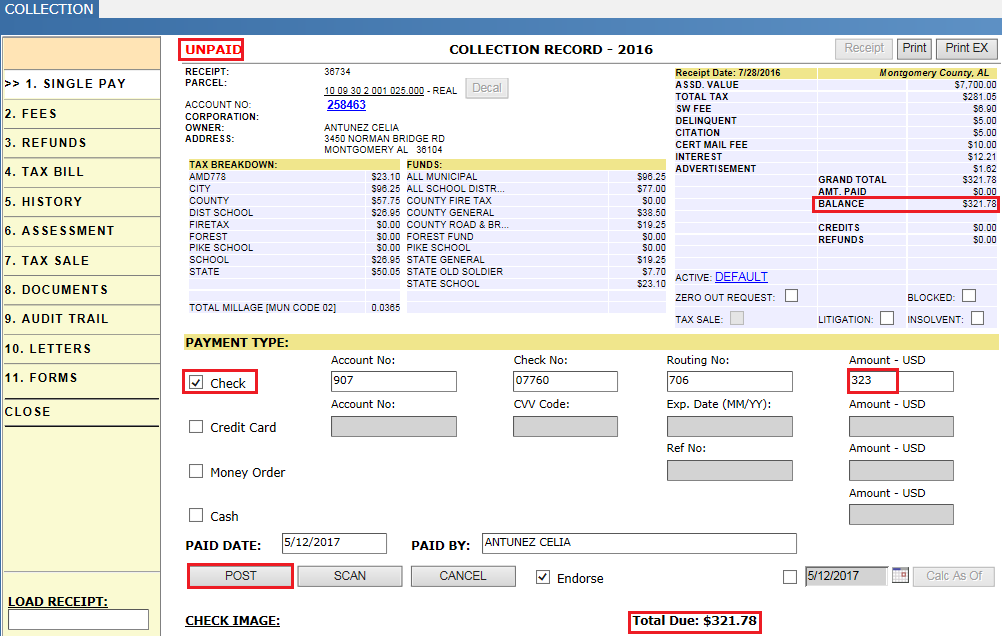
Step 5: Verify, as the total due is $321.78 but tax payer paying $323, based on the kitty setup the remaining $1.22 will be moved into Kitty. Click on proceed Payment.
By clicking on Transaction link, user can see the details of kitty:
User can also see the kitty amount under daily log of respective teller.
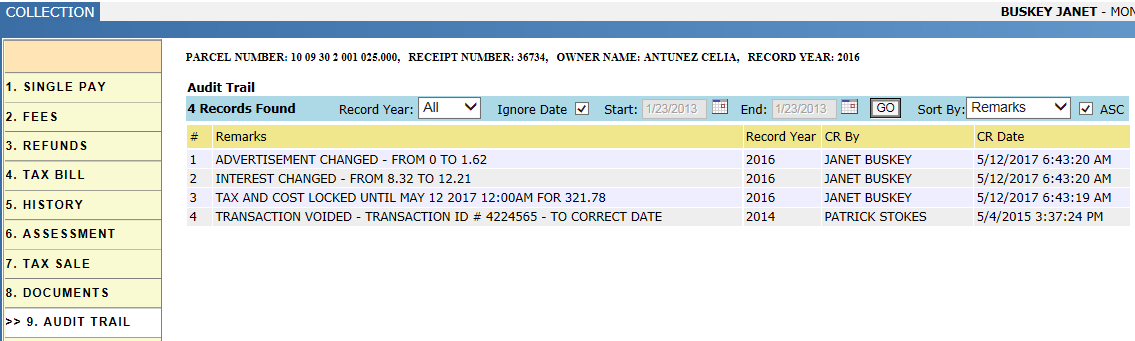
Verify Audit trail:
It should contain all the changes done to the receipt. Change in the fees, interest etc. with respective details like who and when changed those values.
Case 3: From Kitty – Similarly, if tax payer pays tax due with short of very less amount (i.e. in the limit of kitty), based on capture setup that amount can be drawn from the kitty to pay the full amount of that receipt.
These From and To Kitty details can be verified by user under daily log, which is explained in further sections.
Void Transaction
Set up case: Cash Payment – Pay the full amount of receipt and void that transaction.
Step 1: Open the receipt and pay the full due.
Step 2: Give the reason to void and Click on the Void link in the transaction summary. Pop-up will open to confirm the void the transaction click on OK.
Note: User can void the transaction only before the amount got deposited into bank.
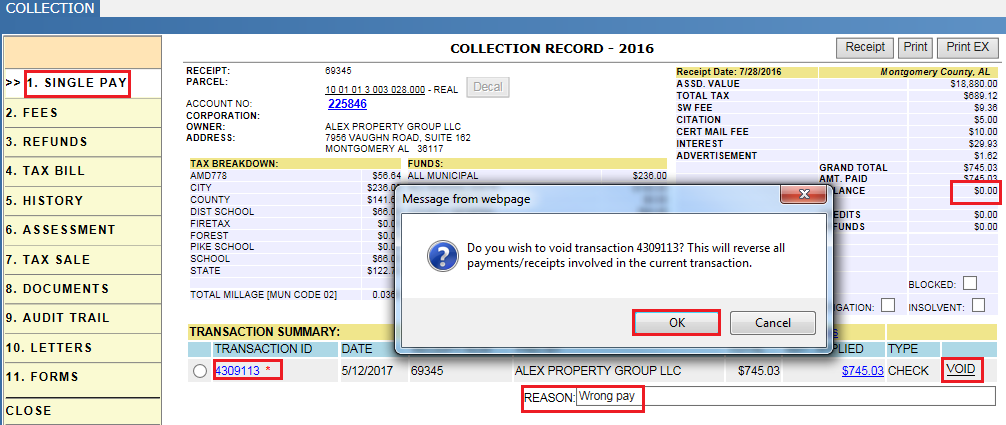
After voiding the transaction, the status of receipt again goes into Unpaid and taxpayer should pay the taxes later.
Add/ Remove Receipts (Swap Payments)
Set up case: Take a receipt from previous daily log and remove that receipt from that transaction and add other unpaid receipt of tax due less than or equal to tax due of removed receipt to it. And the remaining amount should go to the refunds in that transaction (If that is not in Kitty limit).
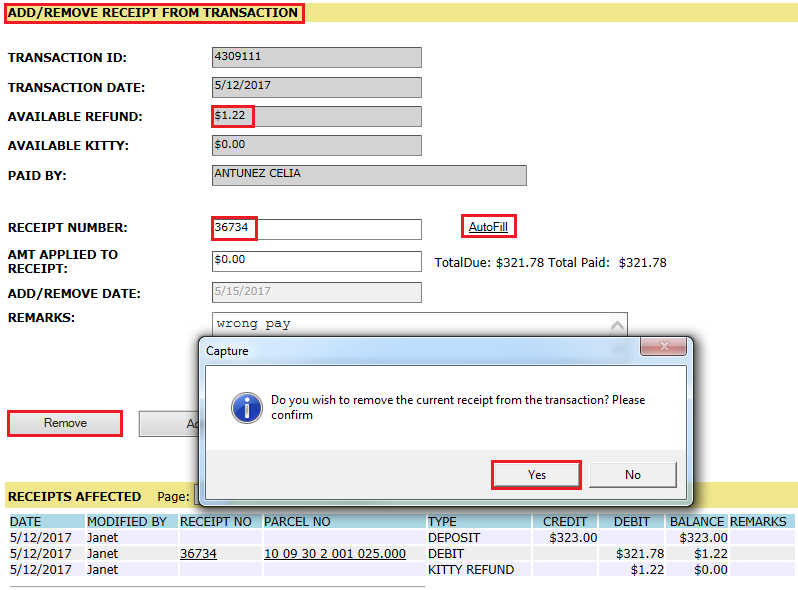
Step 1: Open a transaction from previous daily log and click on the Add/Remove Receipt hyper link.
Step 2: On that page give the receipt number to be removed and click on auto fill. Verify all the details, give the remarks and click on Remove button. Pop-up will open to confirm removing receipt click on Yes.
Step 3: Again, click on Add/ remove receipt link and give the new unpaid receipt to be added to that transaction and click on AutoFill. Then user should verify the tax due and click on Add. Pop-up will open to confirm adding the receipt to that transaction click on Yes.
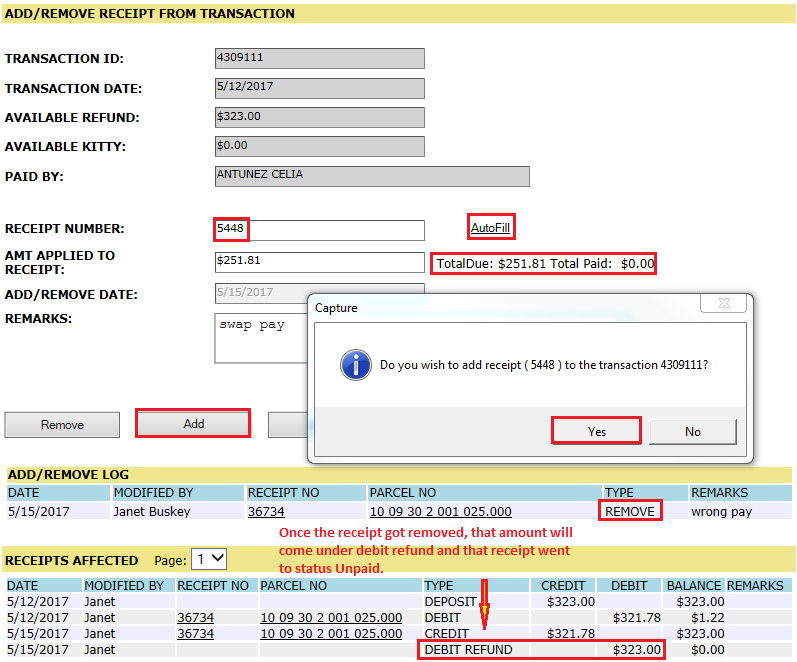
Verification: Once the new receipt got added to that transaction, that amount will be taken from the debit refund of that transaction ($323[Debit refund] - $251.81 [Due] = $71.19 [Refund]) and remaining amount will be refunded.
Verifying the Refund amount in Receipt:
User can see the debit refund amount under Refund tab of both removed and added receipts.
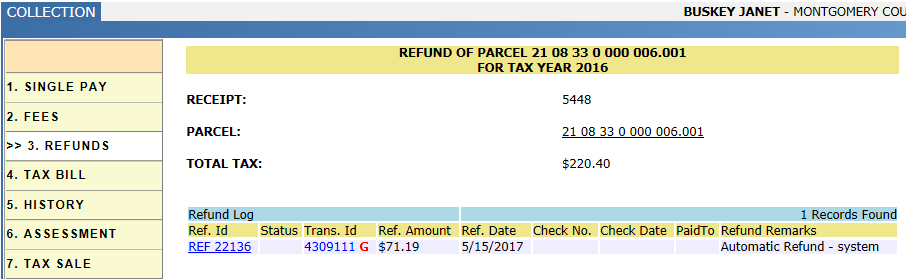
User can also verify this refund amount under Daily log --> Refunds.
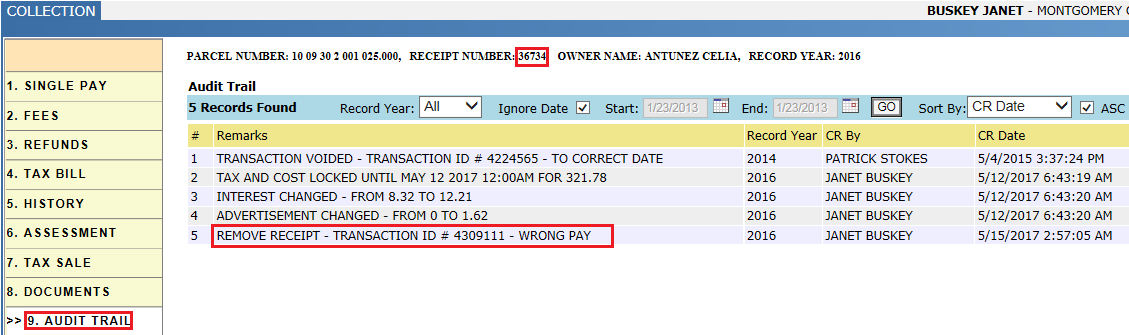
Verifying Audit trail:
In the removed receipt, it should contain the details from which transaction it got removed and who and when it got removed.
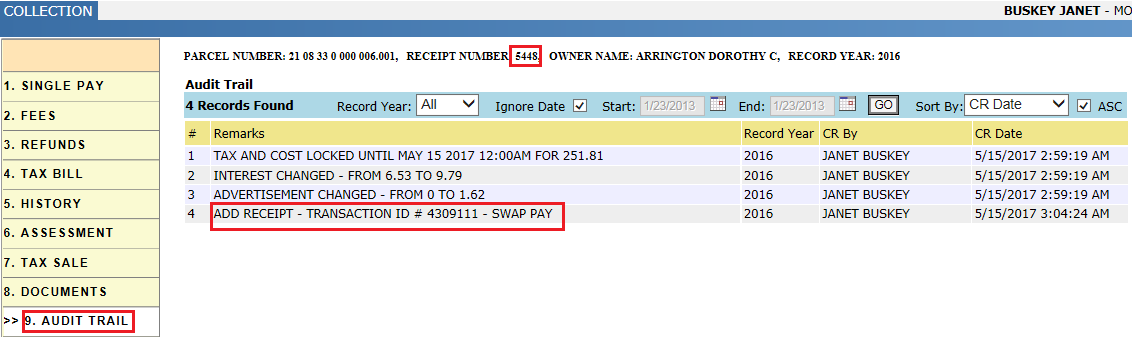
In the Newly added receipt:
It should contain the details to which transaction it got added and who and when it got added.
Group Pay - Cash Payment
Group Pay allows for multiple payments to be made at the same time in one transaction. Individuals may have multiple parcels they wish to pay at the same time. Mortgage companies also make use of Group Pay when paying on behalf of many clients at once. Once the number of parcels a mortgage company pays becomes too large, then users should switch to Mortgage Servicing to process mortgage payments.
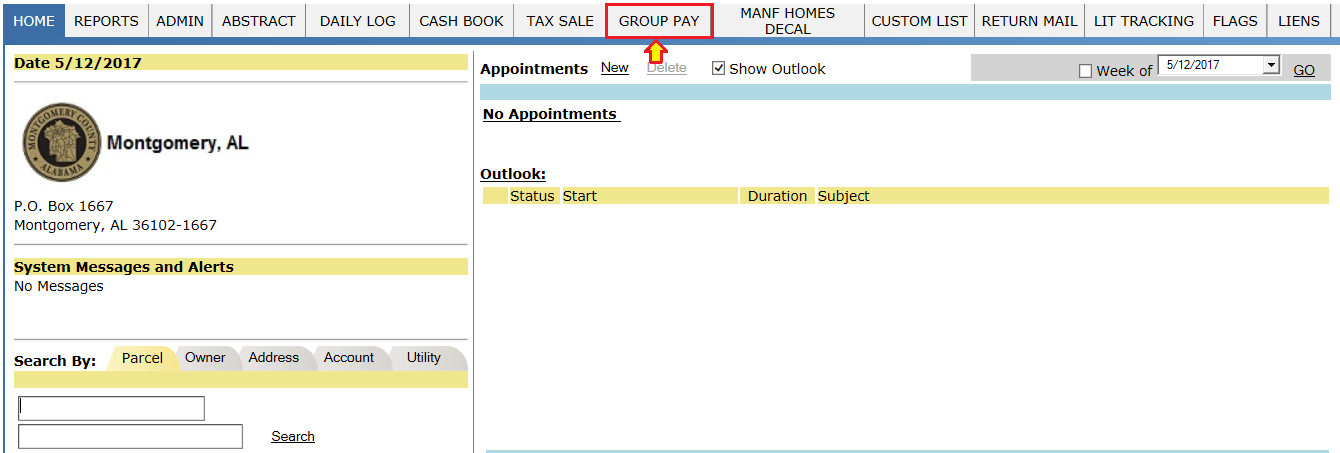
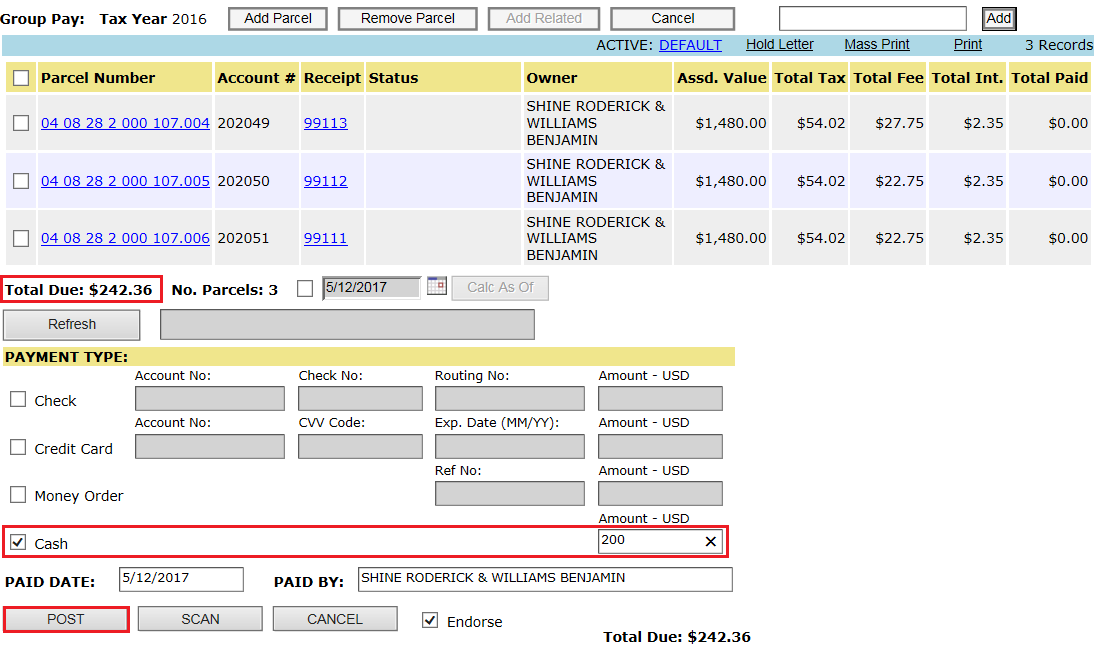
Click on the GROUP PAY, it will open the Multi-Receipt Payment page.
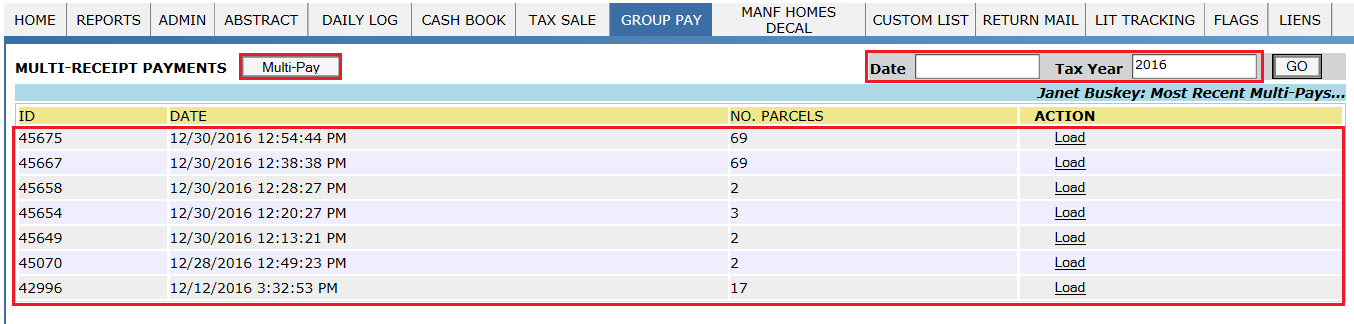
The Multi-Receipt Payment page displays all groups that have been created and shows when they were created and the number of parcels in the group. Each group is assigned a unique ID number. Groups can be searched by date and tax year by entering the appropriate information in their respective fields.
User can create a new group in Group Pay by clicking on the Multi-Pay button.
Receipts can be added to the Group Pay manually entering the receipt number in the box, then clicking Add. Typing R (receipt number) Z will automatically add the receipt to the record without having to click Add. Also, Typing K (account number) and clicking on Add button will add the receipt to the record.
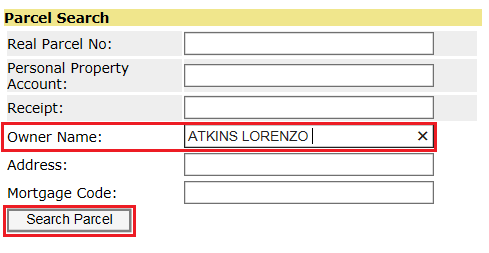
If the receipt number is unknown, individual parcels can be searched for and added by clicking the Add Parcel button to open the Parcel Search window.

When searching for parcels, the parcel number, account number [i.e. K (account number)], receipt number, owner name, address, or mortgage code can be searched for. Note that the “Address” field queries for Mailing Address Not Physical Address. The Mortgage Code search can be used for smaller mortgage servicing companies to process payments.
When searching for parcels, multiple parcels can be selected for payment by check marking the parcels and click Select. (for example: if the owner owned multiple parcels and did not bring in tax bills for scanning, use the owner name search, select parcels)

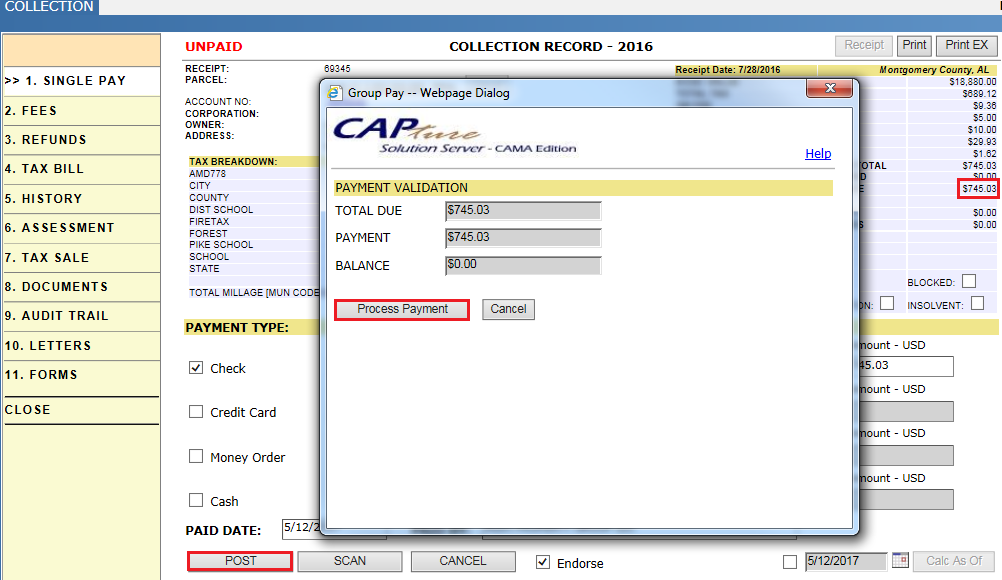
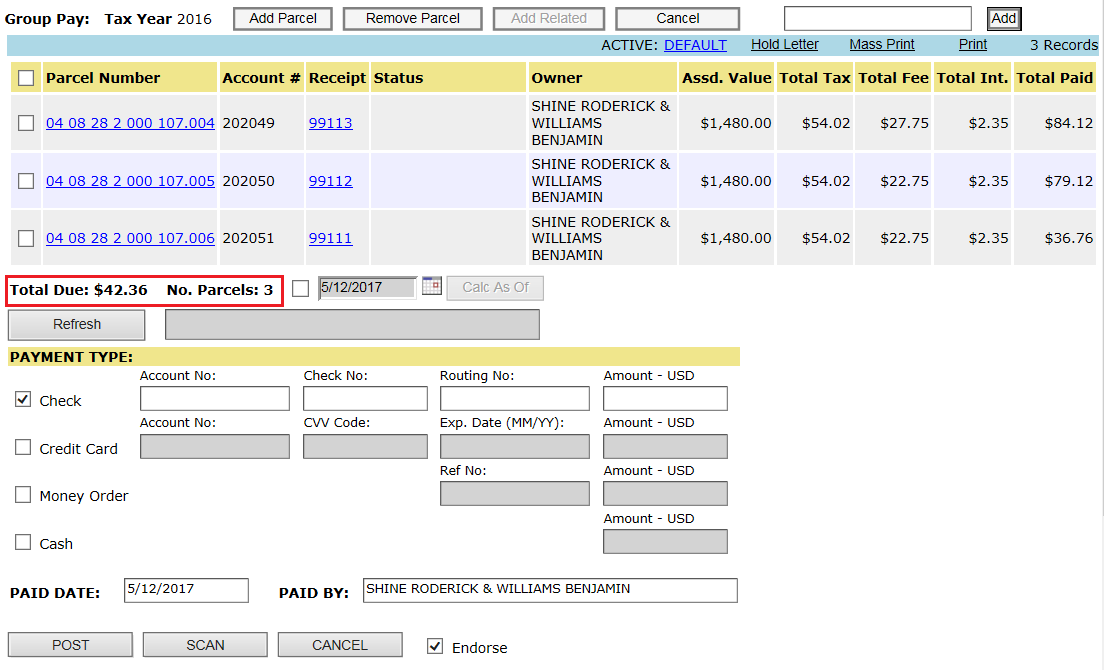
Once selected, the parcels are added to the Group Pay screen. The Parcel Number, Account Number, Receipt number, Status, Owner, Assessed Value, Total Tax, Total Fee, Total Interest, and Total Paid are displayed, as shown below. The total due and number of parcels on the transaction are shown. Once all the payment information is entered (payment mode, paid by etc.), the payment can be posted. To post the payment, click the Post button.
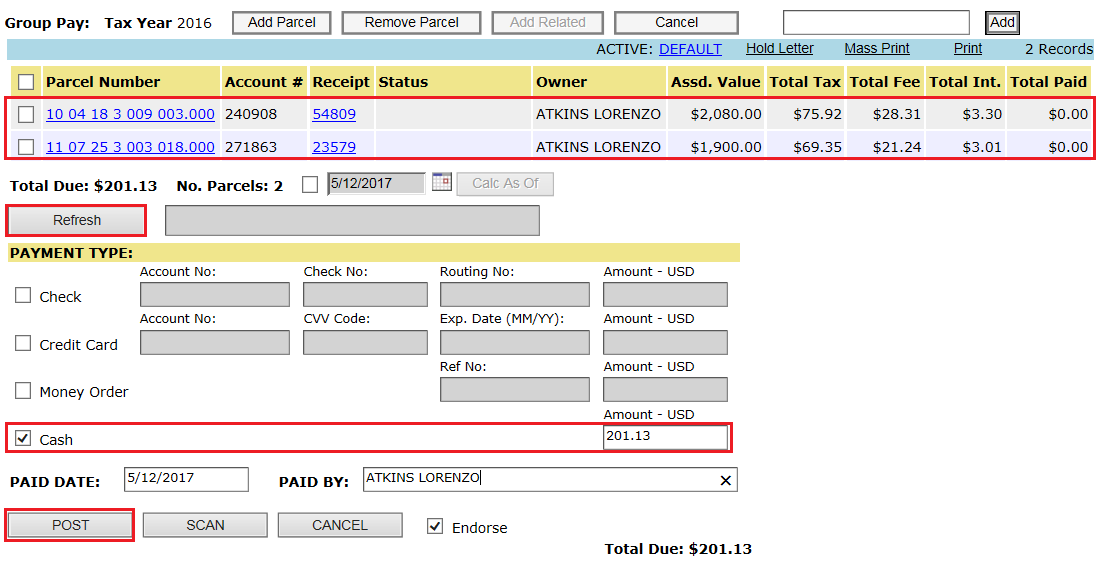
Note: if any fees were updated through Single Pay dash board, then the user must select the Refresh button inside of the multi-pay screen to update the receipts in Group Pay.
User should Verify the payment and balance and click on Process Payment.
After click on process payment, the payment information will be updated into Capture and a Transaction ID is generated for that transaction. Also, this transaction entry will come under daily log.
Verification:
Once the receipts got paid, open all the receipts got added in that group and verify as shown in single pay.
Notes:
1) When a user is working on a group and leaves the page, the Load feature allows for that group to be reopened. Clicking the Load hyperlink on the Multi-Receipts Payment screen opens the Group Pay screen for that group. Parcels can then be added or removed and payment can then be submitted.
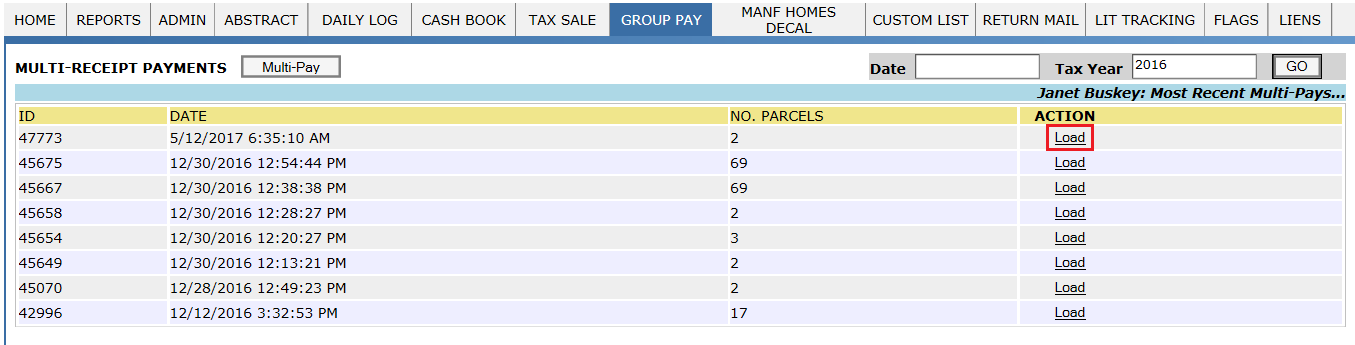
2) Any parcels that have been in litigation, Escapes, insolvent will be highlighted orange (Soft Block). While paying these receipts, Capture will warn the user like “One or More soft blocks are added. Do you wish to continue?” User may or may not process those receipts. There may be additional soft blocks in the system; the above is just one kind of soft block that may be in place. For instance, if a parcel has an unpaid insolvent receipt then a soft block is put in place to warn the teller that an insolvent receipt still needs to be paid.
3) Any parcels that have been sold in tax sale will be highlighted in red (Hard Block) and those receipts should be removed from the group. There may be additional hard blocks in the system; the above is just one kind of hard block that may be in place. For instance, if a parcel has an unpaid personal property account then a county may put a hard block in place so the unpaid personal property is paid first.
Group Part Payment
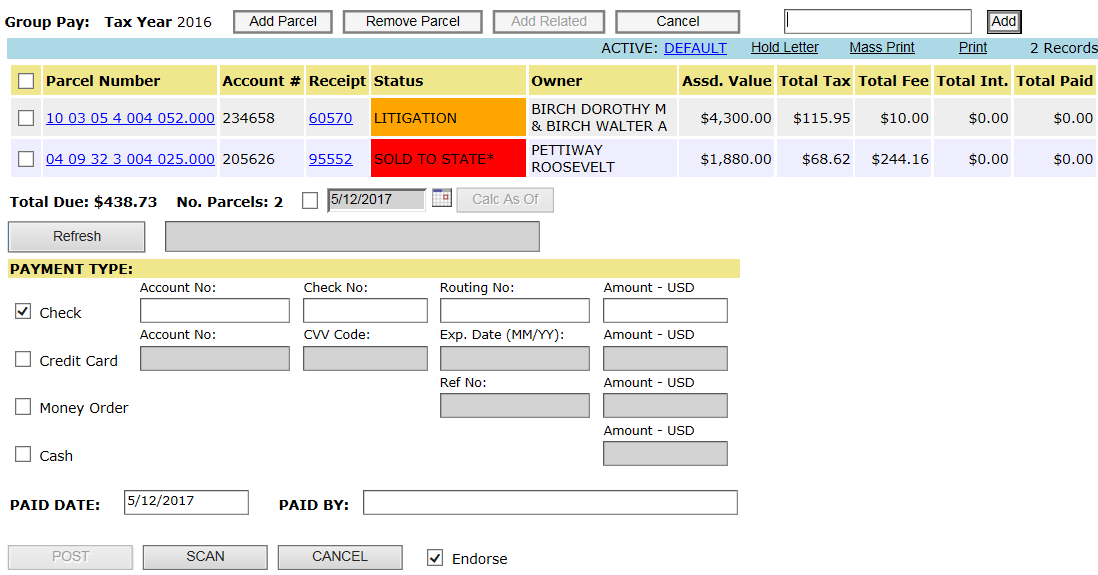
Step 1: Three receipts are added to this group pay, of taxes (Total tax + Total fee + Total Int.) $84.12, $79.12, $79.12.
Note: If same owner has multiple receipts which are in delinquent list, only for one receipt delinquent fee will apply.
Step 2: Whereas tax payer is paying only $200 (i.e. 42.36 short - as this is not in kitty limit, it will be treated as partial pay).
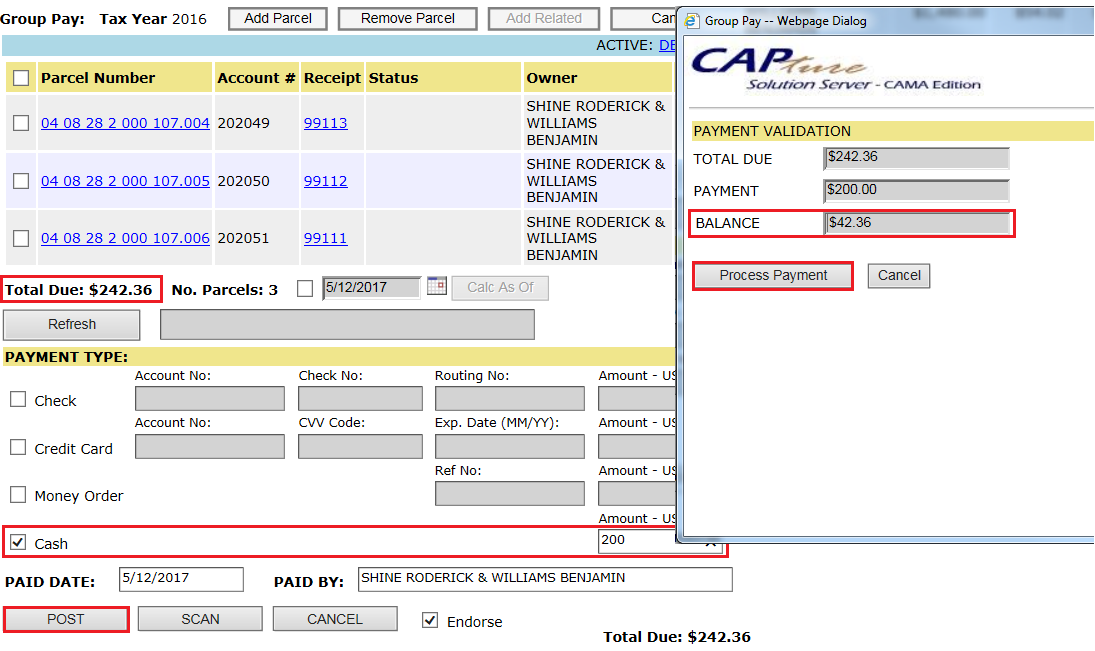
Step 3: System will pay receipts serially, because of this first two receipt will be marked as paid and last receipt as unpaid with balance as $42.36.
Verification: User can see the last receipt is still unpaid (partially paid) with amount due as $42.36.
Return Checks
Return checks indicate a payment was invalid. The user will not void the payment, but rather mark it returned. Users mark payments returned within the transaction. Check the small checkbox adjacent to the grayed out Returned button to make the button available. A reason is required before marking the payment Returned.
Adjust Fees After Payment
Fees are locked after a payment has been applied to a receipt, even a partial payment. The receipt must be completely unpaid to adjust the fees, which is done by removing the receipt from the payment transaction. Once the fees have been adjusted, the receipt is added back to the transaction. A refund or balance will likely appear as the new receipt amount will differ from the original payment amount.
Issue Refund
Refunds are given for various reasons and are handled by removing the receipt from the transaction. A void is not appropriate because the payment was valid, a void would indicate the funds were not received. Removing the receipt from the transaction will autmatically create a refund, which appears as a debit refund on the transaction.
Payment on Wrong Parcel
The main thing to keep in mind when a wrong parcel is paid, is that the payment is still valid, but what the payment is being applied to is incorrect. The transaction should not be voided, but adjusted. Using add/remove receipt, the incorrect receipt is removed from the transaction and the correct receipt is added to the transaction. This process will transfer the payment to the correct receipt.
Calc As Of
The Calc As Of option is used to caculate the receipt in reference to a different date than the current date. By default the current date is populated, Calc As Of allows the user to override the date. The calculated interest is usually the main concern, Calc As Of caculates the interest to the date entered. Deliquent fees may also appear or dissappear depending on the date entered.
Removing Fees
Fees may be removed on unpaid receipts. The fees are listed within the fees tab, here the user can remove certain fees. Fees that are highligted gray can not be removed. The user should enter 0 to remove the fee, then click Update to save the changes.
Interest Free Teller (Super User)
Interest Free Teller is a user access control that autmatically sets the Calc As Of date to 12/31.. Interest free teller is mainly used during grace periods at the beginning of the year to avoid adding interest and late fees to receipts. The super user access control does not turn this control on, it must be done individually.

Confidential | Copyright © 2017 E-Ring, Inc.