


Page Topics:
Sketching
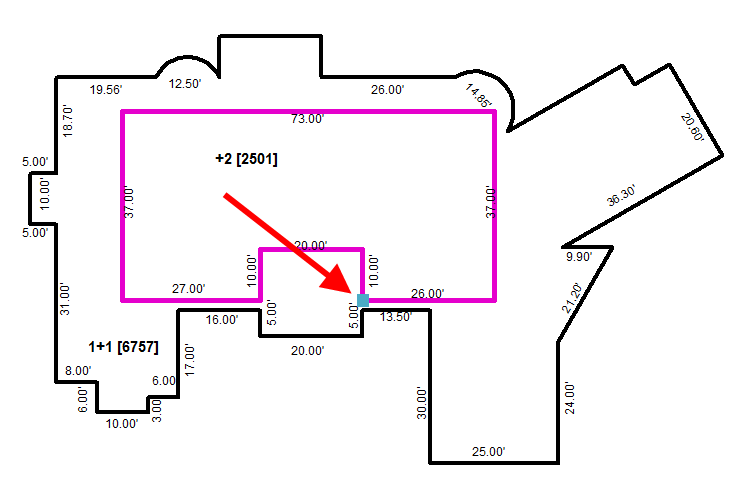
Sample Sketch
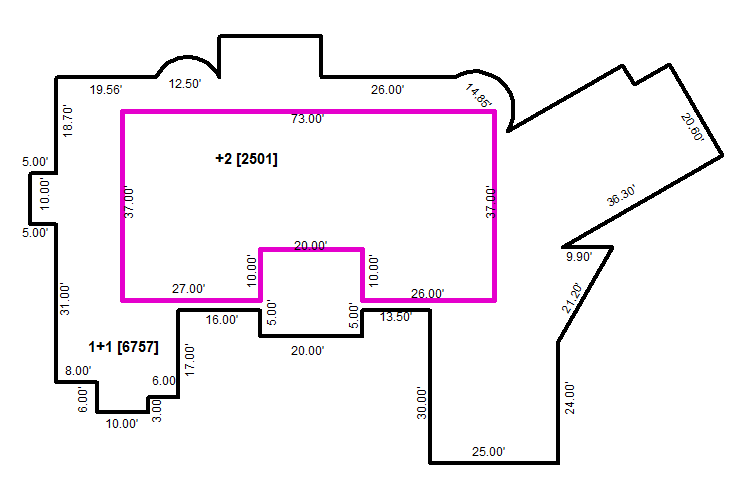
The following steps provide a line by line approach to sketching the building below. For most steps in the process a line and direction is specified. The numbers should be entered without the (‘) which is used to indicate footage.
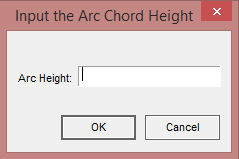
In two places the Curved Segment tool will be used. In both sections, the Arc Height is provided. This can be entered directly by clicking the ‘A’ key as indicated. If this causes the line to curve in the wrong direction, Click the ‘A’ key again and enter the same Arc Height as the opposite value (negative or positive). Curves can also be set by dragging the mouse in any direction.
Two methods are presented to sketch angled walls. First, the rise/run method is used. Second, the length/angle method is used. The length/angle method has the advantage of accuracy when certain known angles are repeated while the rise/run method may be easier for appraisers to measure in the field.
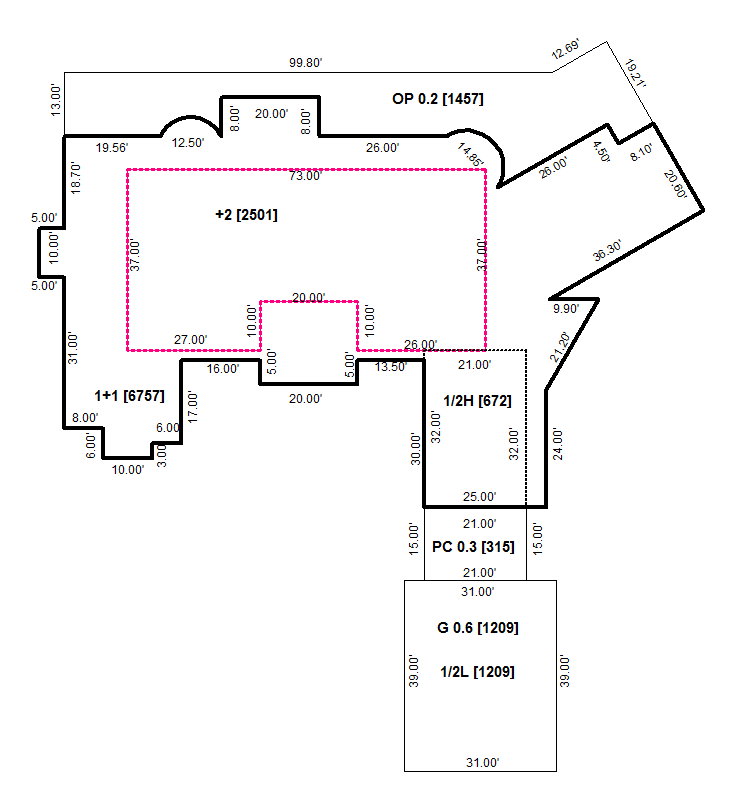
Area 1: 1+1 [2501 Sq. Ft.]
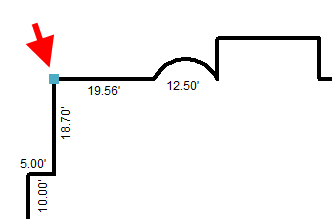
The first area to be drawn includes both curved lines and angles. For all lines in cardinal directions, simply type the length provided and click the arrow key in the direction indicated, then click Enter.
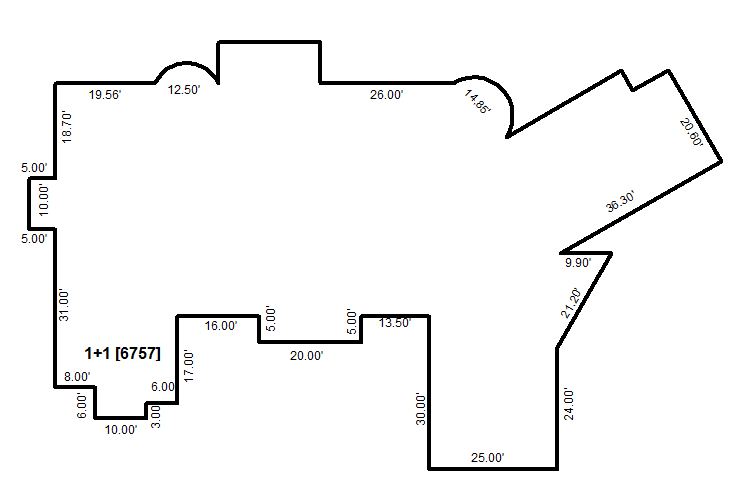
19.65’ Right
Hit the ‘T’ key to switch to the Curve tool

Hit the ‘Home’ key
12.5 Right (Click Enter only once)
Hit the A Key
Set Arc Height = -4 and click Enter (click Enter until the line is set)
Hit the ‘T’ key to switch to the Straight Line tool

Hit the ‘Home’ key
8’ Up
20’ right
8’ Down
26’ Right
Switch to Curve tool
Use Rise/Run to draw the next angled line
10.25’ Right AND 10.25’ Down (Click Enter only once)
Hit the A Key
Set Arc Height = -6 and click Enter (click Enter until the line is set)
Switch to the Straight Line tool
The next several lines will use the Length/Angle method of drawing angled lines.
Hit L Key
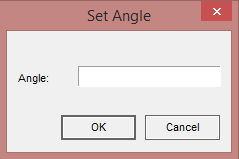
Set Length = 26’ and click Enter
Set Angle = 30’ and click Enter
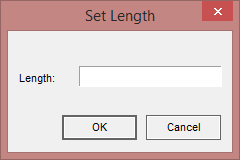
Hit L Key
Set Length = 4.5’ and click Enter
Set Angle = 300’ and click Enter
Hit L Key
Set Length = 8.1’ and click Enter
Set Angle = 30’ and click Enter
Hit L Key
Set Length = 20.6’ and click Enter
Set Angle = 300’ and click Enter
Hit L Key
Set Length = 36.3’ and click Enter
Set Angle = 210’ and click Enter
9.9’ Right
Hit L Key
Set Length = 21.2’ and click Enter
Set Angle = 240’ and click Enter
24’ Down
25’ Left
30’ Up
13.5’ Left
5’ Down
20’ Left
5’ Up
16’ Left
17’ Down
6’ Left
3’ Down
10’ Left
6’ Up
8’ Left
31’ Up
5’ Left
10’ Up
5’ Right
Hit ‘c’ to close the area and click Enter.
In the Group Properties box, set the area as ‘+1’
Area 2: +2 [2501 Sq. Ft.]
The second area will require use of a reference position in order to start the sketch in the right place. Marking Ref. Pos. before sketching allows the cursor to be moved to a starting position without drawing a line. Remember to click Enter after placing the cursor.
Checkmark Ref. Pos.
Start at upper left corner of ‘+1’ area
13’ Right AND 6.7’ Down
Once the cursor is set at the reference position, actual sketching will begin.
73’ Right
37’ Down
Ctrl-Left three times to align with the first 5’ wall
10’ Up
Ctrl-Left twice to align with the next 5’ wall
Ctrl-Down
Ctrl-Left four times to align with the starting point
Hit ‘c’ to close the area and click Enter.
In the Group Properties box, set the area as ‘+2’
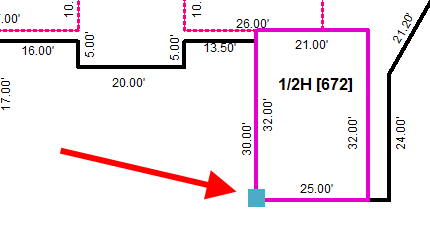
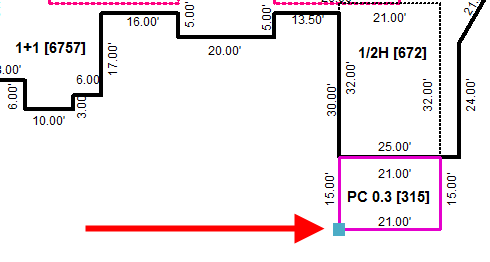
Area 3: 1/2H [672 Sq Ft]
The third area will again use a reference position to set a starting point. This area will introduce the Ctrl-direction method which moves the cursor in the indicated direction until it aligns with another point in the sketch. Remember to click Enter after placing each line.
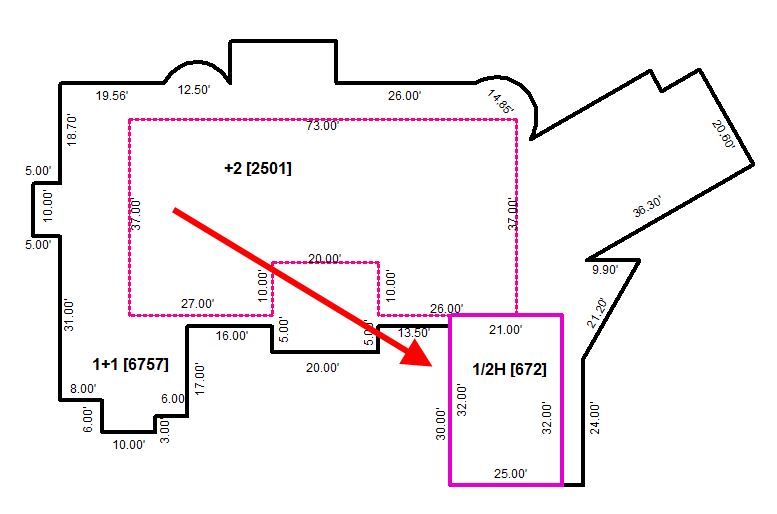
Checkmark Ref. Pos.
Start at the position shown on the second area
13.5’ Right
Once the cursor is set at the reference position, actual sketching will begin.
21’ Right
32’ Down
Ctrl-Left until the cursor aligns with the starting point
Hit ‘c’ to close the area and click Enter.
In the Group Properties box, set the area as ‘1/2H 0.5’
Area 4: OP 0.2 [1457 Sq. Ft.]
This area combines keyboard commands with mouse entry. When using the mouse to sketch simply click the points to which the line should extend. While this method can be inaccurate when drawing new walls it can be used to very quickly trace existing walls. Remember to switch to the Curved Segment tool when going over curved lines and switch back to the straight line tool afterwards. Also remember to hit the ‘Home’ key after changing from one tool to another.

Start at upper-left corner of the ‘+1’ area

13’ Up
99.8’ Right
11’ Right AND 6.3’ Up
Use the mouse to connect the next point to the outer corner of the ‘+1’ area.
Continue using the mouse to trace the back wall of the ‘+1’ area until the area is complete
Remember to switch to the curved line tool as needed.
In the Group Properties box, set the area as ‘OP 0.2’
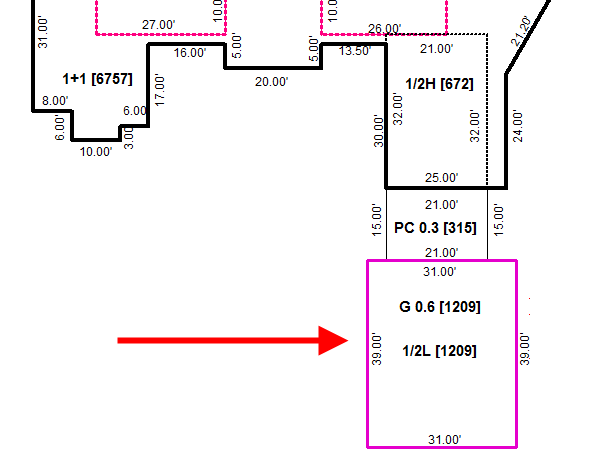
Area 5: PC 0.3 [315 Sq. Ft.]
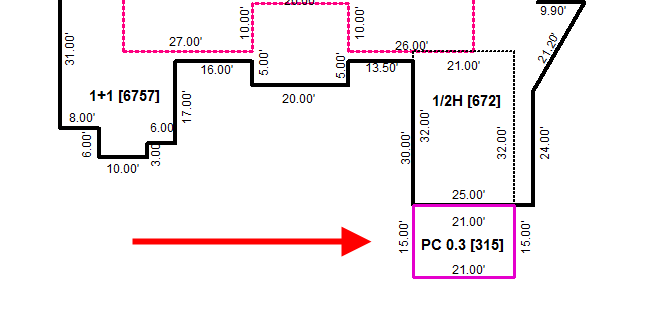
Start at the point indicated on the ‘1/2H’ area.
21’ Right
15’ Down
Ctrl-Left until the cursor aligns with the starting point
Hit ‘c’ to close the area and click Enter.
In the Group Properties box, set the area as ‘PC 0.3’
Area 6: G 0.6 [1209 Sq. Ft.]
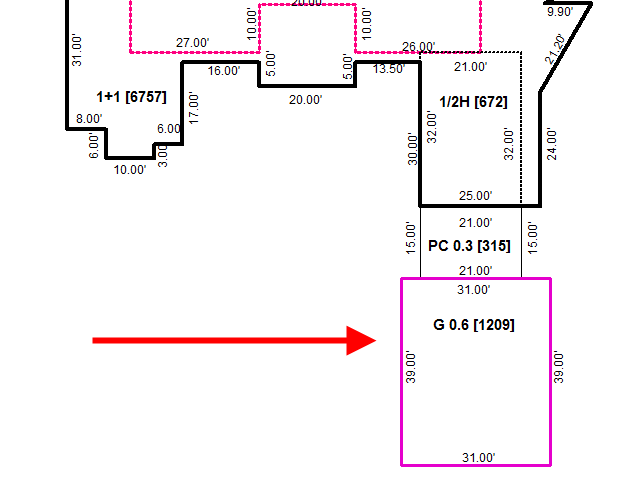
Checkmark Ref. Pos.
Start at the position shown on the ‘PC 0.3’ area
4’ Left
Once the cursor is set at the reference position, actual sketching will begin.
31’ Right
39’ Down
Ctrl-Left until the cursor aligns with the starting point
Hit ‘c’ to close the area and click Enter.
In the Group Properties box, set the area as ‘G 0.6’
Area 7: 1/2L [1209 Sq. Ft.]
The final are to be sketch is exactly the same size as an existing area (G 0.6). Rather than manually sketching this area, Capture can create an exact copy as a separate, independent area.
In the Building Navigator, right-click G 0.6
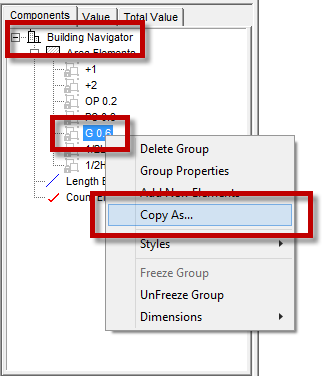
Select “Copy As…” from the menu.
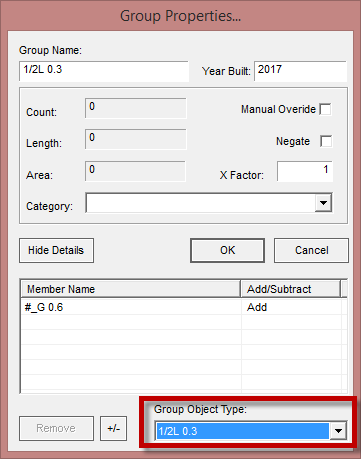
Select ‘1/2L 0.3’ on the Group Properties box.
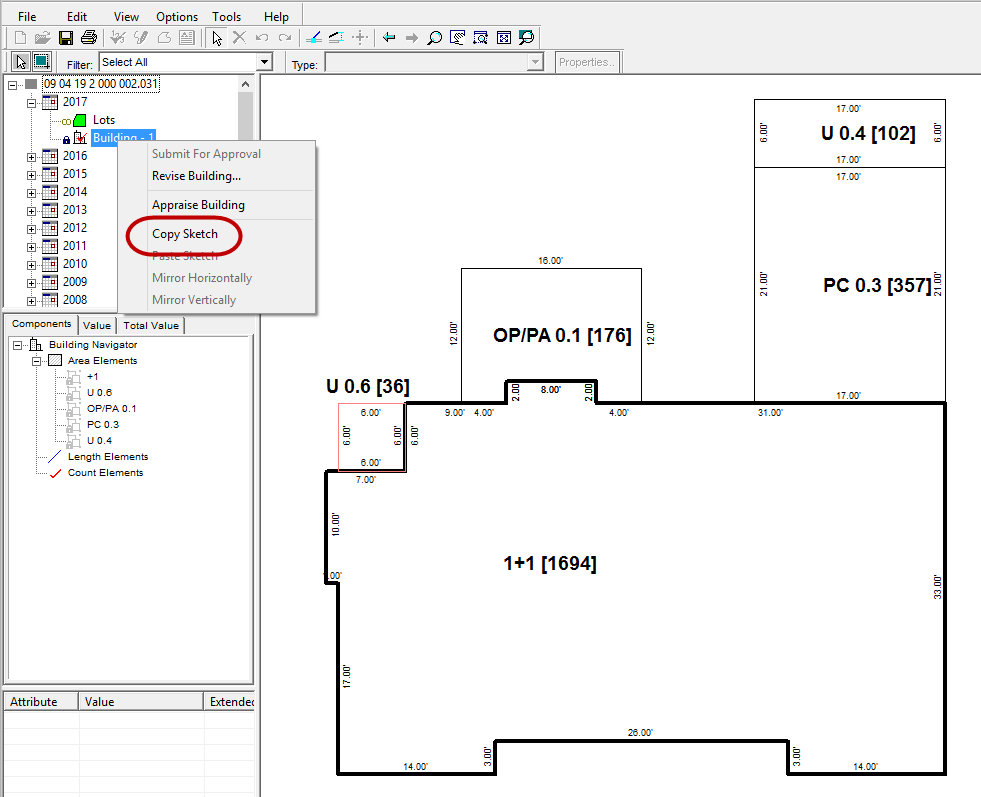
Copying & Flipping Sketches
Some neighborhoods contain dozens if not hundreds of houses all built on the same design. Rather than sketching the same building repeatedly, Capture allows sketches to be copied from one building to another across different parcels and even different years. Once copied, a sketch can be pasted as many times as needed. The user may also find that some of the houses have a layout which is the reverse of one previously sketched. For these scenarios an existing sketch can be flipped either vertically or horizontally.
In the following scenario, a house sketched on one parcel is exactly the same as a nearby house, and the mirror image of a third house.
1. Open the sketch module of the already sketched house. Right-click the building listing and select Copy Sketch. Note that the building must be checked out to access the sketch.
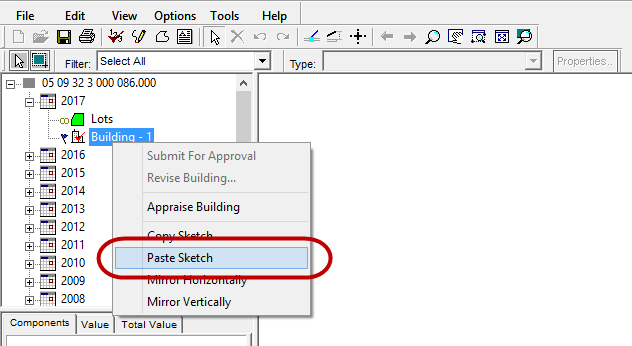
2. Check out the second parcel and access the sketch module for the building. Revise the building, then right-click the building and select Paste Sketch. Recalculate the area and complete the appraisal.
3. Check out the third parcel and paste the sketch into the sketch module. Right-click the building and select Mirror Vertically. Note that the building is flipped along the vertical axis. Recalculate the area and complete the appraisal.

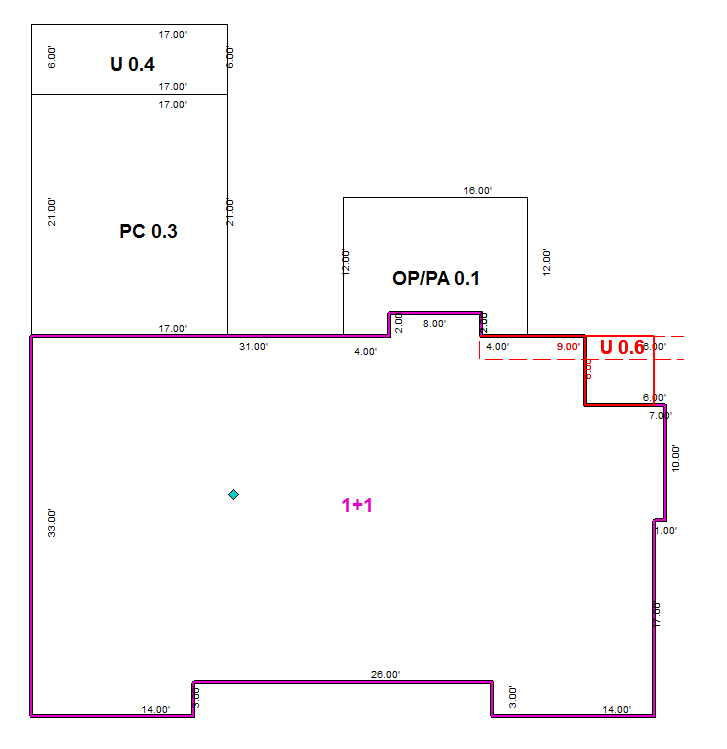
Note: Mirror Horizonatally will flip the building along a horizontal axis.

Confidential | Copyright © 2017 E-Ring, Inc.